Side Dishes
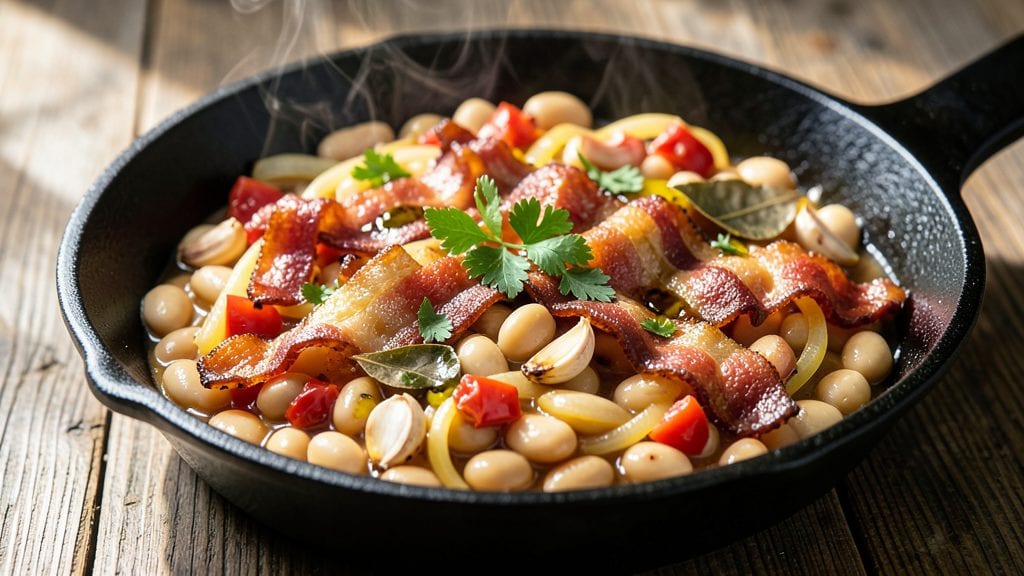
This charo beans recipe transforms humble white beans into a rich, smoky side dish that steals every meal. The secret lies in crispy bacon, caramelized tomatoes, and a slow simmer that develops deep, savory flavors—all while keeping prep simple with just one pot.
I first made this during a busy week when I needed a hearty side that required minimal effort but maximum impact.
The beauty of charo beans is their versatility—this version adapts traditional techniques for home cooks. Crispy bacon adds smoky depth, while crushed tomatoes create a slightly sweet contrast. The beans soften just enough to absorb all the flavors, resulting in a dish that’s both comforting and restaurant-worthy.
Perfect for weeknight dinners or holiday tables, it pairs beautifully with grilled meats or crusty bread.
What sets this recipe apart is the one-pot magic: no chopping boards cluttered with dishes, no complicated steps. Just toss everything in, let it simmer, and enjoy the aroma filling your kitchen.
The final result? Creamy beans with crispy bacon bits and tender tomatoes, all infused with smoky richness. It’s the kind of dish that makes you want to serve it again and again.
For extra depth, I recommend adding a splash of red wine or a pinch of smoked paprika—both elevate the flavors without overpowering the dish. Whether you’re feeding a family or meal prepping for the week, this recipe delivers foolproof, restaurant-quality results every time.
Ingredients for charo beans
One-pot magic with smoky bacon and tender tomatoes. Just these simple ingredients transform basic beans into a flavor-packed side.
| Ingredient | Amount | Notes |
|---|---|---|
| Great Northern Beans 🍲 | 1 ½ cups | Dried, soaked overnight |
| Thick-Cut Bacon 🥓 | 6 oz | Cut into 1/2-inch pieces |
| Crushed Tomatoes 🍅 | 14 ½ oz | Can (15 oz), no salt added |
| Yellow Onion 🧅 | 1 whole | Diced, medium size |
| Garlic Cloves 🧄 | 3 cloves | Minced, fresh preferred |
| Bay Leaves 🌿 | 2 whole | Dried, standard size |
| Smoked Paprika 🌶️ | 1 tsp | For smoky depth |
| Ground Black Pepper 🌶️ | ½ tsp | Freshly cracked |
| Kosher Salt 🧂 | 1 ½ tsp | Adjust to taste |
| Extra-Virgin Olive Oil 🫒 | 2 tbsp | For crisping bacon |
| Red Wine 🍷 | ½ cup | Dry, optional for depth |
| Fresh Parsley 🌿 | ¼ cup | Chopped, for garnish |
| Chicken Broth 💧 | 1 cup | Low-sodium preferred |
The bacon is where the flavor starts. Thick-cut bacon from the butcher section (not the pre-packaged stuff) gives you the best crispy bits. I grab mine from Costco when I'm doing a big batch, but any grocery store's bacon works if it's fresh—look for good marbling. The beans? Great Northerns hold up best here, but cannellini or navy beans work too. Soak them overnight in plenty of water (about 8 cups for 1.5 cups dried)—this cuts cooking time dramatically. For the tomatoes, no-salt-added crushed tomatoes are key. The 15 oz can gives you that perfect balance of sweetness and acidity without extra sodium.
No red wine? Extra chicken broth works just as well—just add another half cup. Fresh parsley is ideal for garnish, but dried parsley at one-third the amount gets you close. The smoked paprika is non-negotiable for that authentic charo flavor—Penzeys or the bulk section at Whole Foods have the best quality. If your bacon is extra fatty, drain it on paper towels before cooking to avoid greasy beans. The onions should be sweet yellow ones—they caramelize beautifully and add natural sweetness. No yellow onion? White onion works too, just cook it a little longer.
This tastes even better the next day—honestly, it's one of those dishes that improves with time. Keeps in the fridge for 4-5 days in an airtight container. For meal prep, I portion it into 4 containers so I can grab and go. Freezes beautifully for 3 months—just thaw overnight in the fridge before reheating. The bacon bits stay crispy if you reheat gently, so I usually add a splash of broth when warming up. Garnish with extra parsley right before serving—it makes all the difference.
Why You'll Love This Recipe
- One-Pot Magic: I swear by this recipe because it’s literally one pot—no extra dishes, no fuss. The bacon renders down while the onions caramelize, and by the time the beans simmer, everything melds together without a single pan to scrub. (Yes, even on a Tuesday night.)
- Smoky-Sweet Symphony: That crispy bacon crumbles into the beans like little flavor bombs, while the crushed tomatoes add a tangy depth. The garlic? Oh, it’s the star—soft but punchy, with just enough heat to make your taste buds dance. Honestly, it’s the kind of dish that tastes even better the next day.
- Meal Prep MVP: This recipe doubles (or triples) effortlessly, and the flavors only get richer when reheated. Pack it for lunches, serve it at potlucks, or freeze half for when you’re too tired to cook. My college-aged kid lives on it—cheap, filling, and no one complains about leftovers.
- Budget-Buster Combo: Great Northern beans and thick-cut bacon stretch this dish into a full meal without breaking the bank. A pound of bacon feeds four, the beans are a pantry staple, and onions/garlic are always cheap. Between us, it’s my go-to when grocery money’s tight but I still want something that feels special.
Step-by-step instructions for charo beans recipe
This one-pot recipe brings smoky, rich flavors together effortlessly—no fancy techniques required.
Cook the Bacon Until Crispy
In a large Dutch oven or heavy pot, heat the 2 tablespoons extra-virgin olive oil over medium heat. Add the 6 ounces thick-cut bacon in a single layer, making sure the pieces don't overlap. Let the bacon cook undisturbed for 5-7 minutes until the edges become deep golden brown and crispy.
Real talk: This is where the magic starts. The rendered bacon fat will become the flavor base for your beans, so don't rush this step. Once the bacon is crispy, use a slotted spoon to remove it from the pot and set it aside on a paper towel-lined plate, leaving the fat behind. You'll add the bacon back later, but we want to keep the pot clean for the next steps.
Sauté Onion and Garlic
With the bacon fat still in the pot, reduce the heat to medium-low and add the 1 whole yellow onion, diced. Cook for 5-6 minutes, stirring occasionally, until the onions soften and turn translucent at the edges. This ensures they don't brown too quickly and become bitter.
Add the 3 cloves garlic cloves, minced, and cook for another 30 seconds until fragrant. Here's the thing—garlic burns fast, so keep an eye on it. If it starts to darken too quickly, remove the pot from heat for a moment. The goal is aroma, not color. Once the garlic smells heavenly, it's time to add the spices.
Add Spices and Tomatoes
Stir in the 1 teaspoon smoked paprika, 0.5 teaspoon ground black pepper, and 1.5 teaspoons kosher salt. Let the spices toast in the pot for 30 seconds, stirring constantly, until you can smell that deep, smoky aroma. This step builds the flavor foundation.
Pour in the 14.5 ounces crushed tomatoes and stir well to combine with the onions, garlic, and spices. Let the mixture simmer for 5 minutes until the tomatoes begin to thicken slightly and the flavors meld together. You'll notice the sauce darken and develop a rich, tangy depth—this is exactly what we want.
Combine All Ingredients and Simmer
Return the crispy bacon to the pot, breaking it into smaller pieces as you add it back. Stir in the 1.5 cups soaked great northern beans, 2 whole bay leaves, and 1 cup chicken broth. Bring everything to a gentle boil, then reduce the heat to low and cover the pot with a lid.
Let the beans simmer for 45-50 minutes, stirring occasionally, until they're tender but still hold their shape. You'll know they're done when a bean easily crushes between your fingers but doesn't fall apart completely. If the liquid level gets too low, add a splash of water or broth to keep the beans from sticking to the bottom.
Finish with Wine and Parsley
Once the beans are tender, remove the bay leaves and stir in the 0.5 cup red wine. Let the mixture simmer for another 5 minutes to allow the alcohol to cook off and the wine to integrate into the sauce. Taste and adjust the seasoning if needed—you might want to add a pinch more salt or pepper to balance the flavors.
Finally, stir in the 0.25 cup chopped fresh parsley and cook for 1-2 minutes just to warm through. The parsley adds a bright, fresh finish that cuts through the richness of the bacon and tomatoes. Serve immediately, and enjoy the hearty, smoky flavors of this one-pot charo beans recipe.
Pro Tips For Making Charo Beans
- CRISP THE BACON LOW: I used to cook thick-cut bacon on high heat, and it’d either burn or turn out greasy. For charo beans, render it slow over medium-low—about 10 minutes—until the fat is golden but not smoking. The extra patience gives you crispy edges and enough fat to sauté onions without sticking.
- SOAK BEANS OVERNIGHT: Skipping the soak? Your beans will stay tough. Toss them in water (about 3 cups per cup of beans) and let them sit 8+ hours—or at least 2 hours if you’re in a rush. Drain and rinse before cooking, and they’ll break down evenly without that mealy texture.
- SWEAT ONIONS FIRST: Dumping onions into hot bacon fat makes them burn before they soften. Start them on medium heat with a pinch of salt, stirring often, until they’re translucent and just starting to caramelize—about 5 minutes. The flavor’s deeper, and you won’t scorch the whole pot.
- SIMMER BEANS COVERED: I learned this the hard way—uncovered beans dry out and split. Once the liquid reaches a boil, drop the heat to low, cover the pot, and let them bubble gently. Check every 20 minutes, adding water as needed, until they’re tender but still hold their shape. No mushy beans here.
Essential equipment for this dish
Dutch Oven Must-Have
A Dutch oven is the star of this recipe—its heavy base distributes heat evenly, preventing hot spots that can burn your beans. I use a Le Creuset 5.5-quart for its durability, but any enamel-coated Dutch oven (like All-Clad or Lodge) works perfectly.
The lid creates a steamy environment that tenderizes the beans while keeping the flavors concentrated. If you don’t own one, a heavy-bottomed pot with a tight-fitting lid will do in a pinch. Just avoid thin aluminum—it won’t hold heat well enough for even cooking. 🔥
Slotted Spoon Essentials
You’ll need a slotted spoon to remove crispy bacon without losing the flavorful fat. I recommend a stainless steel one with a wide, flat bottom (like the OXO Good Grips) to easily scoop bacon while leaving the fat behind. This step is critical—skipping it means greasy beans.
For extra efficiency, keep a paper towel-lined plate nearby to drain the bacon fat. Pro tip: Use the same spoon to stir the onions and garlic later—it’s already seasoned with bacon flavor! ⚡
Immersion Thermometer
While not strictly necessary, an immersion thermometer (like the Thermoworks ThermoPop) ensures your beans reach the perfect tenderness without overcooking. Insert it into a bean to check for doneness at 200°F—they should be soft but still hold their shape.
This is especially helpful if you’re new to cooking beans. Without one, test by gently pressing a bean with a fork—it should yield slightly but not mash completely. 🌡️
Chef’s Knife and Cutting Board
A sharp chef’s knife (I use a Wüsthof Ikon) and a cutting board are non-negotiable for dicing onions and mincing garlic efficiently. Dull knives make prep frustrating and unevenly sized pieces cook at different rates.
For garlic, I smash the cloves with the flat side of my knife before mincing—this releases more flavor. A non-slip cutting board (like Teakhaus) adds safety, especially when handling slippery onions. 💪
Measuring Spoons and Spice Grinder
Precision matters with spices: Use stainless steel measuring spoons (like OXO’s) for accurate amounts of smoked paprika and black pepper. For freshness, I grind whole peppercorns in a spice grinder (like Spicewalla) right before cooking—it makes a noticeable difference.
A mortar and pestle works too if you’re grinding small batches. Don’t skimp on quality spices; Penzeys or McCormick Gourmet are my go-tos for consistent flavor. 🌶️
Optional: Instant Pot
For a faster version, an Instant Pot cuts cooking time from 50 minutes to 20 minutes (using the "Bean/Chili" setting). Start by sautéing the bacon and onions on the "Sauté" function, then add the remaining ingredients and pressure cook.
Release the pressure naturally for 10 minutes before opening. This method works well for meal prep—just add the wine and parsley at the end. If using, a 6-quart Instant Pot (like Duxtop) is ideal for this recipe. ⏰
Nutrition facts
Frequently asked questions
What makes charo beans different from other white beans?
Charo beans are a specific variety of large, creamy white beans with a slightly nutty flavor and firm texture. Unlike cannellini or navy beans, they hold their shape beautifully while absorbing flavors—perfect for one-pot dishes. Their size (about 1/2-inch diameter) makes them ideal for hearty stews and soups where you want visible texture.
Can I substitute dried beans for canned in this recipe?
The recipe specifically uses dried beans for better texture and flavor development. However, if short on time, use 2 (15 oz) cans of no-salt-added white beans (drained and rinsed). For best results, simmer them with the other ingredients for 15-20 minutes to let flavors meld. The dish will be ready faster, but the depth of flavor won't be as rich as with dried beans.
Why does the recipe call for soaking the beans overnight?
Soaking reduces cooking time and prevents indigestible sugars that cause gas. Dried beans contain phytic acid, which softens during soaking. For this recipe, overnight soaking (8+ hours) in plenty of water ensures tender beans without splitting. Pro tip: Use a large bowl and cover with a clean towel—no need for fancy soaking methods.
How can I make this dish vegetarian?
Swap the bacon for 6 oz smoked tempeh or mushrooms (like shiitake or cremini)—crisp them in olive oil until golden. Add 1 tbsp soy sauce for umami depth. For extra richness, stir in 2 tbsp nutritional yeast at the end. The smoky paprika and tomatoes will still provide that signature charo flavor.
What if my beans turn out mushy?
Overcooking is the most common cause. Test doneness by pressing a bean with a fork—it should yield slightly but not mash completely. If they're too soft, the beans absorbed too much liquid. Next time, reduce simmering time by 5-10 minutes or add 1/4 cup broth at the end to restore balance. Always use a heavy pot to prevent scorching.