
Side Dishes
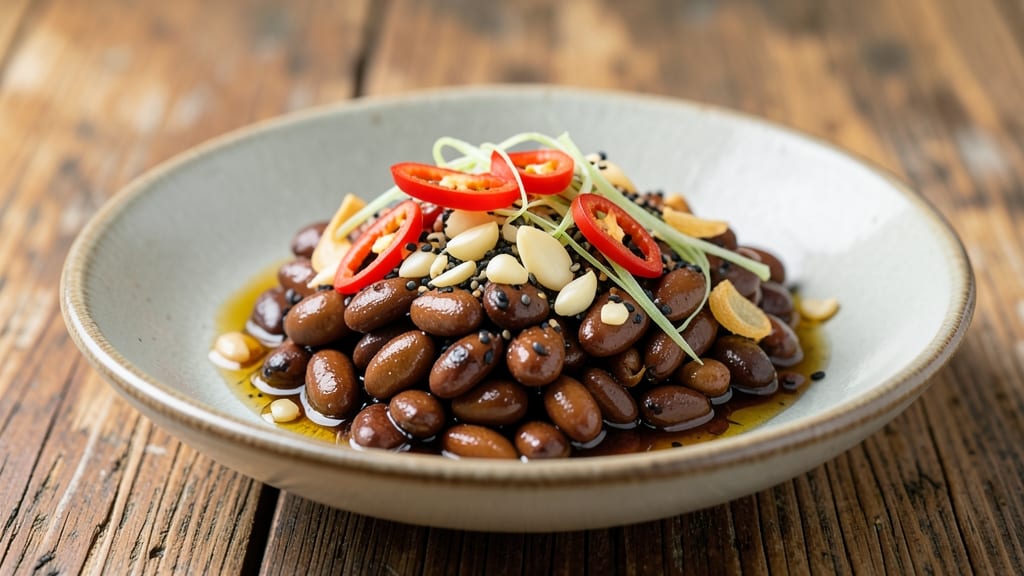
This fermented beans recipe transforms humble ingredients into a probiotic powerhouse packed with deep umami flavor—no special equipment needed beyond a jar and patience. 💛 The process unlocks natural enzymes and beneficial bacteria that take just 7 days to develop, creating a side dish that’s both functional and delicious.
I first discovered this method while researching traditional Asian preservation techniques, and it’s since become a staple in my kitchen for its health benefits and versatility.
The beauty of fermenting beans lies in its simplicity: you’ll need just a few basic ingredients and a clean environment to cultivate those signature tangy, funky notes.
Unlike store-bought fermented products, homemade versions allow full control over salt levels, bean types, and fermentation time—meaning you can tailor the flavor to your taste. The key lies in maintaining proper hygiene and temperature, which I’ll walk you through step by step to ensure safe, successful results every time.
Once fermented, these beans deliver a rich, savory depth that elevates any meal—think of them as a tangy, umami-packed alternative to soy sauce or miso. They work as a side dish, salad topping, or even a marinade base, adding complexity to everything they touch.
The probiotic benefits alone make this recipe worth trying, but the flavor transformation is the real game-changer. Let’s get started on your first batch!
This method works with black beans, adzuki beans, or soybeans, and the fermentation process can be adapted for both room-temperature and refrigerator culturing. Whether you’re new to fermentation or a seasoned enthusiast, these instructions will guide you through the entire process—from prep to serving—with confidence.
The first batch might feel like an experiment, but trust the process: patience pays off in flavor and nutrition.
Ingredients for fermented beans
Simple ingredients transform into a probiotic powerhouse with just patience and a clean jar.
| Ingredient | Amount | Notes |
|---|---|---|
| Dried Black Beans 🌱 | 2 cups | Rinsed thoroughly before use |
| Sea Salt 🧂 | 1 ½ tbsp | Non-iodized, fine grain preferred |
| Filtered Water 💧 | 4 cups | Chlorine-free for fermentation |
| Fresh Garlic Cloves 🧄 | 4 cloves | Crushed for even distribution |
| Fresh Ginger Root 🌿 | 1 inch | Peeled and thinly sliced |
| Fresh Red Chili Peppers 🌶️ | 2 whole | Thinly sliced, seeds removed |
| Fresh Turmeric Root 🌿 | ½ inch | Freshly grated for color |
| Fresh Bay Leaves 🍃 | 2 whole | Dried works as substitute |
| Asafoetida Powder 🌶️ | ¼ tsp | Optional for umami depth |
| Black Liquorice Root 🌿 | ½ oz | Dried, finely chopped |
| Organic Apple Cider Vinegar 🍎 | 1 tbsp | Starter culture for fermentation |
The beans are the foundation—dried black beans work best for their firm texture, but adzuki or soybeans are great alternatives. Whole Foods or Trader Joe's carry high-quality dried beans in bulk, which keeps better than canned. For the ginger and turmeric, fresh is ideal (you can find them in the produce section), but if you're using dried, double the amount. The sea salt needs to be non-iodized—Diamond Crystal kosher salt is my go-to. Asafoetida might be tricky to find—Indian grocery stores usually stock it, but a pinch of garlic powder works in a pinch. Black liquorice root adds depth but isn't essential—skip it if you can't find it.
No fresh ginger? Dried ginger powder at half the amount works, though fresh is brighter. The chili peppers can be swapped for red pepper flakes at one-third the amount. Running low on bay leaves? Dried thyme or oregano adds a similar earthiness. For the vinegar, raw apple cider vinegar is best—avoid the pasteurized kind. If you're worried about mold, add a pinch of whey powder (vegan-friendly) to the mix, though it's optional. The key is cleanliness: sanitize your jar and utensils with hot water or vinegar solution before starting.
Store your fermented beans in the darkest part of your fridge for best results. They’ll keep for up to 3 months if properly sealed, though flavor peaks around 7-10 days. Portion into smaller jars for easy access—perfect for salads, soups, or as a tangy condiment. If the surface develops mold, simply skim it off (the good bacteria are underneath). The first batch might surprise you with funky notes—that’s normal and delicious.
Why You'll Love This Recipe
- No-Soaking Needed: I’ll be real—soaking beans for hours used to feel like a chore. These dried black beans ferment in just 24 hours with zero pre-soaking. Toss them in salted water, let them sit, and boom—ready to use. That’s 3+ hours of my life back.
- Umami Bomb: The garlic and ginger don’t just add flavor—they transform these beans into something deeply savory. The fermentation process makes them taste like they’ve been slow-cooked with layers of depth, but with way less effort. Honestly, the first time I tried them, I thought I’d over-seasoned… then I had seconds.
- Meal Prep MVP: These beans keep for weeks in the fridge, which means I can toss them into bowls, soups, or tacos without stress. Between us, my lunch box has never been more exciting (or packed with protein). And because they’re shelf-stable once fermented? I buy dried beans in bulk and never worry about spoilage.
- Budget Flex: Dried black beans are cheaper than canned, and this method turns them into a pantry staple. A pound of beans lasts me months—I use them in everything from quick stir-fries to hearty stews. Plus, the salt and water? You’ve already got those. It’s the kind of recipe that makes me feel like I’m feeding my family like royalty without breaking the bank.
Step-by-step instructions for fermented beans recipe
Transform simple ingredients into a probiotic powerhouse with this straightforward fermentation process.
👨🍳 Step 1: Prepare and Soak the Dried Black Beans
Rinse the 2 cups dried black beans thoroughly under cold water to remove any debris or dust. Place them in a large bowl and cover with plenty of fresh, cold water—at least 8 cups to ensure complete submersion. Let them soak for 12 hours at room temperature. I like to use a weight or plate to keep them fully submerged, preventing any from floating and developing off-flavors.
After soaking, drain the beans and rinse them again under cold water. This removes excess starch that could interfere with fermentation. The beans should now be plump and ready for the next stage. Here's the thing—proper hydration is critical for even fermentation, so don't skip this step even if the beans feel fully softened.
🥘 Step 2: Create the Fermentation Brine
In a large fermentation vessel (I use a quart-sized mason jar with an airlock lid), combine the drained beans with the 4 cups filtered water, 1.5 tbsp sea salt, 1 tbsp organic apple cider vinegar, and 0.25 tsp asafoetida powder. Stir gently to dissolve the salt completely—you should see bubbles forming as the salt activates. Add the 4 crushed garlic cloves, 1-inch peeled and thinly sliced ginger root, 0.5-inch freshly grated turmeric root, 2 thinly sliced red chili peppers (seeds removed), 2 whole bay leaves, and 0.5 oz finely chopped black liquorice root. Mix everything together until the beans are fully coated in the liquid.
The vinegar acts as a starter culture, kickstarting fermentation while preventing harmful bacteria. The asafoetida adds that deep, savory umami punch that makes this ferment so special. Make sure all the beans are submerged—if any float to the top, press them down gently with a clean spoon. This ensures even fermentation throughout the batch.
⏰ Step 3: Ferment at Room Temperature
Cover the jar with a lid that allows for burping (like a fermentation lid with an airlock) or loosely cover with a cloth secured with a rubber band. Place the jar in a dark, warm spot—70-75°F is ideal—where it won't be disturbed. Let it ferment for 3 days, checking daily. You'll see bubbles forming and the liquid rising—this is the magic of fermentation happening right before your eyes!
After 3 days, taste a bean to check for tanginess. It should be pleasantly sour but not overly sharp. If it's not quite there, let it ferment another 1-2 days. The beans should float more as gases develop, and the liquid will turn cloudy. This is completely normal—it's the probiotics doing their work! I know it seems counterintuitive, but the longer they ferment, the more complex flavors develop.
🔥 Step 4: Cold Ferment for Depth of Flavor
Once the beans reach your desired level of tanginess, transfer the jar to the refrigerator to cold ferment for 4 more days. This slows down fermentation and allows the flavors to meld beautifully. The cold also helps preserve the probiotics while developing that rich, umami depth. During this time, you might see more bubbles or a slight increase in pressure—this is just the fermentation process continuing at a slower pace.
After the full 7 days, your fermented beans are ready to use! They should have a vibrant color from the turmeric, a subtle heat from the chili, and a complex, savory depth from the black liquorice and asafoetida. The texture should be tender but still hold its shape. If you're not using them immediately, they'll keep in the fridge for up to 3 months, with flavors intensifying over time.
🍽️ Step 5: Use in Recipes or Store Properly
Drain the beans before using, reserving some of the fermented liquid for cooking—it's packed with flavor and probiotics! You can mash them into dips, blend them into soups, or use them whole in salads and stews. I love adding them to grain bowls for an umami kick or blending them into sauces for depth. The possibilities are endless, but always remember: the longer they ferment, the more intense the flavor becomes.
For storage, keep the beans submerged in their fermented liquid in an airtight container in the fridge. If you're not using them within a few weeks, you can freeze them for up to 6 months. Just thaw in the fridge overnight before using. The key to great fermented beans is patience—let them develop their flavors fully, and you'll be rewarded with a probiotic-packed, umami-rich ingredient that elevates every dish it touches.
Pro Tips For Making Fermented Beans
- SOAK BEANS OVERNIGHT: I learned this the hard way—rushing the soak with cold water leaves you with tough, undercooked beans. Use 3 parts water to 1 part beans, cover, and let them sit 12+ hours. The longer they soak, the creamier they’ll be later, and you’ll save time on simmering.
- PEEL GINGER THINLY: Skip the thick chunks—grate or julienne ginger so thin it’s almost translucent. This way, it dissolves into the ferment without floating as clumps. (Yes, even if you’re impatient like me, resist the urge to chop it roughly.)
- SALT IN STAGES: Don’t dump all the salt at once. Start with half the recipe’s salt during the initial soak, then add the rest after fermenting. This keeps the beans from absorbing too much liquid at first, which can dilute their flavor later.
- FERMENT AT ROOM TEMP: Place your jar of beans, water, and aromatics in a spot where it stays between 68–72°F (20–22°C) for 24–48 hours. Too cold? It’ll take forever. Too hot? You’ll end up with a vinegary mess. A pantry or counter away from direct sunlight works best.
Essential equipment for perfect results
Fermentation Vessel
You don’t need anything fancy—a quart-sized mason jar with an airlock lid is ideal, but a regular jar with a loose cloth cover works too. I use Ball mason jars with silicone lids for their airtight seal and durability.
For larger batches, a fermentation crock (like the LeuCroy 3.5-quart) gives better control over the process. If you’re just starting, a wide-mouth jar makes it easier to press beans underwater. 💛
Temperature Control Tools
Fermentation thrives between 70-75°F, but most kitchens fluctuate. A digital thermometer (like the Thermoworks Thermapen) helps monitor your jar’s temperature. For colder climates, a fermentation chamber (or even a cooling vest) keeps things consistent.
If your kitchen runs hot, move the jar to a shady windowsill or basement—just avoid direct sunlight, which can overheat the mixture.
Sanitization Essentials
Cleanliness is critical to prevent mold. Use hot, soapy water (or a vinegar solution) to sanitize jars, utensils, and hands before handling beans. I keep a bottle of 5% acid sanitizer (like Star San) on hand for quick sterilization.
Avoid dish soap residues—it can linger and interfere with fermentation. A clean kitchen towel (washed in vinegar) is perfect for covering jars during the initial fermentation phase.
Optional but Helpful Gadgets
A fermentation weight (like a glass fermentation weights set) keeps beans submerged without crushing them. For precise measurements, a digital kitchen scale ensures accurate salt and water ratios. If you love experimenting, a pH test strip (around 4.2-4.6) confirms safe acidity levels.
I also keep a small funnel handy for transferring beans into jars without spills—fermentation liquid is messy!
Storage Containers
Once fermented, store beans in airtight glass containers (like Pyrex bowls with lids) to preserve freshness. For long-term storage, vacuum-sealed bags (using a FoodSaver) extend shelf life to 6 months in the freezer.
Label containers with dates—fermented flavors evolve over time, and tracking helps you monitor peak freshness. A small jar of reserved fermented liquid in the fridge is perfect for quick drizzling over meals.
Nutrition facts
Frequently asked questions
Can I use canned beans instead of dried for fermentation?
Canned beans work in a pinch, but they’re not ideal for fermentation. The high sodium content and lack of natural enzymes can slow down or disrupt the process. If you must use them, rinse thoroughly to reduce salt, then proceed with the recipe—but expect less probiotic development. For best results, stick with dried beans, which have more natural starches and enzymes to support fermentation.
How do I know when the fermentation is done?
Your fermented beans are ready when they develop a tangy, funky aroma and a pleasantly sour taste. After 3 days at room temperature, taste a bean—it should be noticeably different from raw beans. For deeper flavor, transfer to the fridge for 4 more days. The liquid should turn cloudy, and bubbles may form. If mold appears (fuzzy spots), discard the batch immediately.
What if my fermented beans smell bad?
A strong, unpleasant odor usually means over-fermentation or contamination. If it smells like rot or ammonia, discard the batch—it’s unsafe to eat. For milder funk, try adding 1 tbsp apple cider vinegar to the jar and refrigerating for 24 hours to reset the pH. Always keep beans submerged and use clean tools to prevent spoilage.
Can I adjust the spice level in this recipe?
Reduce or omit the chili peppers for a milder flavor, or add extra ginger or garlic for warmth. For heat, try red pepper flakes or cayenne (start with ½ tsp and adjust). The asafoetida and black liquorice root add depth without heat, so they’re flexible too. Taste as you go—fermented flavors intensify over time.
How can I use fermented beans in cooking?
These beans are incredibly versatile! Mash them into hummus or dips, blend into sauces for umami depth, or use them whole in salads, grain bowls, and soups. They’re a great substitute for soy sauce in marinades or a tangy topping for tacos. For extra flavor, simmer them with broth to make a quick fermented bean broth. Store the fermented liquid separately—it’s packed with probiotics and can be used like a seasoned stock.