Side Dishes
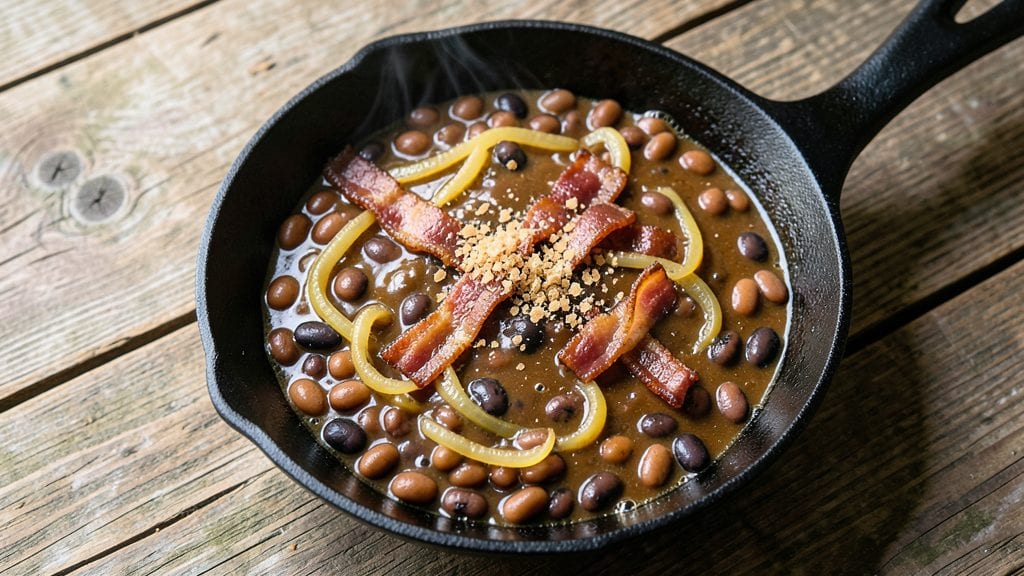
Grandma Brown's home baked beans recipe has been the centerpiece of family gatherings for decades, bringing sweet, smoky comfort to every table. The secret lies in slow-cooked navy beans simmered with molasses, brown sugar, and bacon until the sauce thickens into a rich, caramelized glaze.
I first tasted these beans at a Sunday dinner when I was just a kid—the way the flavors melded over hours made them unforgettable.
This recipe stays true to tradition while making it approachable for home cooks. Whether you use a heavy Dutch oven on the stovetop or a slow cooker for hands-off cooking, the result is the same: tender beans in a glossy, slightly sticky sauce that clings to every bite.
The combination of smoky bacon, deep molasses, and just enough sweetness creates that perfect balance that makes these beans irresistible.
What sets these baked beans apart is their ability to transform a simple side dish into the star of the meal. The aroma alone fills the kitchen with warmth, while the texture—creamy beans with crispy bacon bits—makes every spoonful satisfying.
Serve them straight from the pot with cornbread for the full experience, or let guests dig in with forks and spoons.
Perfect for holidays, potlucks, or a cozy weeknight dinner, these beans bring a taste of tradition to any table. The method is straightforward, but the flavors take time to develop—making it worth every minute of waiting. Let’s get cooking and bring Grandma Brown’s legacy to your kitchen.
Ingredients for grandma brown's home baked beans
Sweet, smoky, and packed with flavor—these 13 ingredients bring Grandma Brown's tradition to your table.
| Ingredient | Amount | Notes |
|---|---|---|
| Navy Beans (Dried) 🌾 | 2 cups | Rinsed before soaking overnight |
| Thick-Cut Bacon 🥓 | 1 ½ lb | Cut into 1-inch pieces |
| Unsalted Butter 🧈 | ½ cup | Full-fat for richness |
| Dark Molasses 🍯 | ½ cup | Not blackstrap for sweetness |
| Light Brown Sugar 🍚 | ¾ cup | Packed firmly |
| Yellow Onion 🧅 | 1 whole | Chopped into 1/2-inch pieces |
| Garlic Cloves 🧄 | 4 cloves | Minced for depth |
| Kosher Salt 🧂 | 2 tsp | Adjust to taste |
| Ground Black Pepper 🌶️ | ½ tsp | Freshly cracked |
| Dried Mustard 🌿 | 1 tsp | For subtle tang |
| Apple Cider Vinegar 🍎 | 2 tbsp | Brightens flavors |
| Water 💧 | 4 cups | For soaking beans |
| Bay Leaves 🍃 | 2 whole | For aromatic depth |
The navy beans are the heart of this recipe, so don't skimp on quality. Bob's Red Mill or Great Northern beans from the bulk section work best—they hold their shape and soak evenly. If you're short on time, canned navy beans (rinsed well) can work in a pinch, but soaked dried beans develop that unmatched creamy texture. For bacon, thick-cut from Costco gives the best smoky flavor, but any good-quality bacon will do. The molasses? Grandma's or Brer Rabbit brands are classic choices—avoid blackstrap unless you want a stronger, bitter note. And the brown sugar? Light brown keeps it balanced; dark would overpower the molasses.
No molasses? Maple syrup at half the amount gets you close, though it'll taste different. Short on bacon? Smoked paprika plus a splash of liquid smoke mimics that smoky depth. The mustard is key for that subtle tang—if you're out, Dijon mustard at half the quantity works, but it'll be more pronounced. For the beans, if you forget to soak them overnight, boil them for 2 minutes first, then let them sit in warm water for an hour. The bay leaves? Don't skip them—they add that warm, earthy note that makes these beans taste like home. And if you're using a slow cooker, add the bacon first to render the fat before adding everything else.
These beans taste even better the next day as the flavors meld. Store leftovers in an airtight container in the fridge for up to 5 days. For freezing, portion into 1-cup servings—they reheat perfectly straight from the freezer. I always make a double batch because they disappear fast. The sauce thickens as it cools, so if it seems too thin when reheating, simmer uncovered for 5 minutes to reduce it. And trust me, the crispy bacon bits? Save those for the top—they're worth the extra minute of crisping.
Why You'll Love This Recipe
- No-Soaking Needed: I’ll admit, I used to dread soaking beans—until I tried Grandma Brown’s method. Just a quick rinse and a long simmer with bacon fat? Those dried navy beans turn tender in one pot, no fuss. Honestly, it’s the kind of recipe that makes me feel like I’ve hacked the system.
- Sweet-Smoky Magic: That molasses and brown sugar combo? It’s dangerously good. The bacon renders into crispy bits that caramelize into the beans, while the molasses adds this deep, almost custardy richness. Between us, I’ve caught myself sneaking seconds straight from the pot—no shame.
- Potluck Star: This recipe’s my go-to for gatherings because it’s reliable. Bring it to a picnic, holiday spread, or even a casual BBQ—it pairs with everything from cornbread to grilled chicken. Plus, the flavor only gets better the next day, so I always make extra. (Yes, even on a Tuesday night.)
- Budget-Friendly Feast: Dried beans and thick-cut bacon stretch this dish into a full meal for less than $5. The butter and molasses add depth without breaking the bank, and leftovers taste just as good reheated. I’ll be real: my freezer’s got three containers of these right now, and I’m not complaining.
Step-by-step instructions for Grandma brown's home baked beans
Here's how to make these rich, smoky-sweet baked beans just like Grandma used to—simple steps for big flavor.
Soak and Prepare the Beans
Start by rinsing the 2 cups navy beans under cold water to remove any debris. Place them in a large bowl and cover with the 4 cups water. Let them soak overnight—this ensures they cook evenly and stay tender. I like to soak them in the fridge for at least 8 hours, but up to 12 hours works too.
After soaking, drain the beans and give them a quick rinse again. This removes any excess starch that could make the beans gummy during cooking. Drain them well in a colander, shaking gently to remove as much water as possible. This step is crucial because it prevents a watery final texture.
Cook the Bacon and Sauté the Aromatics
In a large Dutch oven, cook the 1.5 lb thick-cut bacon over medium heat until it's crispy and golden brown. This should take about 10-12 minutes. Once done, remove the bacon from the pot with a slotted spoon and set it aside on paper towels to drain. Leave the rendered bacon fat in the pot—it's packed with flavor.
In the same pot, melt the 0.5 cup unsalted butter over medium heat. Add the chopped yellow onion and cook for 5-6 minutes until it's softened and translucent. Stir in the minced garlic cloves and cook for another 30 seconds until fragrant. Be careful not to let the garlic burn—it should smell sweet and nutty, not bitter.
Combine All Ingredients and Simmer
Add the drained navy beans, 0.5 cup dark molasses, 0.75 cup light brown sugar, 2 tsp kosher salt, 0.5 tsp ground black pepper, 1 tsp dried mustard, 2 tbsp apple cider vinegar, and the 2 whole bay leaves to the pot. Stir everything together to combine well. The mixture should look thick and saucy.
Pour in just enough water to cover the beans by about 1 inch—this helps create a rich, saucy texture. Bring the mixture to a boil over high heat, then reduce the heat to low. Cover the pot and let it simmer gently for 2 hours. Stir occasionally to prevent sticking, and add a splash of water if the beans look dry.
Finish with Crispy Bacon and Rest
After 2 hours, the beans should be tender but still hold their shape. Remove the bay leaves and crumble the reserved bacon into the pot. Stir everything together and let it simmer uncovered for another 15-20 minutes. This allows the flavors to meld and the sauce to thicken slightly. Taste and adjust the seasoning if needed—you might want to add a pinch more salt or sugar to balance the flavors.
Once everything is perfectly seasoned, let the beans rest for 10 minutes before serving. This resting time helps the flavors settle and the sauce thicken just right. Serve warm with crusty bread or cornbread, and watch everyone go back for seconds!
Pro Tips For Making Grandma Brown'S Home Baked Beans
- SOAK BEANS OVERNIGHT: I learned this the hard way—skipping the soak leads to beans that stay rock-hard no matter how long you cook them. Dried navy beans need at least 8 hours in water (or a quick 2-hour soak with a pinch of baking soda) to soften properly. Trust me, your molasses-sweetened beans will thank you.
- CRISP BACON LOW AND SLOW: Don’t rush the bacon—render it in a cold skillet over medium heat until the fat pools but the meat stays tender. Drain most of the fat (save a couple tablespoons for flavor), then crumble it into the beans. The difference between crispy and greasy bacon in your beans comes down to patience, not heat.
- SWEAT ONIONS FIRST: Chop your onions and cook them in butter until they’re translucent and just starting to caramelize—about 8-10 minutes. This step builds flavor that cuts through the molasses and sugar, preventing a cloying sweetness. Skip it, and your beans might taste like dessert instead of savory comfort food.
- STIR IN MOLASSES GRADUALLY: Molasses is potent—add it slowly while stirring constantly to avoid a bitter, burnt taste. Start with half the amount called for, let the beans simmer for 10 minutes, then add the rest. This lets the flavors meld without overpowering the beans’ natural earthiness. (Yes, even if you’re impatient like me.)
Storing and reheating this grandma brown's home baked beans
Fridge Storage Tips
Store leftover baked beans in an airtight container with a lid—glass or BPA-free plastic works best. The sauce thickens as it cools, so leave about ½ inch headspace to prevent spills.
Keep them refrigerated at 40°F or below for up to 5 days, but I always finish mine within 3 days because the flavors peak after 24 hours.
The beans stay creamy and the bacon retains its crispiness if you press plastic wrap directly on the surface before sealing the container. 🥫
Freezing for Later
For long-term storage, portion the beans into 1-cup servings in freezer-safe containers or heavy-duty ziplock bags. Remove as much air as possible before sealing to prevent freezer burn. Label with the date—they’ll keep their quality for up to 3 months.
When ready to eat, thaw overnight in the fridge, then reheat gently. I like to freeze extra portions because they make quick, comforting meals on busy nights. 🧊
Stovetop Reheating
Transfer beans to a saucepan and heat over medium-low with 2-3 tablespoons of water to loosen the sauce. Stir occasionally and simmer for 8-10 minutes until warmed through. If the sauce thickens too much, add a splash more water.
For extra richness, stir in 1 tablespoon of butter during reheating. Always taste and adjust seasoning—sometimes the molasses flavors concentrate during storage. 🔥
Slow Cooker Warm-Up
Place the beans in your slow cooker on low heat for 2-3 hours, stirring occasionally. This method keeps the sauce silky and prevents the bacon from getting soggy. If using a 6-quart slow cooker, start with 1 cup of beans to avoid overflow.
The gentle heat helps redistribute flavors beautifully, making them taste almost as good as fresh. Perfect for lazy weekends or potlucks! ⏰
Microwave Shortcut
For a quick fix, transfer a 1-cup portion to a microwave-safe bowl, cover loosely with a damp paper towel, and heat on 50% power for 3-4 minutes. Stir halfway through to ensure even heating. Avoid high power—it can make the sauce watery.
If the beans seem dry, add 1 tablespoon of water or broth and microwave for another 30 seconds. The texture won’t be as perfect as stovetop, but it’s a lifesaver on hectic days. ⚡
Reviving Dry Sauce
If the sauce looks too thick after reheating, simply add 1-2 tablespoons of water or broth and simmer uncovered for 5 minutes to reduce it back to the right consistency. For extra shine, stir in 1 teaspoon of butter or a splash of apple cider vinegar to brighten the flavors.
I’ve had this happen when storing beans in shallow containers—just a little liquid goes a long way to restore that glossy finish. 💡
Nutrition facts
Frequently asked questions
Why do I need to soak the beans overnight?
Soaking removes indigestible sugars and reduces cooking time, ensuring tender beans that absorb flavors perfectly. Overnight soaking (8-12 hours) breaks down tough outer skins, while quick soaking (2 minutes boil + 1 hour sit) works in a pinch. Never skip this step—it prevents mushy, gummy texture.
Can I make this recipe without molasses?
Yes, but the flavor will change. Substitute ½ cup maple syrup for sweetness or ¼ cup honey + ¼ cup brown sugar for depth. The molasses provides that signature deep, caramelized richness that's hard to replicate. If you must omit it, increase the brown sugar to 1 cup for balance.
How do I prevent the sauce from getting too thin?
Simmer uncovered for the last 15 minutes to reduce naturally, or mash 2-3 beans with a fork to thicken. If using canned beans, drain them well and add 1 tablespoon cornstarch mixed with water to the pot during cooking. The key is patience—don't rush the simmering time.
Can I use a slow cooker instead of stovetop?
Cook on low for 6-8 hours or high for 3-4 hours, adding ½ cup water halfway if needed. The slow cooker's gentle heat enhances the sweet-smoky flavors. Just add bacon first to render fat, then proceed with the recipe. For best results, use a 6-quart pot and avoid overfilling.
What's the best way to crisp up the bacon after cooking?
Spread the reserved bacon pieces on a baking sheet and broil for 2-3 minutes at 450°F, stirring once. For extra crunch, use a skillet over medium-high heat for 1-2 minutes. The secret is fresh-from-the-oven crispiness—don't skip this final step for that satisfying texture contrast!