Side Dishes
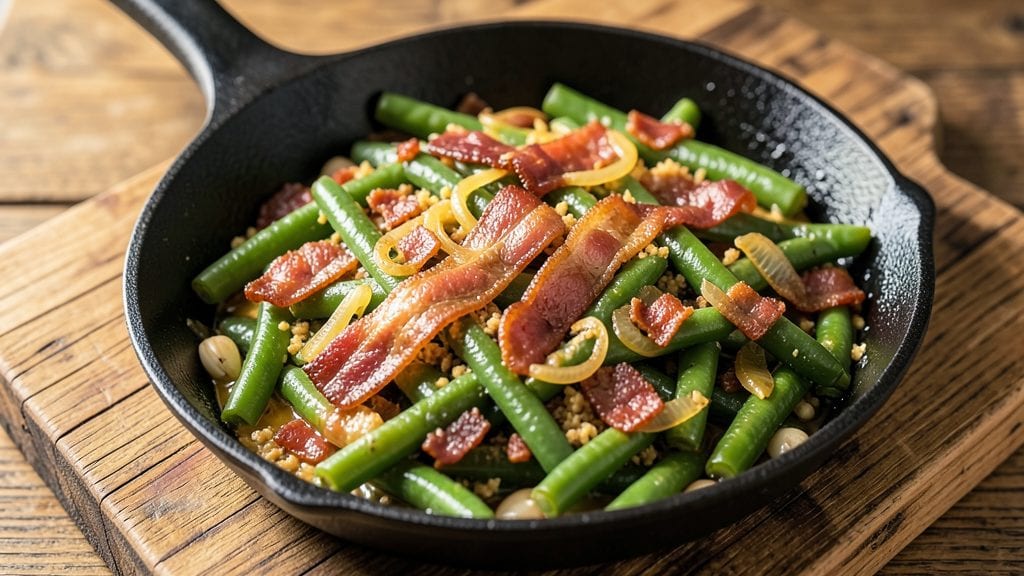
This Texas Roadhouse green beans copycat recipe delivers the same crispy bacon and garlic-infused flavor that makes their version legendary. The secret lies in perfectly crisped bacon, caramelized onions, and a buttery garlic sauce that coats every tender green bean.
I've replicated this dish after countless trips to the restaurant, and the home version is just as satisfying—if not better. The key is balancing the smoky, salty notes of the bacon with the bright, aromatic garlic butter, creating a side dish that's impossible to resist.
What sets this copycat recipe apart is the attention to detail in the cooking process. You'll start by rendering thick-cut bacon until it's crispy, then use those rendered fats to sauté onions until they're golden and sweet.
The garlic gets cooked low and slow to avoid burning, preserving its delicate flavor. Fresh green beans are added just long enough to blanch them while absorbing all that rich, savory goodness. This isn't just a side dish—it's a flavor experience that transforms simple green beans into something extraordinary.
The result is a plate of green beans that looks and tastes exactly like what you'd get at Texas Roadhouse: crispy bacon bits scattered throughout, tender-crisp green beans, and a glossy garlic butter sauce that clings to every bite.
The aroma alone will have everyone gathering around the table, and the first taste will have them asking for seconds. This recipe is foolproof and delivers restaurant-quality results every time, making it perfect for family dinners, holiday meals, or anytime you want to elevate your side dish game.
Whether you're serving it alongside steak, chicken, or even as a vegetarian main with crusty bread, these green beans will be the star of the show. The beauty of this recipe is its versatility—it works as a standalone side or pairs perfectly with almost any protein.
Once you try this version, you'll never settle for anything less than Texas Roadhouse-style green beans again. Let's get cooking!
Ingredients for texas roadhouse green beans copycat
Crispy bacon, caramelized onions, and buttery garlic—just eight ingredients for Texas Roadhouse magic.
| Ingredient | Amount | Notes |
|---|---|---|
| Fresh Green Beans 🥬 | 1 ½ lb | Trimmed, ends removed |
| Thick-Cut Bacon 🥓 | 8 oz | Thick-cut preferred for crispiness |
| Yellow Onions 🧅 | 1 whole | Thinly sliced for caramelization |
| Garlic Cloves 🧄 | 6 cloves | Minced for aromatic flavor |
| Unsalted Butter 🧈 | ½ cup | Full-fat for richness |
| All-Purpose Flour 🌾 | 1 tbsp | For thickening sauce |
| Salt 🧂 | 1 tsp | Kosher or sea salt |
| Black Pepper 🌶️ | ½ tsp | Freshly ground preferred |
| Fresh Parsley 🌿 | ¼ cup | Chopped, for garnish |
| Granulated Sugar 🍯 | 1 tsp | For caramelizing onions |
| Dried Thyme 🌿 | ¼ tsp | Optional, for depth |
The bacon is everything here. Thick-cut from Costco or Trader Joe's gives the best crisp, but any good-quality bacon works. Look for slices with good marbling—those little fat streaks are what render into flavor gold. The onions? Yellow, not red—they caramelize better. I usually grab a big bag from Walmart's Great Value because they're cheap and consistent. Skip the pre-sliced onions—they dry out fast. The garlic should be fresh, with no green shoots—Lundberg or Denali are my go-tos. For the butter, Land O'Lakes or Plugrá are reliable, but nothing beats the flavor of Kerrygold if you want to splurge.
No thick-cut bacon? Regular bacon cut into smaller pieces works, but it won't be as crispy. Onions too sweet? Add a pinch of sugar to the mix. Short on parsley? Fresh cilantro or basil gives a different but nice vibe. The flour is just for thickening—if you're watching carbs, cornstarch at half the amount does the trick. Want extra smokiness? Add a pinch of smoked paprika to the garlic butter. The green beans? Fresh is best, but frozen works in a pinch—just don't thaw them first. And trust me on the full-fat butter—low-fat won't give the same rich flavor.
This keeps for 3-4 days in the fridge, but honestly, it's best eaten fresh. The bacon stays crispy for about 2 days if stored in an airtight container. For leftovers, reheat in a skillet over medium heat—just add a splash of water to keep everything saucy. I always make a double batch because it disappears fast. Freezes beautifully for up to 3 months if you want to prep ahead. Just thaw in the fridge overnight before reheating.
Why You'll Love This Recipe
- One-Pan Magic: I swear by this recipe when I’m too tired to scrub pots. Toss everything—bacon, beans, onions—on a single sheet pan, and the oven does all the work. No chopping boards, no fuss, just crispy bacon and tender greens waiting when you walk in the door.
- Smoky Garlic Bomb: That first bite? Pure flavor payoff. The thick-cut bacon renders into salty, smoky goodness, while the garlic and butter melt into a rich, golden sauce that clings to every bean. It’s the kind of dish that makes you pause mid-bite just to savor it.
- Weeknight Workhorse: Between us, this is my go-to when I need something fast but still impressive. Serve it alongside grilled chicken for a casual dinner, or pile it on toast with a fried egg for a lazy weekend brunch. Honestly, it’s the unsung hero of my meal rotation.
- Budget-Friendly Leftovers: A single batch stretches across three meals—toss into salads, serve over rice, or reheat with a splash of water to keep it crisp. And with bacon as the star, you’re getting restaurant-quality flavor without the price tag. My wallet thanks me every time.
Step-by-step instructions for Texas Roadhouse green beans copycat recipe
Here's how to recreate that signature Texas Roadhouse flavor at home—crispy bacon, rich garlic butter, and tender green beans.
Cook the Thick-Cut Bacon Until Crispy
Cut the 8 oz thick-cut bacon into ½-inch pieces and place them in a large skillet over medium heat. Cook undisturbed for 5-6 minutes until the edges start to crisp and the fat begins to render. This is where the magic happens—the thick-cut bacon creates those perfect crispy bits while releasing enough fat to cook everything else.
After 6 minutes, stir the bacon gently with tongs to break it up slightly, but leave some larger pieces for texture. Continue cooking for another 4-5 minutes until the bacon is golden brown and fully crispy. Remove the bacon with a slotted spoon and set it aside on a paper towel-lined plate, leaving the rendered fat in the skillet. You should have about 4-5 tablespoons of bacon fat remaining—this is your flavor foundation.
Caramelize the Onions and Cook the Garlic
Add the 1 whole yellow onion, thinly sliced, to the skillet with the bacon fat. Cook over medium heat for 8-10 minutes, stirring occasionally, until the onions soften and begin to turn golden brown. This caramelization adds natural sweetness that balances the savory flavors. Sprinkle the 1 teaspoon granulated sugar over the onions and stir to help them caramelize more quickly.
After the onions are golden, push them to one side of the skillet and add the 6 minced garlic cloves to the empty space. Cook for 30-45 seconds until the garlic becomes fragrant and just starts to turn golden. Immediately add the 0.25 teaspoon dried thyme and stir everything together for 10 seconds to combine the flavors. Remove the skillet from heat temporarily while you prepare the green beans.
Blanch the Green Beans
Trim the ends from the 1.5 lb fresh green beans and cut them into 2-inch pieces. Bring a large pot of water to a rolling boil and add 1 teaspoon salt. Once boiling, add the green beans and cook for 3-4 minutes until they're bright green but still crisp-tender. You want them to retain their bite—overcooking makes them mushy.
Drain the green beans immediately in a colander and rinse them under cold water for 10 seconds to stop the cooking process. This blanching step ensures they stay vibrant and crisp when they hit the skillet later. Keep them in the colander while you finish the sauce.
Make the Garlic Butter Sauce
Return the skillet with the onion-garlic mixture to medium heat. Add the 0.5 cup unsalted butter and stir until it melts completely, about 30 seconds. Sprinkle the 1 tablespoon all-purpose flour over the mixture and stir vigorously for 1-2 minutes until it forms a smooth, thick paste. This creates a roux that will give your sauce that signature creamy texture.
Pour in ½ cup of water (or the reserved bacon fat if you prefer extra richness) and stir constantly for 2-3 minutes until the sauce thickens. Season with the 0.5 teaspoon black pepper and taste—you should have a rich, savory base that's ready for the green beans. If the sauce is too thick, add another splash of water.
Combine and Finish
Add the blanched green beans to the skillet with the sauce and toss gently to coat them evenly. Cook for 2-3 minutes over medium heat until the green beans are heated through and the sauce clings to them. Return the crispy bacon to the skillet and toss everything together for 30 seconds to distribute the bacon pieces.
Remove from heat and stir in the 0.25 cup chopped fresh parsley. Taste and adjust seasoning with additional salt if needed—you want the flavors to be balanced but still have that restaurant-quality punch. Serve immediately while the green beans are hot and the bacon is crispy, garnished with extra parsley if desired.
Pro Tips For Making Texas Roadhouse Green Beans Copycat
- CRISP THE BEANS FIRST: I learned this the hard way—raw green beans in the skillet just won’t caramelize right. Blanch them for 3-4 minutes in boiling salted water first, then shock in ice water. This softens them just enough to brown beautifully without turning mushy later. (Yes, it’s an extra step, but the texture makes all the difference.)
- CUT BACON IN 1/4-INCH SLICES: Thick-cut bacon is great, but for even cooking and crispier edges, slice it into 1/4-inch pieces before frying. Smaller pieces render faster and don’t clump, so you get that perfect balance of crispy bacon and buttery flavor in the sauce. (And no, don’t skip the frying—it’s non-negotiable for that Roadhouse taste.)
- SWEAT ONIONS LOW AND SLOW: After cooking the bacon, push it aside and let those onions sweat in the bacon fat over low heat for 8-10 minutes. Rushing this step means they’ll burn before they soften, and burnt onions ruin the whole dish. (Trust me, I’ve done it—twice.)
- STIR IN GARLIC AT THE END: Add the minced garlic and butter only in the last 30 seconds of cooking. Garlic burns faster than you think, and you want it to sizzle just enough to release its aroma without turning bitter. (Pro move: Smash the garlic cloves with the side of your knife first—it cooks more evenly.)
Make-ahead tips for this texas roadhouse green beans copycat
Prep Ahead Strategy
Start by prepping the bacon and onions 24 hours in advance—they're the flavor foundation. Cook the bacon until crispy, drain on paper towels, and store in an airtight container. Save the fat in a small jar in the fridge for up to 5 days.
Thinly slice the onions and store them in a sealed container with a paper towel to absorb moisture. This saves you 15 minutes of prep day-of. 💡
Blanch Beans Early
Green beans can be blanched a day ahead and stored in the fridge. After blanching, plunge them into ice water, drain, and pack them in a single layer in a ziplock bag with a paper towel to absorb excess moisture.
They’ll keep for 2 days in the fridge—just reheat in the sauce for 2-3 minutes before serving. This is my secret to always having fresh-tasting sides. ✨
Sauce Prep Shortcut
Make the garlic butter sauce one step at a time to avoid overcooking. Melt the butter and mix it with the flour to form a roux, then store it in the fridge for up to 3 days.
When ready to serve, simply reheat the roux in the skillet with the reserved bacon fat, add water, and simmer until thickened. This halves your cooking time on busy nights. 🔥
Bacon Storage Hack
Keep the crispy bacon fresh by storing it in a single layer on a wire rack inside an airtight container with a paper towel underneath. This prevents sogginess and keeps it crispy for 3 days.
If you’re prepping for a big meal, cook double the bacon—it’s perfect for garnishing other dishes or adding to salads later. 🥓
Freezer-Friendly Version
For meal prep, assemble the dish completely (except garnish) and freeze it in a single layer on a tray before transferring to a freezer bag. Thaw overnight in the fridge, then reheat in a skillet over medium heat for 5-7 minutes, adding a splash of water if needed.
The texture stays crispy, and the flavors are just as bold. ❄️
Last-Minute Garnish
Always add fresh parsley right before serving—it brightens the dish and makes it look restaurant-worthy. Store chopped parsley in an airtight container with a damp paper towel in the fridge for up to 5 days.
For extra flair, toast the parsley seeds in a dry skillet for 30 seconds before chopping—it adds a nutty depth. 🌿
Nutrition facts
Frequently asked questions
Can I make this recipe without bacon?
The bacon is what gives these green beans their signature smoky depth, but you can substitute with 4 oz smoked turkey bacon or 4 oz crispy fried onions for a vegetarian version. For extra richness, add 1 tablespoon bacon bits at the end. The flavor won't be identical, but it'll still be delicious!
Why does the recipe call for blanching the green beans?
Blanching ensures the green beans stay vibrant and crisp-tender rather than turning mushy. The quick cook in boiling water followed by an ice bath stops the cooking process, so they absorb the flavorful sauce perfectly when reheated. Skipping this step can make the final dish soggy and less flavorful.
Can I use frozen green beans instead of fresh?
Yes, but with one key adjustment: Do not thaw them first. Pat frozen green beans completely dry before adding to the skillet, and cook them for 1-2 minutes longer than fresh to ensure they're heated through. They won't be as crisp as fresh, but the flavor will still be fantastic.
How do I keep the bacon extra crispy?
Cook the bacon in a cold skillet over medium-low heat until the fat renders (about 8-10 minutes). Then increase heat to medium-high for the last 2-3 minutes to crisp it up. Store in a single layer on a wire rack in an airtight container to prevent sogginess.
What if my sauce is too thin or too thick?
If too thin, stir in 1 teaspoon flour mixed with 1 tablespoon cold water and cook for 1 minute**. If too thick, add 1 tablespoon warm water or reserved bacon fat and stir until smooth. The sauce should coat the back of a spoon but still be pourable. Adjust gradually to avoid lumps.