
Desserts
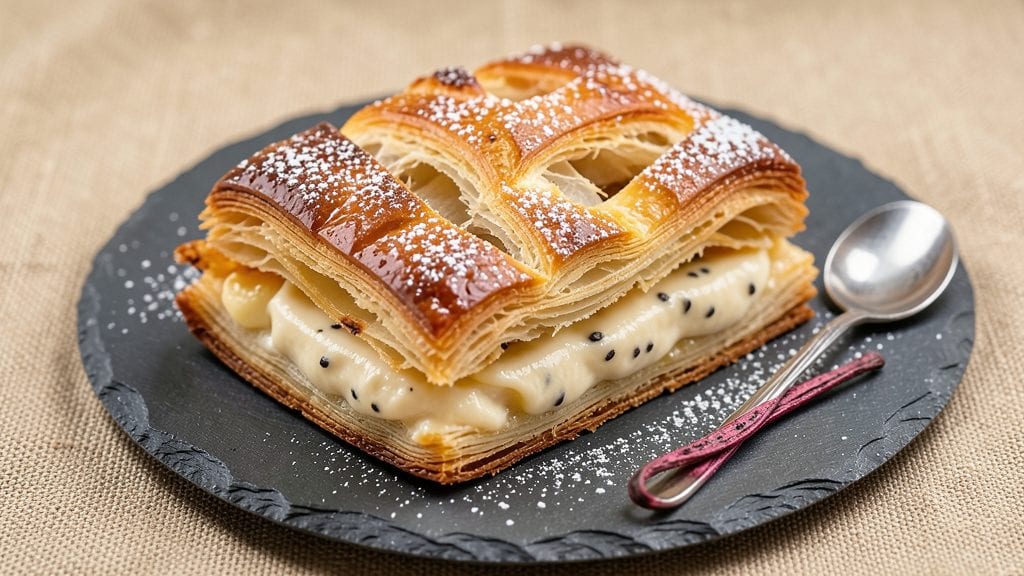
This vanilla bean custard Danish recipe delivers the kind of indulgent pastry that makes every bite feel like a celebration. The secret lies in a rich custard filling infused with real vanilla bean seeds—visible swirls of golden custard that melt into velvety perfection with each forkful.
After years of perfecting the balance between tender dough and ultra-smooth filling, I’ve developed a method that ensures crispy, flaky layers wrapped around a custard so luscious it rivals bakery standards.
The process begins with a buttery yeast dough that develops during a slow overnight rise, creating that signature soft, pillowy texture. While the dough rests, the custard—thickened with egg yolks and cornstarch—simmers until it reaches that silky, spoonable consistency, where vanilla bean seeds add depth and aroma.
The real magic happens during assembly, where precise folding and proofing ensure the custard stays rich and swirled, not runny or overcooked.
By the time it emerges from the oven, you’ll have a golden, caramelized Danish with layers so tender they practically dissolve. The custard filling remains creamy and warm, with vanilla bean seeds scattered throughout like edible jewels.
A light dusting of powdered sugar or a drizzle of caramel elevates it to restaurant-worthy elegance—but the real star is the custard itself, so decadent it’s worth every calorie.
Perfect for brunch gatherings, holiday desserts, or a weekend treat, this recipe scales beautifully for sharing. The dough can be prepped ahead, and the custard reheats effortlessly, making it ideal for meal prep.
Whether you’re baking for a crowd or indulging solo, this vanilla bean custard Danish will become your new go-to recipe. Let’s get started.
Ingredients for vanilla bean custard danish
The foundation of ultra-rich Danish layers begins with these precise ingredients—each playing a critical role in achieving bakery-quality texture and custard depth.
| Ingredient | Amount | Notes |
|---|---|---|
| Unsalted Butter 🧈 | 1 ½ cups | Cold, cubed for flaky layers |
| All-Purpose Flour 🌾 | 5 cups | Sifted for light texture |
| Large Eggs 🥚 | 4 whole | Room temperature for even mixing |
| Granulated Sugar 🍚 | ½ cup | For dough enrichment |
| Instant Yeast 🍞 | 0.01 oz | Or 2 1/4 tsp |
| Salt 🧂 | 1 tsp | Diamond Crystal preferred |
| Heavy Cream 🥛 | 1 ½ cups | Full-fat for custard richness |
| Whole Milk 🥛 | ½ cup | Warmed to 85°F for custard |
| Large Egg Yolks 🥚 | 6 whole | Pasteurized if preferred |
| Granulated Sugar 🍚 | ¾ cup | For custard sweetness |
| Cornstarch 🌾 | ¼ cup | For smooth custard texture |
| Vanilla Bean Pods 🌿 | 2 whole | Madagascar preferred, seeds scraped |
| Powdered Sugar 🍚 | ½ cup | For final dusting |
| Coarse Sugar 🍚 | ¼ cup | For caramel drizzle |
The unsalted butter is non-negotiable for flaky layers—European-style with at least 82% fat content performs best. Purchase from Whole Foods or specialty grocers like Gourmet Getaway for superior quality. Store in the freezer to maintain freshness; let it sit at room temperature for 1 hour before creaming. The vanilla bean pods should be plump and moist, with visible seeds—Madagascar varieties offer the most aromatic depth. If substituting vanilla extract, use double the amount of pure Madagascar extract, not imitation. The heavy cream and whole milk must be full-fat for proper custard emulsification; ultra-pasteurized versions work but may slightly alter texture.
For the cornstarch, Bob's Red Mill brand is ideal due to its fine grind, ensuring a silky custard. If unavailable, arrowroot powder at the same quantity suffices. The egg yolks should be fresh—older yolks may yield a slightly grainier custard. Pasteurized yolks are recommended if feeding vulnerable populations. Substitute powdered milk for whole milk by reducing the liquid by 1/4 cup and adding 1 tbsp of powdered milk per 1 cup of liquid. The coarse sugar for caramel should be turbinado or demerara for proper crystallization; granulated sugar won't produce the same glossy finish. Always sift the flour to prevent dense layers—King Arthur brand is preferred for its consistent protein content.
Store unsalted butter in an airtight container in the refrigerator for up to 3 months or freeze for 6 months. Vanilla bean pods remain viable for 1 year in the freezer, though flavor peaks within 3 months. The dough can be refrigerated overnight, wrapped tightly in plastic—this enhances flavor development. Custard mixture should be used immediately or refrigerated for 24 hours; reheat gently on low heat, stirring constantly to prevent curdling. Baked Danish reheats beautifully in a 350°F oven for 10 minutes, wrapped in foil to retain moisture. Portion into individual servings for 3-day fridge storage or freeze for 2 months—thaw at room temperature before serving.
Why You'll Love This Recipe
- You’re using pantry staples: butter, flour, sugar, eggs. The only splurge is the vanilla bean, but one pod stretches for months of this recipe. Leftovers? They reheat beautifully or freeze like a champ for spontaneous treats.
- No Yeast Nightmare: I swear by this dough—no kneading, no waiting for it to rise. Just mix, chill, roll, and bake. The instant yeast works fast, so you’re not stuck proofing overnight like some fussy sourdough.
- Vanilla Bomb Inside: That custard layer? Chef’s kiss. The vanilla bean swirl cuts through the buttery dough like a creamy, dreamy surprise. Honestly, I’ve made plain Danish before, but this is the kind of dessert that makes people pause mid-bite.
- Breakfast or Brunch Star: Serve it warm with a drizzle of honey for a lazy weekend morning, or slice it cold for a coffee shop vibe. My kids grab these for school lunches—yes, even on a Tuesday—and they come back begging for more.
Step-by-step instructions for vanilla bean custard Danish
Here's how to achieve those signature swirls with visible vanilla seeds—every layer matters.
Prepare the Dough Foundation
In a stand mixer fitted with the paddle attachment, combine the 5 cups all-purpose flour, 0.5 cup granulated sugar, 1 teaspoon salt, and 0.01 oz instant yeast. Mix on low speed for 30 seconds until evenly distributed. Add the 1.5 cups cold, cubed unsalted butter and mix on low until the mixture resembles coarse crumbs with pea-sized butter pieces remaining.
This cold butter technique is critical—it creates those signature flaky layers. Press the dough together briefly, then divide into two equal discs. Wrap each in plastic wrap and refrigerate for at least 1 hour or up to 24 hours. The longer it rests, the more flavor develops and the easier it rolls out later.
Create the Vanilla Bean Custard Filling
In a medium saucepan, whisk together the 6 whole large egg yolks, 0.75 cup granulated sugar, 0.25 cup cornstarch, and the scraped seeds from 2 whole vanilla bean pods. Add the 1.5 cups heavy cream and 0.5 cup warmed whole milk (85°F). Cook over medium-low heat, stirring constantly with a wooden spoon, until the mixture thickens enough to coat the back of the spoon—this should take about 5-7 minutes.
The custard should be smooth and glossy, with a temperature of 170°F when done. Immediately transfer to a bowl, press plastic wrap directly onto the surface to prevent skin formation, and refrigerate for at least 2 hours or overnight. This chilling step ensures clean slicing and prevents the filling from leaking during baking.
Assemble and Roll the Danish
Preheat your oven to 350°F. On a lightly floured surface, roll out one disc of chilled dough into a 12x16-inch rectangle (about ¼-inch thick). Spread the chilled vanilla bean custard evenly over the dough, leaving a 1-inch border around the edges. Sprinkle the remaining vanilla bean pods (cut lengthwise) over the custard.
Roll the dough tightly into a log, sealing the seam well. Wrap the log in plastic wrap and refrigerate for 30 minutes. This resting period allows the layers to relax and prevents the filling from oozing out during baking. Repeat with the second dough disc.
Bake to Golden Perfection
Place both dough logs on a parchment-lined baking sheet, seam-side down. Bake for 25-30 minutes until the danishes are golden brown and the internal temperature reaches 190°F. Rotate the pans halfway through for even browning. The custard should be set but still slightly jiggly in the center.
Remove from the oven and let cool for 10 minutes before slicing into 6 equal pieces. The contrast between the warm, custardy center and the flaky layers is what makes these danishes unforgettable. For extra decadence, drizzle with a caramel made from the 0.25 cup coarse sugar and a splash of water, cooked until amber-colored.
Finish with Powdered Sugar
While still slightly warm, dust the sliced danishes generously with 0.5 cup powdered sugar using a fine-mesh sieve. This final step adds that signature bakery-fresh look and balances the rich custard flavor. Serve immediately or store in an airtight container at room temperature for up to 2 days, though they're best enjoyed fresh from the oven.
Pro Tips For Making Vanilla Bean Custard Danish
- Chill the Dough: DESCRIPTION:
- Scald the Milk First: DESCRIPTION:
- Brush Butter Thin: DESCRIPTION:
- Seal the Custard Tight: DESCRIPTION:
Storing and reheating this recipe
Refrigerator Storage
Store your baked Danish in an airtight container at room temperature for up to 2 days if you prefer them slightly warmer. For longer refrigeration (up to 5 days), place them in the fridge wrapped in plastic wrap or aluminum foil to maintain moisture.
The custard filling stays creamy when refrigerated, though the layers may firm up slightly—reheat briefly to restore tenderness. 🧊
Freezer Preservation
For maximum freshness, freeze your Danish in single-serving portions wrapped tightly in plastic wrap followed by a layer of foil. This prevents freezer burn and preserves the custard's texture for up to 2 months.
Thaw overnight in the fridge or at room temperature for 1-2 hours before serving to avoid sogginess. The custard may separate slightly after freezing—gently reheat to restore its silky consistency.
Oven Reheating
Preheat your oven to 350°F and place the Danish on a baking sheet. Cover loosely with foil to prevent over-browning. Reheat for 8-10 minutes until warmed through and the custard is slightly jiggly in the center.
This method ensures even heating without drying out the layers. For extra decadence, brush with a little heavy cream before reheating to restore moisture. 🔥
Microwave Method
For quick reheating, place a single slice on a microwave-safe plate and cover with a damp paper towel. Heat on 50% power for 20-30 seconds, then check the custard's consistency.
If needed, continue in 5-second intervals until warmed to 165°F internally. Avoid overcooking—the custard should remain velvety, not rubbery. This method works best for single servings and preserves the delicate texture.
Caramel Drizzle Revival
If your Danish loses its caramel drizzle during storage, restore it by melting 2 tbsp coarse sugar with 1 tbsp water in a small saucepan over medium heat. Stir constantly until golden amber, then drizzle over the warmed Danish just before serving.
This step elevates presentation and adds a buttery-sweet contrast to the vanilla custard. Pair with a sprinkle of flaky sea salt for balance. ✨
Custard Consistency Fix
If the custard appears too thick after reheating, stir in 1 teaspoon warm milk or heavy cream to restore smoothness. For a runny custard, chill the Danish for 10 minutes before serving to firm it up slightly.
The key is temperature control—never reheat above 350°F to prevent curdling. A quick 10-second blast in the microwave can also help reset the texture if needed.
Nutrition facts
Frequently asked questions
Why does this custard Danish need overnight dough resting?
The overnight rest in the fridge develops deeper flavor and improves texture by allowing gluten to relax. This prevents tough layers and ensures the butter melts evenly during baking. For best results, don't skip this step—it's what makes the difference between homemade and bakery-quality!
Can I substitute vanilla extract for vanilla bean pods?
Yes, but you'll lose the visible seeds and some depth of flavor. Use 2 teaspoons pure Madagascar vanilla extract (not imitation) and add a pinch of ground vanilla bean seeds for visual appeal. The custard will still taste amazing, just without the signature speckled look.
What if my custard filling is too thick or too thin?
For thin custard, cook it longer until it reaches 170°F and coats the spoon. For thick custard, thin with 1 teaspoon warm milk while stirring. The ideal consistency should be like thick pudding but still pourable. Always stir constantly to prevent lumps!
How do I prevent the custard from leaking during baking?
Chill the custard completely before spreading, leave a 1-inch border of dough, and seal the seam tightly when rolling. Bake at 350°F until set (internal temp 190°F) but not overbaked. The custard should be just slightly jiggly in the center when done.
Can I make this Danish without yeast?
This recipe relies on yeast for the signature tender, pillowy texture. For a quick version, you could use puff pastry instead, but the flavor and texture won't be the same. The yeast dough creates those irresistible flaky layers that pair perfectly with the custard.