
Side Dishes
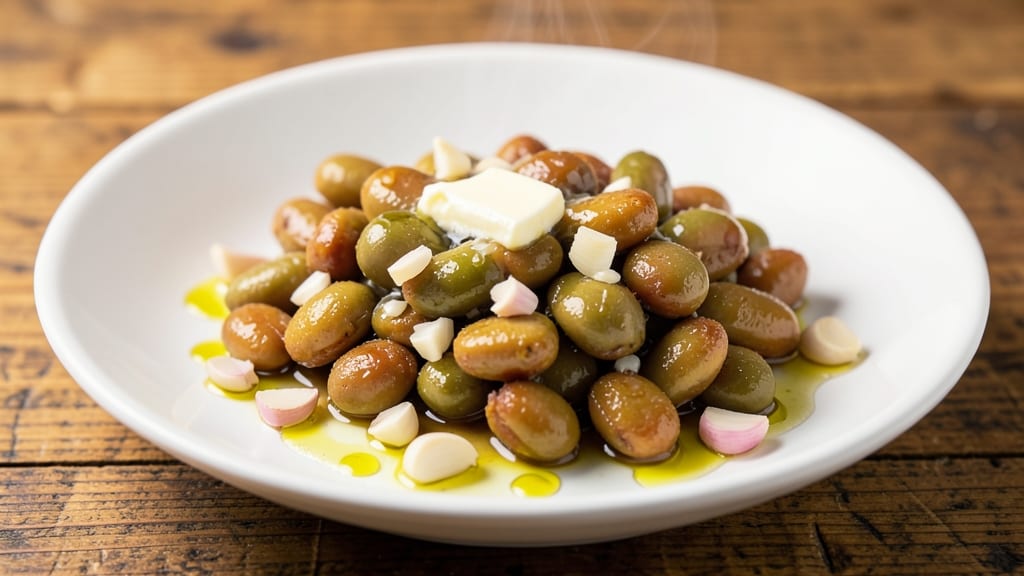
Transforming canned broad beans into a lemon-garlic roast with buttery crisp edges is one of those culinary discoveries that turns a simple pantry staple into something extraordinary. The secret lies in the technique—roasting the beans until their edges develop that irresistible crunch while keeping their centers tender.
I first tried this after discovering how canned broad beans could elevate a vegetarian meal without overpowering the dish.
This recipe delivers restaurant-quality results in just 30 minutes using simple ingredients you likely already have. The lemon-garlic marinade infuses the beans with bright, zesty flavor, while the butter creates that perfect crispy texture that makes every bite satisfying.
It’s a vegetarian-friendly side dish that pairs beautifully with grilled fish, roasted chicken, or even as a standalone appetizer.
What you’ll end up with is a vibrant, flavorful dish that’s crisp on the edges and tender inside, drizzled with a buttery lemon-garlic glaze. The aroma alone will have everyone at the table asking for seconds.
This recipe is foolproof, requiring minimal effort but delivering maximum flavor—ideal for those who want a quick yet impressive side dish without sacrificing quality.
Serve it warm alongside your favorite main course or use it as a topping for salads and grain bowls. The versatility of this dish makes it perfect for weeknight dinners or special occasions. Let’s get started on creating this delicious, crispy, and satisfying side dish!
Ingredients for canned broad beans
Simple pantry staples and fresh flavors transform canned broad beans into a restaurant-worthy side dish.
| Ingredient | Amount | Notes |
|---|---|---|
| Canned Broad Beans 🌱 | 2 cups | Drained and rinsed thoroughly |
| Extra-Virgin Olive Oil 🫒 | ¼ cup | For roasting and crisping edges |
| Unsalted Butter 🧈 | 2 tbsp | Full-fat for rich flavor |
| Fresh Lemon Juice 🍋 | 2 tbsp | Freshly squeezed, zesty |
| Garlic Cloves 🧄 | 4 cloves | Minced finely for infusion |
| Diamond Crystal Kosher Salt 🧂 | 1 ½ tsp | For seasoning and balance |
| Freshly Ground Black Pepper 🌶️ | ½ tsp | Freshly cracked for aroma |
| Fresh Parsley 🌿 | ¼ cup | Chopped for garnish |
| Lemon Zest 🍋 | 1 tsp | Brightens the dish |
| Vegetable Oil Spray 🫒 | 1 tbsp | For even crisping |
| Red Bell Pepper 🌶️ | ½ cup | Diced for color and crunch |
| Red Onion 🧅 | ¼ cup | Finely chopped for depth |
| Vegetable Broth 💧 | ¼ cup | For extra moisture |
The broad beans are the star, so start with quality. Trader Joe's or Whole Foods carry the best canned varieties—look for beans that are plump and firm, not mushy. If your local grocery store doesn’t have them, Amazon Prime Pantry delivers in a pinch. Fresh parsley and lemon juice are non-negotiable for that bright finish. I always grab a whole lemon (not bottled juice) and zest it myself—it makes a world of difference. For the garlic, freshly minced is key; pre-minced garlic loses its punch fast. The red bell pepper and onion add color and crunch, but you can skip them if you're keeping it simple.
No fresh parsley? Dried parsley at half the amount works in a bind, though it won’t have the same pop. Short on lemon juice? Substitute lime juice—it’s tangier and pairs beautifully. The vegetable broth can be swapped for white wine or apple cider> if you’re feeling fancy. For the butter, full-fat is a must>—it’s what creates those crispy edges. If you’re avoiding dairy, vegetable shortening or coconut oil> can mimic the texture, though the flavor won’t be identical. The broad beans should be drained and rinsed thoroughly to remove any canned liquid—this prevents a watery dish.
This dish reheats beautifully, so make extra. Store leftovers in an airtight container for up to 4 days> in the fridge. For longer storage, freeze portions for up to 3 months>. I like to portion it into small containers so I can grab a serving straight from the fridge. The crispy edges soften when reheated, so I always roast a fresh batch when serving. Garnish with extra parsley and lemon zest right before eating—it keeps everything vibrant. This dish is perfect for meal prep because the flavors only get better as they meld together.
Why You'll Love This Recipe
- No-Chop Necessary: I swear by this recipe because it’s the rare one where you don’t have to peel or prep a thing—just drain, toss, and cook. The canned beans save me 20 minutes of scrubbing skins off, and honestly? The texture’s just as good.
- Garlic-Oil Magic: That moment when you crush fresh garlic into warm olive oil and butter? Pure satisfaction. The broad beans soak it up like a sponge, turning into tender, buttery bites with a bright lemon kick—simple, but ridiculously flavorful.
- Lunchbox Hero: Between us, this is my go-to for meal prep. Toss the cooked beans with a little extra olive oil and lemon before packing, and they stay fresh for days. Cold or warm, they’re a hit with kids (yes, even picky eaters) and adults alike.
- Budget Brightener: A can of broad beans, a head of garlic, and a lemon? That’s it. No fancy ingredients, no wasted money—just a dish that feels special without breaking the bank. Leftovers? Even better the next day, if you can resist eating them all.
Step-by-step instructions for lemon-garlic roasted canned broad beans
Here's how to transform simple canned broad beans into a restaurant-worthy dish with crisp edges and bright, zesty flavors.
Prep the Broad Beans for Maximum Crispiness
Drain and thoroughly rinse the 2 cups canned broad beans under cold water to remove any residual canning liquid. Pat them completely dry with paper towels—this step is crucial for achieving those crisp edges later. I like to spread them on a clean kitchen towel and press gently to evaporate any remaining moisture. The drier they are, the better they'll roast.
While the beans dry, prepare the aromatics. Finely mince the 4 cloves garlic cloves and dice the 0.5 cup red bell pepper into small, even pieces. Thinly slice the 0.25 cup red onion and chop the 0.25 cup fresh parsley into small sprigs. Set these aside—they'll add layers of flavor as the beans roast. The bell pepper and onion will caramelize slightly during cooking, deepening their sweetness and adding texture contrast.
Roast for Deep Flavor and Crisp Edges
Preheat your oven to 425°F and line a large baking sheet with parchment paper. Arrange the dried broad beans in a single layer, leaving about ½ inch between each bean. This spacing ensures even browning and crisping. Lightly spray the beans with the 1 tablespoon vegetable oil spray, then drizzle evenly with the 0.25 cup extra-virgin olive oil. Toss gently to coat.
Spread the beans back on the baking sheet and roast for 20 minutes, stirring halfway through the cooking time. You're looking for beans that develop golden-brown spots and begin to crisp at the edges. This high heat transforms their texture from soft to delightfully crunchy. The olive oil will infuse them with rich flavor while preventing dryness. If your oven runs hot, check at the 15-minute mark to avoid over-browning.
Build the Flavor Base with Garlic and Vegetables
While the beans roast, melt the 2 tablespoons unsalted butter in a large skillet over medium heat. Add the minced garlic and cook for 30 seconds until fragrant—don't let it brown, or it'll turn bitter. Add the diced red bell pepper and red onion, cooking for 4-5 minutes until softened and slightly caramelized. This step develops their natural sweetness and creates a flavorful base for the beans.
Pour in the 0.25 cup vegetable broth and scrape up any browned bits from the bottom of the pan. These bits, called fond, are packed with flavor. Simmer for 2 minutes until the liquid reduces slightly. Remove from heat and stir in the 2 tablespoons fresh lemon juice and 1 teaspoon lemon zest. The acidity brightens the dish and balances the richness of the butter and beans.
Combine and Finish with Fresh Herbs
Transfer the roasted broad beans to the skillet with the garlic-vegetable mixture. Toss everything together gently, coating the beans evenly in the flavorful sauce. Sprinkle with the 1.5 teaspoons diamond crystal kosher salt and 0.5 teaspoon freshly ground black pepper, then fold in the 0.25 cup chopped fresh parsley. The parsley adds a fresh, herbal note that cuts through the richness.
Let the mixture sit off the heat for 2-3 minutes to allow the flavors to meld. The beans should be tender-crisp with a glossy sheen from the sauce. If the mixture seems too thick, add a splash of water or the reserved lemon juice to loosen it. Serve immediately while the beans are still crisp and the flavors are vibrant. This dish pairs beautifully with crusty bread or as a side to grilled proteins.
Pro Tips For Making Canned Broad Beans
- Drain and Rinse Well: Canned broad beans hold onto their brine like it’s their last lifeline. Dump them into a colander and give them a thorough rinse under cold water—especially if the canning liquid tastes too salty or metallic. I learned this the hard way when my first batch ended up tasting like a pickle instead of a dish.
- Sauté Garlic Low and Slow: Tossing minced garlic into hot oil at high heat turns it bitter faster than you can say "burnt." For broad beans, keep the heat at medium-low and stir constantly—just until the edges turn golden, not brown. The goal is aroma, not color.
- Pat Beans Dry Before Cooking: Wet broad beans steam instead of sear, and that’s a missed opportunity. After draining, spread them on a clean towel and blot them dry with another towel. This guarantees better contact with your olive oil and butter, so they crisp up nicely instead of turning soggy.
- Finish with Zest, Not Just Juice: Lemon juice brightens the dish, but the zest adds texture and depth that juice alone can’t match. Use a microplane to add a teaspoon of zest at the end—it’s the difference between a simple side and something that feels special. (Yes, even if you’re impatient like me.)
Flavor customization for this dish
Zesty Lemon Variations
Brighten the dish further by adding ½ tsp grated orange zest along with the lemon zest—it adds a citrusy complexity that pairs beautifully with the garlic. For a sweeter twist, substitute 1 tbsp honey> for the lemon juice in the final sauce.
This caramelizes slightly when tossed with the beans, creating a sticky, glossy finish. I’ve also found that a splash of 1 tsp elderflower liqueur> (like St-Germain) enhances the floral notes of the lemon and parsley.
Herb Swaps and Boosts
Fresh parsley works perfectly, but don’t hesitate to experiment with other herbs. Try chopped dill> for a brighter, more anise-like flavor, or thyme sprigs> for an earthy depth. For a Mediterranean touch, add ½ tsp dried oregano> to the roasting oil.
If you love heat, toss in ½ tsp red pepper flakes> with the salt and pepper—it adds a subtle kick that complements the crispy edges.
Umami Depth Additions
For extra richness, stir in 1 tbsp soy sauce> or 1 tsp fish sauce> (if vegetarian, use coconut aminos) into the garlic-vegetable mixture. This enhances the savory notes and balances the acidity of the lemon. Another trick?
Add 1 tbsp nutritional yeast> at the end—it adds a cheesy, umami punch without dairy. I also love sprinkling ½ tsp smoked paprika> over the roasted beans before tossing with the sauce for a subtle smokiness.
Sweet and Savory Twist
For a dessert-like side, swap the lemon juice for 1 tbsp balsamic glaze> and add 1 tbsp brown sugar> to the roasting oil. The caramelized sugar creates a sticky, slightly sweet glaze that contrasts beautifully with the crispy edges.
Top with toasted pine nuts> or crumbled feta> for texture. This version works surprisingly well as a breakfast side with scrambled eggs or avocado toast.
Spicy and Tangy Fusion
Infuse the olive oil with 1 minced jalapeño> before roasting the beans for a subtle heat. After tossing with the sauce, garnish with pickled jalapeño slices> and a drizzle of chipotle-honey sauce>. The tangy-sweet-spicy combo elevates the dish into a flavor bomb.
For a North African twist, add ½ tsp ground cumin> and ½ tsp coriander> to the roasting oil and finish with toasted cumin seeds> on top.
Creamy and Rich Upgrade
For a decadent finish, stir in 2 tbsp crème fraîche> or Greek yogurt> after removing the skillet from heat. This adds a silky texture that contrasts with the crispy beans.
For extra richness, fold in 1 tbsp mascarpone cheese> and a pinch of cardamom>—the floral spice pairs surprisingly well with the lemon. This version feels luxurious but still quick to prepare.
Nutrition facts
Frequently asked questions
Can I use fresh broad beans instead of canned?
Fresh broad beans require shelling and blanching first. Peel the beans after blanching to remove their tough skins, then follow the same roasting method. Fresh beans have a slightly different texture—softer and less crispy than canned—but they work well in this recipe. Just adjust cooking time by 5-7 minutes longer to ensure tenderness.
How do I store leftovers?
Store in an airtight container in the fridge for up to 4 days. The crispy edges will soften slightly, but reheating in a skillet with a splash of water or broth restores some crunch. For longer storage, freeze portions for up to 3 months. Thaw overnight in the fridge before reheating.
What if my beans aren't crispy?
Overcrowding or moisture are the usual culprits. Ensure beans are completely dry before roasting and space them ½ inch apart on the baking sheet. For extra crispiness, broil for 1-2 minutes at the end (watch closely!). If using fresh beans, reduce roasting time by 3-5 minutes to prevent overcooking.
Are there gluten-free options?
This recipe is naturally gluten-free! Just confirm your vegetable broth and kosher salt are certified gluten-free. The butter, lemon, and herbs are all safe. For extra assurance, use tamari instead of soy sauce if adding umami depth. The dish remains light and flavorful without any gluten-containing ingredients.
Can I make this ahead for a party?
Assemble everything except the final toss with parsley. Store components separately in the fridge for up to 2 days. When ready to serve, roast the beans fresh, then combine with the pre-made sauce and herbs. This keeps the crispy texture intact and allows for easy reheating. Garnish with fresh parsley just before serving to maintain vibrancy.