
Side Dishes
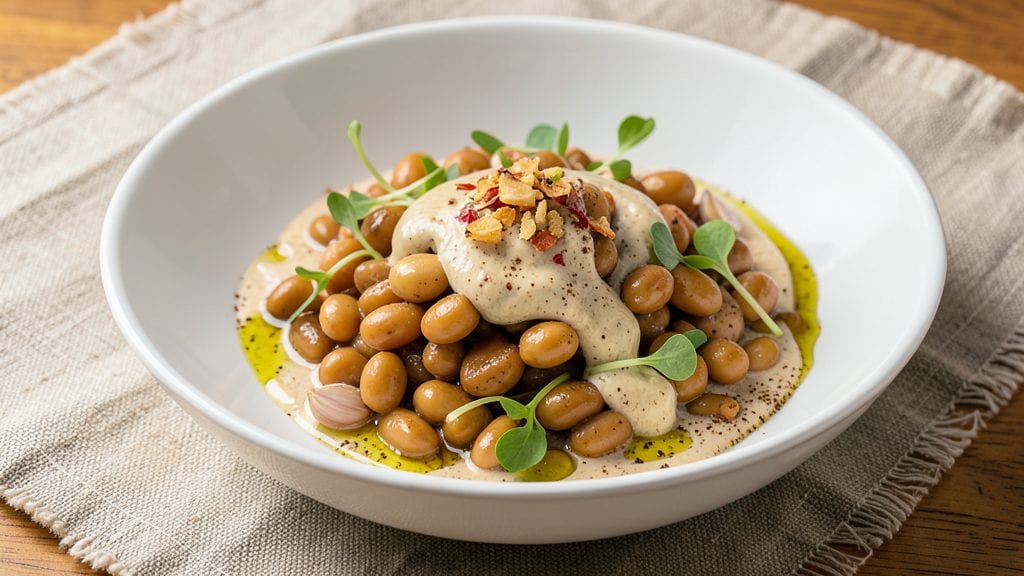
Transforming canned cannellini beans into this garlicky lemon hummus with crispy pita topping proves you don’t need fancy ingredients for restaurant-quality results. The secret lies in blending canned beans with fresh lemon juice and garlic, then topping with perfectly toasted pita for crunch—no special equipment required.
I developed this recipe after realizing how versatile canned beans can be when paired with bright, simple flavors.
This hummus delivers a creamy, tangy texture with a satisfying crunch from the pita topping, making it ideal for dipping, spreading, or serving as a vegetarian main.
The recipe takes just 10 minutes of active prep time, with most of the work done by the food processor while you toast the pita. Perfect for meal prep or last-minute appetizers, this dish highlights how canned beans can elevate everyday meals with minimal effort.
What sets this recipe apart is the balance of flavors—zesty lemon brightens the earthy beans, while garlic adds depth without overpowering. The crispy pita topping, seasoned with smoked paprika and salt, provides a satisfying contrast to the smooth hummus.
This vegetarian dish is hearty enough for a light lunch or a snack that feels like a meal.
Serve with fresh vegetables, warm pita bread, or as a dip for crudités. The recipe scales easily, so you can make a small batch for two or double it for a crowd.
Here’s how to create this flavorful, textured hummus that proves canned beans can be just as impressive as their dried counterparts.
Ingredients for canned cannellini beans
Simple pantry staples transform into a restaurant-worthy hummus with bold lemon and garlic flavors.
| Ingredient | Amount | Notes |
|---|---|---|
| Canned Cannellini Beans 🌱 | 15 oz | Drained and rinsed thoroughly |
| Extra-Virgin Olive Oil 🫒 | ½ cup | High-quality, fruity variety |
| Fresh Lemon Juice 🍋 | 3 tbsp | Freshly squeezed from 1 lemon |
| Garlic Cloves 🧄 | 4 cloves | Peeled and roughly chopped |
| Tahini 🥜 | ¼ cup | Sesame paste for creaminess |
| Ground Cumin 🌿 | ½ tsp | Toasted for deeper flavor |
| Sea Salt 🧂 | ¾ tsp | Fine grain preferred |
| Smoked Paprika 🌶️ | ½ tsp | For subtle smokiness |
| Pita Bread 🍞 | 4 whole | Cut into triangles, toasted |
| Fresh Parsley 🌿 | ¼ cup | Chopped for garnish |
| Cold Water 💧 | 1 tbsp | As needed for blending |
The canned cannellini beans are the star here—look for low-sodium varieties to control salt levels better. Trader Joe's and Whole Foods carry high-quality canned beans with minimal additives. Fresh lemon juice is non-negotiable; bottled won't cut it. For garlic, roasted cloves add a subtle sweetness, but raw works perfectly fine too. The tahini should be smooth and free of grit—Kirkland Signature is a budget-friendly brand that works well. Toast the cumin seeds in a dry pan for 30 seconds before grinding to enhance their aroma.
No tahini? Substitute with 0.25 cup extra virgin olive oil—it won’t be as creamy, but still delicious. Short on lemon juice? Lime juice works in a pinch, though the flavor profile shifts slightly. The smoked paprika can be swapped for regular paprika if unavailable, but you’ll lose that subtle smokiness. For the pita topping, store-bought or homemade works equally well—just make sure it’s toasted until crispy. Fresh parsley is ideal, but dried oregano at one-third the amount will work in a bind. If your hummus is too thick, add cold water one tablespoon at a time until smooth.
This hummus keeps beautifully in an airtight container in the fridge for 5-6 days. The pita topping stays crispy for 2 days if stored separately in a sealed bag. For meal prep, portion the hummus into small containers and keep the pita topping in a separate container—re-toast before serving. Freezing isn’t recommended for the pita, but the hummus itself can be frozen for 3 months. Garnish with extra lemon zest or parsley just before serving to keep everything vibrant.
Why You'll Love This Recipe
- No-Chop Necessary: I swear by this—just drain the beans, crush a few garlic cloves, and whisk in the tahini. That’s it. No peeling, no chopping, no fuss. The canned beans save me 20 minutes of soaking time, and the tahini adds richness without extra effort.
- Bright & Creamy Magic: The tahini gives it that velvety texture, while the lemon juice cuts through the richness like a summer breeze. Honestly, the first time I tasted it, I thought, "Why didn’t I do this sooner?"—especially when I add a drizzle of olive oil at the end. It’s the kind of flavor that sticks with you.
- Weeknight to Potluck: This dip works as a quick snack, a side for grilled fish, or even a spread for toasted bread. I’ve taken it to dinner parties (yes, even the ones where I’m the only one who brought something edible) and it disappears faster than my willpower when I’m hungry.
- Budget-Friendly Pantry Hero: Cannellini beans are a steal, and tahini lasts forever. Between us, this recipe costs me less than $3 for a batch that feeds four—and still tastes like I slaved over it. Leftovers? Even better. They taste just as good the next day, reheated or cold.
Step-by-step instructions for garlicky lemon hummus with crunchy pita topping
Transform simple canned beans into a velvety, aromatic spread with this straightforward method.
Prepare the Base Ingredients
Begin by draining and thoroughly rinsing the 15 oz canned cannellini beans under cold water. This removes any residual canning liquid that could make your hummus watery. Transfer the beans to a food processor and add the 0.5 cup extra-virgin olive oil, 3 tablespoons fresh lemon juice, 4 peeled garlic cloves, 0.25 cup tahini, 0.5 teaspoon ground cumin, 0.5 teaspoon smoked paprika, and 0.75 teaspoon sea salt.
Here's the thing—don't skip rinsing the beans. Even though canned beans are convenient, the liquid contains starch that will turn your hummus into a gloopy mess. I always use a high-quality tahini for that authentic nutty depth, and fresh lemon juice makes all the difference over bottled.
Blend Until Smooth and Creamy
Pulse the food processor several times to break up the larger pieces, then switch to continuous blending. Add 1 tablespoon cold water as needed to help the mixture come together. Blend for 3-5 minutes until completely smooth, scraping down the sides with a spatula every 30 seconds to ensure even blending.
You'll know it's ready when the mixture becomes thick, glossy, and clings to the sides of the bowl. The texture should be like thick mayonnaise—neither too stiff nor too runny. If it's still too thick after blending, add water 1 teaspoon at a time until it reaches the perfect consistency. Don't over-blend or it may become greasy.
Adjust Seasoning and Texture
Taste the hummus and adjust seasoning if needed. I usually find the lemon and garlic need a little more salt at this point—add salt in small increments since it's easy to overdo. For extra brightness, add another tablespoon of fresh lemon juice. The hummus should be balanced between the earthy beans, nutty tahini, and bright citrus.
Transfer the hummus to a serving bowl and smooth the top with a spatula. Cover with plastic wrap pressed directly onto the surface to prevent a skin from forming. Let it rest at room temperature for 15-20 minutes before serving. This resting time allows the flavors to meld together perfectly.
Prepare the Crunchy Pita Topping
While the hummus rests, cut the 4 whole pita bread into triangles. Heat a skillet over medium heat and lightly brush each piece with a tiny amount of olive oil. Toast for 1-2 minutes per side until golden brown and crispy. Watch closely—they cook quickly and burn easily.
For extra flavor, sprinkle the toasted pita with a pinch of sea salt and a dusting of smoked paprika while still warm. The contrast between the creamy hummus and crispy pita is what makes this dish so satisfying. Keep the toasted pita warm in a 200°F oven while you finish assembling.
Serve With Fresh Garnish
Just before serving, chop the 0.25 cup fresh parsley into fine pieces. Drizzle the hummus with an additional teaspoon of extra-virgin olive oil and sprinkle with the parsley. The parsley adds a fresh, herbal note that cuts through the richness of the tahini and beans.
Serve the hummus immediately with the warm pita triangles on the side. The perfect ratio is about 2 tablespoons of hummus per serving with 2-3 pita pieces. This combination delivers a balance of textures—creamy, smooth, and crispy—that makes every bite satisfying. Store any leftovers in an airtight container in the refrigerator for up to 5 days, though it's rarely that good the next day!
Pro Tips For Making Canned Cannellini Beans
- Mash the Beans: Drain and rinse canned cannellini beans, then give them a quick mash with a fork or potato masher—just enough to break up the largest chunks. This ensures your tahini and olive oil blend smoothly instead of sitting in a pool of bean broth.
- Toast the Garlic Low: Sauté your garlic cloves in olive oil over low heat until golden, not brown. I learned this the hard way—burnt garlic turns bitter and overpowers the delicate tahini-lemon balance.
- Whisk Tahini First: Thin your tahini with a splash of warm water or lemon juice before adding it to the beans. This prevents clumps and guarantees a silky texture—no one wants to scrape tahini off their spoon.
- Acidify Gradually: Add lemon juice in stages, tasting between each. Too much at once curdles the tahini, and you’ll end up with a gloopy mess. Start with half the juice, let it sit, then adjust.
Best sauces and condiments for this dish
Lemon-Tahini Sauce
This bright lemon-tahini sauce takes the hummus to the next level by adding a silky, nutty dimension. Mix 2 tablespoons tahini with 1 tablespoon fresh lemon juice, 1 tablespoon extra-virgin olive oil, and ½ teaspoon ground cumin.
Thin with 1-2 tablespoons cold water until smooth, then drizzle over the hummus just before serving. The tahini creates a luxurious mouthfeel that complements the beans beautifully. 💛
Spicy Harissa Swirl
For heat lovers, blend 1 teaspoon harissa paste with 1 tablespoon olive oil and swirl it into the hummus using the back of a spoon. The smoky, spicy harissa adds depth without overpowering the lemon and garlic.
I like to sprinkle toasted cumin seeds on top for extra texture and aroma. This variation works especially well with warm pita triangles. 🌶️
Smoky Chipotle Aioli
Create a smoky chipotle aioli by blending 2 tablespoons mayonnaise with ½ teaspoon adobo sauce (from canned chipotles), ½ teaspoon smoked paprika, and a pinch of salt. Drizzle this over the hummus or serve it on the side for dipping.
The creamy, smoky contrast elevates the dish to restaurant-quality status. I often pair this with extra lemon zest for brightness. 🔥
Garlic-Yogurt Dip
For a lighter option, blend ½ cup Greek yogurt with 2 minced garlic cloves, 1 tablespoon lemon juice, 1 teaspoon olive oil, and ½ teaspoon salt.
This tangy dip can be served alongside the hummus or used as a substitute for some of the hummus in wraps. The yogurt adds a refreshing contrast to the rich beans. ✨
Olive Oil Infusions
Elevate your hummus with infused olive oils. Heat ½ cup olive oil with 1 teaspoon dried oregano and 1 crushed garlic clove for 5 minutes, then strain. Drizzle over the hummus before serving.
For a citrus twist, infuse oil with zest from 1 lemon and 1 teaspoon red pepper flakes for a bright, spicy finish. These infused oils add layers of flavor without extra effort. 🫒
Nutrition facts
Frequently asked questions
Can I use canned cannellini beans instead of dried?
Canned beans are perfect for this recipe—they save time and deliver consistent texture. Just be sure to rinse them thoroughly to remove excess sodium and starch that could make your hummus watery. The recipe was designed specifically for canned beans, so no adjustments are needed.
What if my hummus turns out too thick or too thin?
For thick hummus, add 1 teaspoon cold water at a time while blending until smooth. If it's too thin, blend in 1 tablespoon tahini or extra olive oil to bind it. The key is patience—adjust gradually to avoid overcorrecting. The ideal texture should be like thick mayonnaise.
Can I make this hummus without tahini?
Yes! Substitute 0.25 cup extra virgin olive oil for the tahini, though the texture will be slightly less creamy. For extra richness, add 1 tablespoon nut butter (like almond or cashew) to mimic tahini's depth. The flavor will still be delicious, just with a different mouthfeel.
How do I store leftovers to keep them fresh?
Transfer hummus to an airtight container and press plastic wrap directly on the surface to prevent a skin from forming. Store in the fridge for up to 5-6 days. For the pita topping, keep it in a sealed bag and re-toast before serving to restore crispiness. Freezing isn't recommended for the pita, but the hummus itself can be frozen for 3 months.
What are the best ways to serve this hummus?
This hummus pairs perfectly with warm pita triangles, crudité vegetables, or as a spread for sandwiches and wraps. For a heartier meal, serve with grilled chicken or falafel. The lemon and garlic flavors also make it great with roasted vegetables or as a dip for fresh bread. Get creative with your pairings!