
Side Dishes
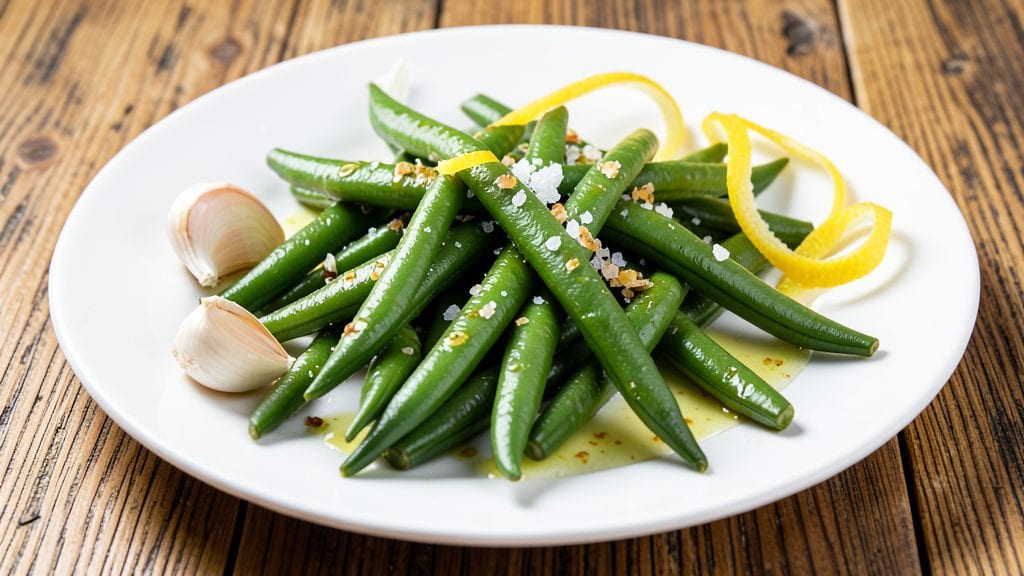
Transforming canned Italian green beans into a restaurant-worthy side dish is simpler than you think—this recipe delivers al dente crunch with bright garlic and lemon zest in just 15 minutes.
The secret lies in proper seasoning and a quick sauté that preserves their natural texture while infusing bold Italian flavors. I developed this method after realizing how often canned beans were overlooked in home cooking, and the results speak for themselves.
What sets this recipe apart is the balance of simplicity and sophistication—no fancy techniques required, just a sauté pan, olive oil, and fresh herbs.
The garlic and lemon zest create a bright, aromatic finish that elevates these humble green beans into something special, perfect for pairing with grilled meats, pasta, or roasted vegetables. The key is timing: just enough heat to warm through without losing that satisfying crunch.
By the end, you’ll have a side dish that’s crisp-tender, fragrant with garlic, and zesty from lemon—exactly what you’d expect from a fresh-picked Italian harvest. This recipe proves that canned ingredients can deliver restaurant-quality results with minimal effort. Let’s get cooking!
Serve immediately alongside your main course or store leftovers in the fridge for up to 3 days, reheating gently to maintain that perfect texture. The versatility makes it ideal for weeknight dinners or holiday spreads—simple yet impressive every time.
Ingredients for canned italian green beans
These twelve ingredients transform humble canned beans into restaurant-worthy Italian green beans with al dente crunch.
| Ingredient | Amount | Notes |
|---|---|---|
| Canned Italian Green Beans 🌱 | 14 oz | High-quality canned, drained well |
| Extra-Virgin Olive Oil 🫒 | 2 tbsp | Lightly fruity, high-quality |
| Garlic Cloves 🧄 | 4 cloves | Fresh, minced finely |
| Lemon Zest 🍋 | 1 tbsp | Fresh, finely grated |
| Fresh Lemon Juice 🍋 | 1 tbsp | Freshly squeezed |
| Kosher Salt 🧂 | ½ tsp | Diamond Crystal preferred |
| Fresh Flat-Leaf Parsley 🌿 | ¼ cup | Chopped finely, stems removed |
| Fresh Basil Leaves 🌿 | ⅛ cup | Torn, not chopped |
| Red Pepper Flakes 🌶️ | ¼ tsp | Optional, for heat |
| Black Pepper 🌶️ | ¼ tsp | Freshly cracked |
| Dried Italian Seasoning 🌿 | ¼ tsp | Or make your own blend |
| Unsalted Butter 🧈 | 1 tbsp | Cold, for finishing |
The quality of your canned beans matters more than you’d think. Mutti or Bonduelle brands deliver the best texture—look for cans labeled 'Italian-style' with no added salt. Fresh herbs elevate the dish significantly; Whole Foods or local farmers' markets offer the brightest parsley and basil. If you’re short on time, dried Italian seasoning works, though fresh basil and parsley provide that authentic Italian touch. Garlic should be fresh, with no green shoots—it’s the aromatic backbone of this dish. For lemon zest, use the outer layer only; the white pith is bitter and detracts from the bright flavor profile.
No extra-virgin olive oil? Light olive oil works in a pinch, though it lacks the fruity depth. Substitute fresh lemon juice with bottled lemon juice if needed, but fresh is always preferred. If you’re avoiding garlic, asafetida powder at a 1:4 ratio mimics its savory depth. For those who prefer no heat, simply omit the red pepper flakes—this dish still shines without them. The Italian seasoning can be homemade by blending dried basil, oregano, thyme, and rosemary in equal parts. When selecting butter, Plugrá or Land O’Lakes are reliable choices for that rich, clean finish.
Store leftovers in an airtight container in the refrigerator for up to 3 days, though they’re best enjoyed fresh. To reheat, gently warm in a sauté pan with a splash of water to maintain that crisp-tender texture. The dish freezes poorly, as the beans lose their al dente quality. For optimal freshness, prepare just before serving—this recipe is designed for minimal effort with maximum impact. The combination of garlic, lemon, and herbs keeps well for 2 days in the fridge if prepped separately, allowing you to assemble just before cooking.
Why You'll Love This Recipe
- No-Chop Necessary: I swear by this trick—just drain the beans, toss them in a pan with olive oil and garlic, and let the heat do the work. No knife skills required, no fuss.
- Garlic-Lemon Magic: That bright lemon zest and fresh juice cut through the richness of the olive oil, while the garlic adds this warm, savory punch. It’s the kind of flavor that makes you reach for seconds without thinking.
- Weeknight to Potluck: Same five ingredients, but it works as a side for grilled chicken, a light lunch with crusty bread, or even a last-minute potluck dish. Honestly, I’ve served it at everything from family dinners to book club gatherings.
- Budget-Friendly Staple: Canned beans mean no wasted trips to the store, and the ingredients cost pennies. I make a big batch on Sundays, and it lasts me all week—sometimes even longer, because it’s that good.
Step-by-step instructions for canned Italian green beans with garlic and lemon zest
This method transforms simple canned green beans into a vibrant, restaurant-worthy side dish with bright citrus and aromatic garlic.
Prepare the Green Beans
Drain the 14 oz canned Italian green beans thoroughly and rinse under cold water to remove any residual sodium. I like to give them a quick shake in a colander to eliminate excess moisture—this ensures they'll crisp up properly during cooking rather than steam. Pat them dry gently with paper towels if needed, focusing on the thicker stems where water tends to cling.
Transfer the drained beans to a large bowl and set aside. The key here is to work quickly—once you start cooking, the garlic will release its aroma and the lemon will brighten the dish, so have everything prepped before you begin. This is where proper mise en place makes all the difference in professional results.
Sauté the Garlic and Build the Flavor Base
Heat the 2 tbsp extra-virgin olive oil in a large skillet over medium heat. Add the 4 minced garlic cloves and cook for 1-2 minutes until they become fragrant but haven't yet begun to brown. The moment they turn golden, remove the pan from heat immediately—burnt garlic will dominate the dish with bitterness rather than its sweet, mellow flavor.
Return the skillet to medium-low heat and add the 1 tbsp lemon zest, stirring constantly for 30 seconds to infuse the oil with its bright citrus notes. This step is where the magic happens—those tiny zest particles will cling to the beans, adding a subtle but noticeable brightness that cuts through the richness of the olive oil.
Cook the Green Beans to Perfect Al Dente Texture
Add the prepared green beans to the skillet along with the 0.5 tsp kosher salt, 0.25 tsp black pepper, 0.25 tsp dried Italian seasoning, and 0.25 tsp red pepper flakes (if using). Stir gently to combine, then increase heat to medium-high and cook for 4-5 minutes, stirring occasionally. You're looking for beans that maintain their bright green color and crisp texture—this indicates they're cooked al dente.
Here's the thing—canned beans cook faster than fresh, so keep a close eye on them. The moment they begin to soften noticeably (you'll see them lose some of their snap when you press between your fingers), remove them from heat. Overcooking turns them mushy, and we're aiming for that satisfying crunch that makes this dish so appealing.
Finish with Fresh Herbs and Butter
Transfer the cooked green beans to a serving bowl and stir in the 0.25 cup chopped fresh flat-leaf parsley and 0.125 cup torn fresh basil leaves. Their vibrant colors and fresh aromas will elevate the dish from simple to sophisticated. Meanwhile, return the skillet to low heat and add the 1 tbsp unsalted butter, allowing it to melt completely.
Pour the melted butter over the green beans along with the 1 tbsp fresh lemon juice, tossing gently to distribute evenly. The butter adds richness that balances the acidity of the lemon, while the fresh herbs provide a final aromatic punch. Taste and adjust seasoning if needed—you might find the beans need a touch more salt to harmonize all the flavors.
Serve Immediately for Maximum Freshness
Serve the green beans while still warm, ideally within 10 minutes of cooking. The contrast between the crisp-tender beans, bright citrus, and aromatic herbs makes this dish shine as a side for grilled meats, roasted fish, or even as a vegetarian main with crusty bread. The residual heat from serving will continue to develop the flavors, so don't let them sit at room temperature for long.
For an extra touch, garnish each serving with an additional sprinkle of lemon zest and a few torn basil leaves. This presentation not only looks beautiful but also ensures every bite delivers that perfect balance of crunch, brightness, and herbal notes that define this classic Italian preparation.
Pro Tips For Making Canned Italian Green Beans
- Drain and Rinse Right: Open the can and dump the beans straight into a colander—no need to transfer. Give them a quick cold-water rinse if the liquid tastes overly briny, but skip this if the beans are packed in a light brine (check the label). I learned this the hard way: ignoring the rinse step makes the dish taste like a salt lick.
- Toast the Garlic Low: Sauté the minced garlic in olive oil over medium-low heat until it’s golden, not browned. High heat burns garlic faster than you can blink, turning it bitter. My grandmother swore by this, and she was right: the flavor stays bright and sweet, not smoky.
- Zest Before Juicing: Use a microplane to zest the lemon before juicing—it’s faster and gives you fresh, aromatic zest without the risk of seeds or pith sneaking in. Save the juice for later and store it in the fridge; zest loses potency after a few hours. (Yes, even if you’re impatient like me.)
- Finish with Oil: Drizzle the last tablespoon of olive oil over the warm beans at the very end—this coats them evenly and makes every bite silky. Cold oil won’t distribute, and skipping this step leaves the dish feeling dry. Does it look weird? Yes. Does it work? Every single time.
Make-ahead tips for leftovers
Prep Ahead Components
Start by prepping the garlic, lemon zest, and fresh herbs a day ahead and storing them in an airtight container in the fridge. This saves time and ensures maximum freshness when you're ready to cook.
I like to keep the minced garlic in a small jar with a splash of olive oil to preserve its flavor, and store the lemon zest and herbs separately in a sealed container with a paper towel to absorb moisture. 🧄
Partial Cooking Method
For a true make-ahead solution, partially cook the green beans and store them separately from the flavor components. After draining the 14 oz canned beans, rinse and pat them dry, then store in a sealed container in the fridge for up to 2 days.
When ready to serve, simply sauté them with the prepped garlic, lemon, and herbs for just 3-4 minutes—this maintains that perfect al dente texture while letting you assemble at the last minute.
Flavor Base Prep
Create a garlic-lemon oil infusion ahead of time by combining 2 tbsp extra-virgin olive oil, 4 minced garlic cloves, and 1 tbsp lemon zest in a small jar. Store this flavorful oil in the fridge for up to 3 days.
When cooking, simply heat this pre-made mixture in your skillet and add the beans directly—this cuts your active cooking time to just 5 minutes while keeping the flavors vibrant. 🍋
Reheating Strategy
If you've already cooked the beans completely, store them in an airtight container for up to 3 days. To reheat, transfer them to a skillet with 1 tbsp fresh butter and warm over medium-low heat for 2-3 minutes, adding a splash of water if needed.
The butter helps restore moisture and richness, while the quick heat prevents the beans from becoming soggy. This method maintains that satisfying crunch you worked so hard to achieve.
Herb Blend Shortcut
Make a pre-mixed herb blend using 0.25 cup chopped parsley and 0.125 cup torn basil stored in a small container with a sprinkle of salt. This blend keeps well in the fridge for 3 days and can be added directly to the beans at the last minute.
For an extra flavor boost, add 0.25 tsp dried Italian seasoning to the mix—this ensures every bite has that authentic Italian touch without requiring fresh herbs at serving time.
Complete Meal Prep
For a full meal prep solution, combine all the ingredients except the butter and lemon juice in a large airtight container, storing them separately. When ready to serve, simply toss everything together, add the butter and lemon juice, and warm through.
This approach works best for 1-2 days of storage, as the fresh herbs will start to lose their vibrancy after that. The key is keeping the beans and flavor components separate until the final moment to preserve texture and freshness. ✨
Nutrition facts
Frequently asked questions
Can I use frozen Italian green beans instead of canned?
Frozen beans work perfectly, but adjust the cooking time to 3-4 minutes over medium-high heat—they'll need slightly less time than canned to maintain their crisp texture. Just make sure to thaw them first in cold water for 5 minutes before cooking to ensure even heating. The flavor profile remains identical, though canned beans have a slightly firmer bite.
What's the best way to store leftovers?
Store cooked green beans in an airtight container in the fridge for up to 3 days. To reheat, warm them gently in a skillet with 1 tbsp butter and a splash of water over medium-low heat for 2-3 minutes. This prevents them from becoming mushy while restoring their crisp-tender texture. Never microwave—they'll turn soggy!
Can I make this recipe without fresh herbs?
Yes, but the flavor will be less vibrant. Substitute with 0.5 tsp dried parsley and 0.25 tsp dried basil, or use 0.25 tsp dried Italian seasoning for a balanced herbal note. For extra depth, add 0.25 tsp dried oregano—it mimics the complexity of fresh basil. The dish will still taste great, just with a more subdued herbal profile.
Why did my green beans turn mushy?
Overcooking is the most common cause—canned beans cook faster than fresh, so watch them closely! Remove them from heat the moment they begin to soften (4-5 minutes max). Another culprit is excess moisture: always drain and pat the beans dry before cooking. If reheating, add just a splash of water to prevent steam from turning them limp. The goal is al dente crunch, not mush!
What's the best way to serve these green beans?
Pair them with grilled meats like chicken or fish, or serve alongside pasta dishes for a complete Italian meal. For a vegetarian option, toss with crusty bread and a simple tomato sauce. The bright lemon and garlic flavors also complement roasted vegetables or polenta beautifully. Garnish with extra lemon zest and herbs right before serving to keep everything fresh and vibrant.