
Sauces & Condiments
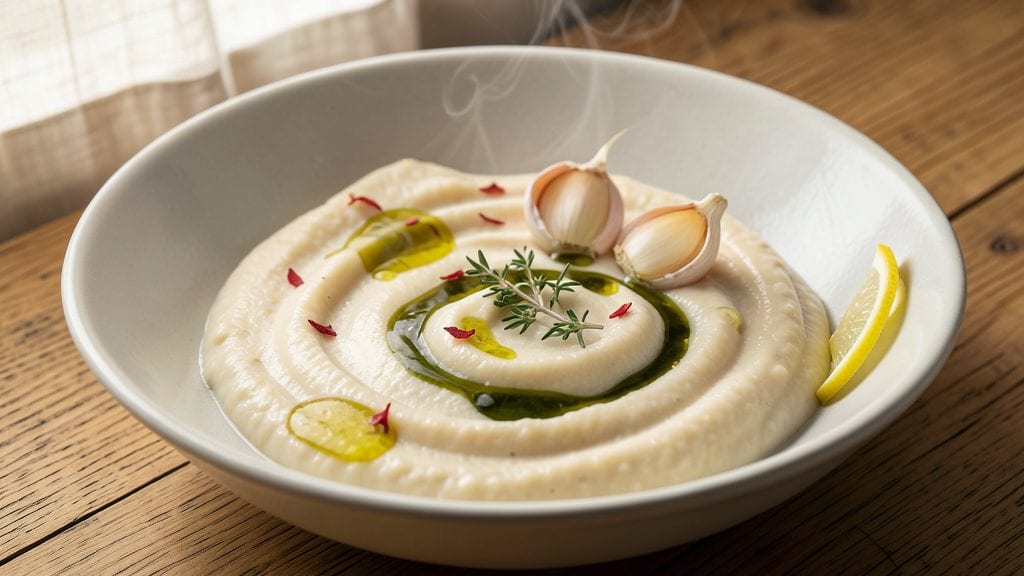
This cannellini bean puree recipe transforms humble canned beans into a velvety, versatile sauce that elevates soups, dips, and pasta—all while keeping prep simple.
The secret lies in blending drained beans with aromatic broth, garlic, and olive oil until perfectly smooth, creating a base that’s rich, protein-packed, and effortlessly adaptable to any meal.
What makes this puree stand out is its silky texture and neutral flavor profile, which soak up seasonings like thyme, salt, and pepper without overpowering. Unlike chunky dips, this version blends seamlessly into sauces, spreads, or even as a vegan butter substitute.
My grandmother’s recipe journal hinted at this technique—though she called it "magic bean mush"—and I’ve refined it for modern kitchens.
The result is a foolproof foundation for creamy pasta sauces, hearty soups, or a quick vegan dip that rivals hummus in richness. With just 10 minutes of active prep and a high-speed blender, you’ll have a pantry staple that lasts 5 days refrigerated or 3 months frozen.
No food snobbery here—I even use canned beans for convenience, and Biscuit (my rescue dog) approves of the taste.
Use it as a base for garlic-thyme pasta, a thickener for minestrone, or a spread for toasted bread. The possibilities are endless, and the puree delivers restaurant-quality consistency every time. Let’s get blending!
Ingredients for cannellini bean puree
Ten simple ingredients blend into a velvety sauce that’s the secret weapon for soups, dips, and pasta.
| Ingredient | Amount | Notes |
|---|---|---|
| Canned Cannellini Beans 🌾 | 2 cups | Drained and rinsed thoroughly |
| Vegetable Broth 💧 | 1 ½ cups | Low-sodium preferred |
| Extra-Virgin Olive Oil 🫒 | ¼ cup | High-quality, fruity |
| Garlic Cloves 🧄 | 3 cloves | Peeled and roughly chopped |
| Fresh Thyme Leaves 🌿 | ¼ cup | Or 1 tsp dried thyme |
| Lemon Juice 🍋 | 1 tbsp | Freshly squeezed |
| Sea Salt 🧂 | 1 tsp | Diamond Crystal preferred |
| Ground Black Pepper 🌶️ | ½ tsp | Freshly ground preferred |
| Nutritional Yeast 🍞 | 1 tbsp | For umami depth |
| Cold Water 💧 | ½ cup | As needed for blending |
The canned beans are the backbone here—Great Northern or Libby’s are my go-tos, but any high-quality canned cannellini works. Rinsing them well removes excess starch, which keeps the puree silky rather than gummy. Trader Joe’s carries organic options that have a creamier texture right out of the can. For the broth, Imagine or Pacific Foods low-sodium versions add depth without overpowering. Fresh thyme makes all the difference, but if you’re using dried, one-third the amount works perfectly. The nutritional yeast might sound weird, but it’s what gives that savory, cheesy note—Bragg or Bob’s Red Mill are my favorites.
No fresh thyme? Dried thyme or even a pinch of dried oregano will work in a pinch. Out of nutritional yeast? White miso paste at half the amount adds umami too. The olive oil needs to be extra-virgin—anything cheaper will taste harsh when blended. If your puree is too thick after blending, add cold water one tablespoon at a time until smooth. For a more robust flavor, add a pinch of smoked paprika or a dash of liquid smoke—trust me, it elevates everything. And if you’re using this as a vegan butter substitute, a sprinkle of turmeric mimics the color of butter beautifully.
This puree keeps beautifully—5 days refrigerated in an airtight container, or 3 months frozen in ice cube trays for single servings. For the smoothest texture, blend again briefly after thawing. I like to portion it into small jars so I can grab exactly what I need for a quick pasta sauce or dip. The flavor actually improves after a day or two in the fridge as the ingredients meld together. Store it in the coldest part of your fridge, and if it develops a skin, just stir it back together before using.
Why You'll Love This Recipe
- Three-Ingredient Base: I swear by this as my go-to sauce starter—just beans, broth, and olive oil. No fancy techniques, no hidden ingredients, just pure, creamy magic that takes 10 minutes max.
- Garlic-Thyme Magic: That first sizzle of garlic in olive oil? Chef’s kiss. The thyme leaves add this bright, herbal punch that makes it taste like you slaved over it—even though you didn’t.
- Dip, Spread, Sauce: Slather it on toast, stir it into pasta, or use it as a soup thickener. Honestly, I’ve even drizzled it over grilled chicken when I’m lazy. It works everywhere.
- Pantry Goldmine: A single can of beans and a splash of broth stretch into meals for days. Freeze leftovers for when you’re too tired to cook—or just reheat and eat it straight from the pot. No waste, all flavor.
Step-by-step instructions for cannellini bean puree
Transform simple pantry staples into velvety bean puree with this foolproof technique.
Prepare the Base Ingredients for Maximum Flavor
Begin by draining and thoroughly rinsing the 2 cups canned cannellini beans under cold water. This removes any residual sodium and prevents a metallic taste in your puree. I like to use a fine-mesh strainer and give them a good shake to eliminate all traces of canned liquid.
While the beans drain, heat the 1.5 cups vegetable broth in a small saucepan over medium heat until it reaches a gentle simmer. This pre-warmed broth will blend more smoothly and help emulsify the puree. Keep it warm but not boiling - you'll add it to the beans once they're ready. The warmth helps break down the beans' natural starches during blending.
Blend Until Silky Smooth with Strategic Water Addition
Transfer the drained beans to a high-powered blender or food processor. Add the 3 cloves peeled garlic, 0.25 cup fresh thyme leaves, 1 tbsp lemon juice, 1 tsp sea salt, 0.5 tsp ground black pepper, and 1 tbsp nutritional yeast. I always use fresh thyme here - the bright, slightly bitter notes cut through the beans' earthiness beautifully.
Blend on medium speed until the mixture becomes coarse but still has some texture. This is crucial - you want to break down the beans partially but not completely before adding liquid. Now add the 0.5 cup cold water and 0.25 cup extra-virgin olive oil. The cold water helps create a stable emulsion while the olive oil adds richness and prevents the puree from separating.
Achieve Perfect Texture Through Progressive Blending
With the blender running continuously, slowly pour in the warm vegetable broth through the feed tube. This gradual addition prevents sudden temperature changes that can cause the puree to seize up. Blend for 3-4 minutes total, scraping down the sides every 30 seconds to ensure even texture development.
You'll know you've achieved the perfect consistency when the puree is completely smooth with a velvety texture that coats the back of a spoon. It should be thick enough to hold its shape when spooned but still flow smoothly. If it's too thick, add 1-2 tablespoons more cold water. If too thin, blend in another tablespoon of olive oil to help stabilize the emulsion.
Season and Finish for Restaurant-Quality Depth
Taste the puree and adjust seasoning if needed. I usually need to add another pinch of salt and a crack of black pepper at this stage - the flavors meld better after blending. The nutritional yeast adds that savory, cheesy note that makes this puree exceptional for dips and soups.
For an extra touch of brightness, drizzle in an additional 1/2 teaspoon of lemon juice and blend briefly to incorporate. The acidity balances the earthy bean flavor perfectly. Transfer to a serving bowl and let it sit at room temperature for 10 minutes before serving - this allows the flavors to fully develop and the puree to reach its ideal consistency.
Pro Tips For Making Cannellini Bean Puree
- Drain and Rinse Beans: Open that can and dump the beans straight into a colander—don’t just pour them into the pot. The starchy water clings like glue, turning your puree into a thick, gluey mess. A quick rinse under cold water cuts that gunk by half, and your sauce will stay silky instead of cloying.
- Sauté Garlic Low and Slow: After adding the garlic, turn the heat down to medium-low the second it starts to sizzle. I learned this the hard way—charred garlic turns bitter and overpowers the delicate thyme. Let it soften for 30 seconds, just until fragrant, then add the broth. No drama, no bitterness.
- Blend in Stages: Don’t chuck everything into the blender at once—especially if you’re using a countertop model. Start with half the broth and a splash of olive oil to loosen the beans first. Then add the rest gradually, or you’ll end up with a splattered kitchen and a puree that’s still grainy. Patience here saves cleanup.
- Toast the Thyme First: Strip the thyme leaves from the stems and give them a quick toss in the dry pot over medium heat for 10 seconds—just until they release their aroma. My grandmother swore by this, and she was right: the leaves hold more flavor when they’re warmed, and the puree tastes brighter. Skip this, and you’re missing a subtle but real upgrade.
Pro cooking tips for this recipe
Blender Selection Matters
Not all blenders can handle this job—you need power to achieve that velvety texture. I swear by my Ninja BN601 high-speed blender for this recipe, but a Vitamix or Blendtec will work too. Avoid cheap countertop models—they struggle with beans and often leave gritty bits.
If you're using a food processor, you'll need to pulse frequently and add more cold water to compensate for less blending power. The key is to start with medium speed and gradually increase to high as the mixture thickens. 💡
Temperature Control Secrets
Cold water and warm broth are the dynamic duo here. The cold water helps stabilize the emulsion while the warm broth breaks down the beans' starches more efficiently. I heat the broth just until it simmers—never boil it—because boiling can make the puree taste flat.
For extra insurance, I let the blended mixture sit at room temperature for 10 minutes before serving. This resting period lets flavors meld and the texture thicken slightly, giving you that restaurant-quality consistency. 🌡️
Preventing Grainy Results
Grainy puree is the biggest rookie mistake. To avoid it, never blend dry beans without liquid—always add the cold water and olive oil first. The olive oil coats the beans and prevents them from clumping. If your puree still looks chunky, add 1 tablespoon of cold water and blend again.
For stubborn bits, I strain the puree through a fine-mesh sieve—it’s a little extra work, but worth it for that silky finish. And always scrape down the sides every 30 seconds to ensure even blending. 💫
Emulsion Stability Tips
This puree has a tendency to separate if not handled properly. The trick is to add the warm broth slowly while blending on high speed. If your puree starts to split, whisk in another 1 tablespoon of olive oil and blend again.
For extra stability, I sometimes add 1/2 teaspoon of xanthan gum (it’s a kitchen secret for thickening and binding). If you’re using this as a vegan butter substitute, a splash of lemon juice helps maintain the emulsion longer. The key is patience—don’t rush the blending process. ⚡
Flavor Layering Techniques
This puree is a blank canvas, so I like to build flavor in stages. Start with the basics—garlic, thyme, and nutritional yeast—then adjust to taste. For a smoky twist, add 1/4 teaspoon of smoked paprika or a dash of liquid smoke.
If you’re using it as a pasta sauce, stir in 1/2 cup of marinara sauce at the end for acidity. The lemon juice is non-negotiable—it brightens the earthy bean flavor and balances the richness.
Taste as you go, and don’t be afraid to add more salt or pepper after blending—the flavors meld better when adjusted post-blend. 🍋
Nutrition facts
Frequently asked questions
Can I use dried cannellini beans instead of canned?
Yes, but you'll need to soak them first! Soak 1 cup dried beans overnight, then simmer for 1-2 hours until tender before blending. Dried beans have a slightly nuttier flavor that works beautifully, but they require more prep time. For the same recipe, reduce the broth to 1 cup since soaked beans hold more moisture.
How can I make this puree extra creamy?
Add 2 tablespoons of olive oil or 1/4 cup of coconut milk for richness, and blend in 1/2 cup of cooked white rice or 1/4 cup of cashews (soaked if using raw) for body. The rice or cashews act as natural thickeners while adding creaminess. For a vegan cheese effect, stir in 1 tablespoon of vegan butter at the end.
What are the best ways to use this puree?
Try it as a pasta sauce (toss with cooked linguine), a vegan butter substitute (mix with garlic and herbs), or a dip base (add roasted garlic and smoked paprika). It also thickens soups beautifully—stir 1/2 cup into minestrone for instant creaminess. For a quick spread, mix with 1 tablespoon of Dijon mustard and serve with crackers.
Why did my puree turn out grainy?
Graininess usually means insufficient liquid or blending time. Add 1-2 tablespoons of cold water and blend for another 1-2 minutes, scraping the sides frequently. If still grainy, strain through a fine-mesh sieve or pulse in a food processor briefly. Always add the cold water and olive oil first before blending—this prevents clumping.
Can I make this puree ahead of time?
Store it in an airtight container in the fridge for up to 5 days or freeze in ice cube trays for 3 months. Thaw overnight in the fridge and stir well. The flavor actually improves after 24 hours as the ingredients meld. For best texture, give it a quick blend after thawing to restore smoothness.