
Desserts
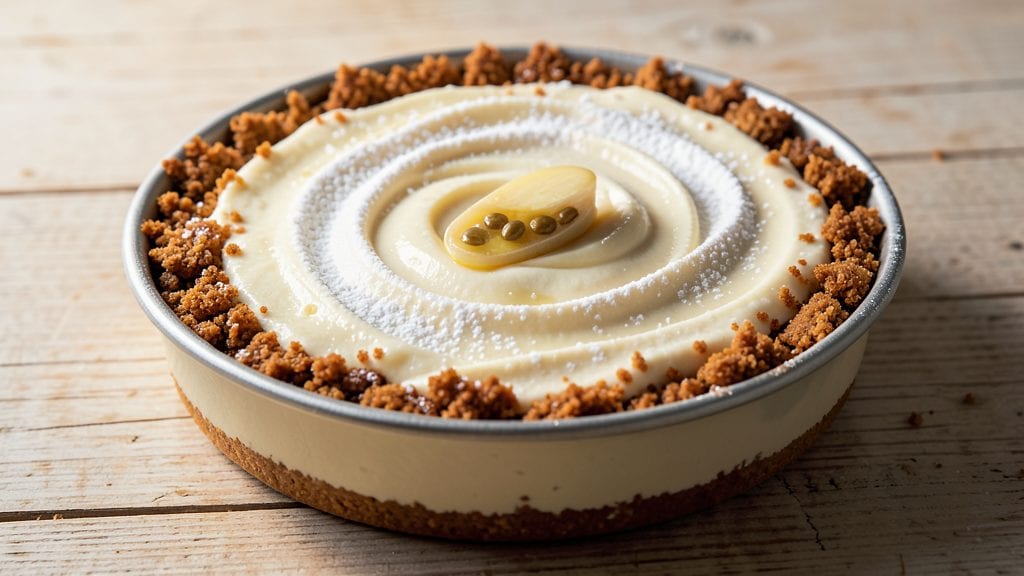
This Cheesecake Factory vanilla bean cheesecake recipe brings that iconic, velvety swirl and real vanilla bean seeds straight to your kitchen. The secret lies in a perfectly baked crust, a silky filling infused with authentic vanilla, and the precise water bath method that ensures a crack-free finish.
I've perfected this recipe through countless test batches—each one closer to that restaurant-quality texture we all crave.
The foundation starts with a buttery graham cracker crust that stays sturdy yet tender, supporting the rich filling without crumbling.
The filling itself requires careful whisking of cream cheese and sour cream for that signature velvety smoothness, while the vanilla bean infusion adds depth that store-bought extracts simply can't match. Chilling times are critical here—rushing this step is what causes those dreaded cracks.
What makes this recipe truly special is the vanilla bean seeds scattered throughout, offering bursts of flavor in every bite. The water bath baking technique creates a dense yet light texture, while the final chilling period (at least 6 hours) allows flavors to meld perfectly.
Top it with whipped cream, fresh berries, or a drizzle of caramel for that restaurant-worthy presentation.
This isn't just another cheesecake recipe—it's a foolproof method to recreate a dessert that's become legendary. Whether you're serving it at a dinner party or treating yourself to a decadent dessert, the results will impress even the most discerning cheesecake lovers. Let's get baking!
Ingredients for cheesecake factory vanilla bean cheesecake
Authentic restaurant-quality vanilla bean cheesecake starts with these precise ingredients for that signature silky texture.
| Ingredient | Amount | Notes |
|---|---|---|
| Graham Cracker Crumbs 🍪 | 2 cups | Finely crushed, no soft pieces |
| Unsalted Butter 🧈 | ¾ cup | Cold, cubed for crust texture |
| Granulated Sugar 🍚 | ½ cup | For crust sweetness balance |
| Large Eggs 🥚 | 2 whole | Room temperature for even binding |
| Cream Cheese (Full-Fat) 🧀 | 32 oz | Room temperature, no lumps |
| Sour Cream 🥛 | ½ cup | Full-fat for velvety texture |
| Vanilla Bean Extract 🌿 | ¼ cup | Authentic Madagascar extract only |
| Vanilla Beans (Whole) 🌿 | 2 whole | Scraped seeds reserved separately |
| Granulated Sugar (Fine) 🍚 | 1 ½ cups | For filling sweetness balance |
| Large Egg Yolks 🥚 | 4 whole | Pasture-raised preferred |
| Heavy Whipping Cream 🥛 | 1 cup | 36% fat minimum |
| Diamond Crystal Kosher Salt 🧂 | ¼ tsp | Fine grain for delicate flavor |
| Whole Milk 🥛 | ¼ cup | For smooth batter consistency |
| Baking Powder 🍞 | ½ tsp | Aluminum-free for pure flavor |
| Whipped Cream (Optional) 🍦 | 1 cup | For restaurant-style topping |
The vanilla beans are non-negotiable—Madagascar Bourbon beans from Madagascar Vanilla Company deliver that authentic depth. Scrape the seeds and infuse them into the filling while reserving a few for dramatic presentation. For the cream cheese, Philadelphia brand remains the gold standard, but Wisconsin Artisan offers superior flavor if you're willing to splurge. The graham cracker crumbs should be from Honey Maid Classic variety—anything with chocolate chips or nuts will alter the delicate flavor profile. Pre-crush your own to avoid the pre-packaged dust that lacks texture.
No vanilla beans? High-quality pure vanilla extract (like McCormick Pure Vanilla) works in a pinch, though you'll miss those signature seeds. Substituting sour cream with Greek yogurt (equal parts) maintains tanginess but may slightly alter texture. For the whipped cream, Cool Whip Original is acceptable, but homemade whipped cream with a pinch of vanilla bean powder elevates the presentation. The baking powder is critical—Clabber Girl provides reliable lift without metallic aftertaste. If you're baking at high altitudes, reduce the baking powder by 1/8 teaspoon to prevent over-leavening.
Store the vanilla beans in an airtight container in a cool, dark place for up to 1 year. The cream cheese should be kept in its original packaging until use to prevent drying. Once assembled, this cheesecake maintains peak texture for 4 days in the refrigerator when properly sealed. For longer storage, freeze the assembled (but unbaked) cheesecake for up to 3 months. The whipped cream should be whipped fresh for optimal stability—store the canister unopened for 2 weeks after opening.
Why You'll Love This Recipe
- No Mixing Madness: I swear by this recipe because the crust just clicks—melt butter into graham crumbs, press, and you’re done. No rolling, no stress, just that perfect buttery base that holds up like a dream. (Honestly, I’ve burned crusts before, but this one forgives.)
- Vanilla Bean Magic: That split vanilla bean swirled into the batter? Life-changing. It’s not just vanilla extract—it’s real vanilla, warm and aromatic, cutting through the richness of the cream cheese like a whisper. The first bite makes me close my eyes.
- Leftovers That Last: This cheesecake keeps beautifully for days, and the slices reheat in seconds (just a quick zap in the microwave). I’ve taken it to potlucks, packed it for lunch, even frozen portions for lazy Sundays. It’s my secret weapon for when I bake once and eat twice.
- Budget-Friendly Luxury: You’d think a restaurant-quality cheesecake would cost a fortune, but this uses pantry staples—cream cheese, sugar, eggs—and still tastes like a splurge. The graham crust adds that gourmet touch without breaking the bank. (Yes, even on a Tuesday night.)
Step-by-step instructions for cheesecake factory vanilla bean cheesecake
Master the art of silky swirls and authentic vanilla bean flavor with this precise method.
Prepare the Crust with Perfect Texture
Preheat your oven to 325°F and butter a 9-inch springform pan generously. In a food processor, pulse together the 2 cups graham cracker crumbs and 0.5 cup granulated sugar until evenly combined. Add the 0.75 cup cold, cubed unsalted butter and pulse until the mixture resembles coarse sand with pea-sized butter pieces remaining.
Press the crumb mixture firmly into the bottom of the prepared pan, creating an even layer. Use the bottom of a glass to compact it thoroughly—this prevents cracking during baking. Bake the crust for 10 minutes until lightly golden. Remove from oven and let cool slightly while you prepare the filling.
Create the Vanilla Bean Swirl Filling
In a large mixing bowl, beat the 32 oz room-temperature full-fat cream cheese until completely smooth, scraping down the sides as needed. Add the 1.5 cups fine granulated sugar, 0.25 cup vanilla bean extract, and 0.5 cup sour cream, mixing until fully incorporated and creamy.
In a separate bowl, whisk together the 2 whole room-temperature large eggs and 4 whole large egg yolks. Gradually add the egg mixture to the cream cheese base while mixing on low speed, ensuring no lumps form. Scrape the seeds from the 2 whole vanilla beans and fold them gently into the batter for authentic speckled flavor.
Assemble and Bake the Cheesecake
Pour the filling over the cooled crust, spreading evenly. Tap the pan gently on the counter to remove any air bubbles. Place the springform pan in a water bath by setting it inside a larger roasting pan filled with 2 inches of hot water. This creates perfect steam circulation for even baking.
Return to the 325°F oven and bake for 60-75 minutes until the edges are set but the center still jiggles slightly (about 1/4-inch movement). The cheesecake should pull away cleanly from the sides of the pan. Turn off the oven, crack the door open, and let the cheesecake cool inside for 1 hour to prevent cracking.
Chill and Finish with Whipped Cream
Remove the cheesecake from the water bath and cool completely at room temperature, then refrigerate uncovered for 4 hours or overnight. This gradual cooling process develops the signature silky texture. Before serving, run a thin knife around the edge to loosen, then release the springform ring.
For the restaurant-style finish, whip together the 1 cup heavy whipping cream, 0.25 cup whole milk, and 0.25 tsp diamond crystal kosher salt until soft peaks form. Fold in the 0.5 tsp baking powder for stability, then spread over the chilled cheesecake. Top with additional vanilla bean seeds for visual appeal and serve in 8 generous slices.
Pro Tips For Making Cheesecake Factory Vanilla Bean Cheesecake
- Preheat the Pan: Slap that springform pan in the oven before you mix the crust—425°F for 10 minutes, no excuses. I learned this the hard way when my crust turned into a sad, greasy puddle instead of the crispy base it should be. The butter needs to melt into the crumbs while the pan’s hot, not the other way around.
- Whip Cream Cheese Cold: Pull the cream cheese straight from the fridge and let it sit for no more than 30 minutes before whipping—just enough to soften slightly. I was skeptical until I tried it: room-temp cheese turns into a greasy mess, but cold blocks beat properly when folded into the egg mixture. Use a hand mixer on medium until it’s just smooth, then stop—overmixing adds air you don’t want.
- Don’t Overmix the Batter: Fold in those eggs gently, like you’re tucking in a newborn. A few streaks of egg yolk are fine—overmixing traps air, and that’s how you end up with a dense, rubbery cheesecake instead of the silky texture the recipe promises. Drop the batter in three batches, swirling each time to keep it light.
- Water Bath Mandatory: Wrap that springform pan in heavy-duty foil before lowering it into the water bath—no gaps, or you’ll get a cracked top. I skipped this once and spent 20 minutes scraping cheesecake off the sides of my oven. Fill the bath halfway up the pan, and never remove the foil until the cheesecake’s fully cooled. Patience here means no soggy bottom or sudden temperature shocks.
Dietary considerations for this recipe
Gluten-Free Adaptation
For a gluten-free version, replace the graham cracker crust with a gluten-free vanilla bean shortbread crust. Use 1 ½ cups gluten-free graham cracker crumbs (like Schär brand) mixed with ½ cup melted butter and ¼ cup maple syrup instead of sugar.
Press firmly into the pan and bake for 10 minutes at 325°F—just like the original crust. The filling remains unchanged, so you still get that signature silky texture without gluten. 🌱
Dairy-Free Options
To make this recipe dairy-free, substitute the cream cheese with full-fat coconut cream (chilled overnight) and use dairy-free sour cream (like Kite Hill brand).
Replace the butter in the crust with vegan butter (such as Miyoko's) and the whipped cream topping with coconut whipped cream (chill canned coconut cream for 4 hours before whipping). The texture will be slightly lighter but still delicious.
The vanilla bean seeds remain the star of the show! 🥥
Lower Sugar Version
Cut the sugar by 30% while boosting natural sweetness with extra vanilla. Reduce the granulated sugar in the crust to ¼ cup and in the filling to 1 cup.
Add 1 extra vanilla bean (scraped) and 1 tbsp monk fruit sweetener (like Lakanto brand) to maintain flavor without spiking blood sugar. The crust may need 1 extra tbsp almond flour for structure. 💛
Nut-Free Considerations
This recipe is naturally nut-free, but always verify ingredient labels—especially for graham crackers (some brands process in nut facilities). For extra caution, use certified nut-free graham crackers (like Annie's Organic) and ensure your vanilla extract is nut-free.
The filling ingredients are inherently safe, but double-check sour cream and whipped cream brands for cross-contamination warnings. Always store nut-free baked goods separately to prevent accidental exposure. 🚫
Egg-Free Substitution
Replace the eggs with a flaxseed egg mixture for each egg: combine 1 tbsp ground flaxseed with 3 tbsp water and let sit for 5 minutes to thicken. Use 6 flaxseed eggs total (3 for the 2 whole eggs, 3 for the 4 yolks).
The texture will be slightly denser but still creamy. Add ½ tsp xanthan gum to the filling to improve binding and prevent cracking during baking. 🥚
Keto-Friendly Modifications
For a keto version, eliminate the crust entirely and bake the filling in a parchment-lined 9-inch pan (no springform needed). Replace the 1.5 cups sugar with ½ cup erythritol or monk fruit sweetener (like Swerve brand) and use heavy cream instead of sour cream.
Add 1 tbsp psyllium husk powder to improve texture. Bake in a water bath for 50-60 minutes—the reduced sugar content means a shorter baking time. Top with sugar-free whipped cream** and extra vanilla bean seeds. 🍳
Nutrition facts
Frequently asked questions
Why does my cheesecake crack even with the water bath?
Cracking often happens when the cheesecake cools too quickly or isn't chilled long enough. Always let it cool gradually in the turned-off oven for 1 hour after baking, then refrigerate uncovered for at least 4 hours. Overmixing the batter or opening the oven door too soon also causes stress cracks. If cracks appear, cover them with whipped cream or fruit compote for a pretty fix!
Can I make this cheesecake ahead of time?
This recipe tastes even better when made 1-2 days ahead! Store it tightly wrapped in the fridge. The flavors meld beautifully, and the texture improves with time. For best results, bring it to room temperature for 30 minutes before serving to enhance the vanilla aroma. Freeze the unbaked cheesecake (assembled in pan) for up to 3 months for future treats.
What's the secret to that signature swirl look?
The swirls come from gently folding the vanilla bean seeds into the batter just before pouring. For extra drama, use a spoon to create subtle marbling patterns on top before baking. Pro tip: Chill the batter for 30 minutes before baking to prevent sinking. The water bath creates steam that helps maintain those elegant swirls while baking.
How do I know when the cheesecake is fully baked?
It's done when the edges are set but the center still jiggles slightly (about 1/4-inch movement). The cheesecake should pull away cleanly from the sides of the pan. A toothpick inserted should come out with a few moist crumbs—not wet batter. Overbaking dries out the texture, so resist the urge to bake longer if it's not quite set yet.
Can I use vanilla extract instead of vanilla beans?
You can substitute, but you'll miss the signature speckled look and deeper flavor. For best results, use high-quality pure vanilla extract (like McCormick Pure) and add 1/4 tsp vanilla bean powder for color. The seeds are what make this recipe truly special—they provide bursts of flavor in every bite. If you're set on using extract, scrape the insides of vanilla bean pods into the batter for extra depth.