Main Courses
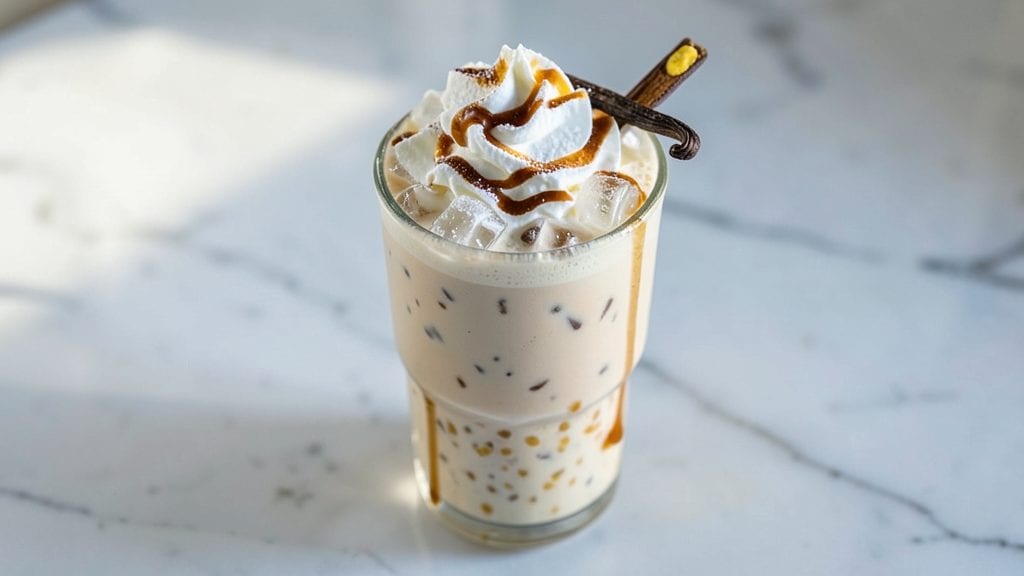
This copycat vanilla bean frappuccino recipe delivers the same creamy, swirled perfection you crave from your favorite coffee shop—right in your own blender. 💛 The secret lies in blending ice cream with vanilla bean paste (not extract) and letting it swirl naturally, creating those signature ribbons of vanilla flavor without overpowering the creamy base.
What sets this recipe apart is the texture—smooth, thick, and perfectly chilled, with just the right amount of ice cream to keep it rich but drinkable.
I developed this after years of perfecting my frappuccino game, including the trick of adding a splash of milk at the end to loosen it just enough for that signature sip. The vanilla bean paste adds depth that imitation extracts can’t match.
By the time you’re done, you’ll have a frappuccino with real vanilla bean swirls, a velvety texture, and that familiar sweet-creamy balance. It’s the kind of drink that feels like a treat—whether you’re enjoying it as a midday pick-me-up or a dessert-like indulgence. Ready to make it? Here’s how.
Serve it immediately with whipped cream and a drizzle of caramel for the full experience, or keep it simple with a sprinkle of cinnamon. This recipe scales easily, so you can make one for yourself or a pitcher for a crowd.
The key is patience—let the swirls develop while you blend, and you’ll have that café-quality frappuccino at home.
Ingredients for copycat vanilla bean frappuccino
Five core ingredients plus a few finishing touches—this is what makes the café version taste homemade.
| Ingredient | Amount | Notes |
|---|---|---|
| Vanilla Bean Paste 🌿 | 1 tbsp | High-quality real vanilla bean |
| Vanilla Ice Cream 🍦 | 2 cups | High-fat, premium brand preferred |
| Whole Milk 🥛 | ½ cup | Cold, full-fat for creaminess |
| Ice Cubes ❄️ | 2 cups | Freshly made, no liquid added |
| Granulated Sugar 🍚 | ¼ cup | Adjust to taste, fine grain |
| Whipped Cream 🍦 | ¼ cup | Homemade or store-bought, stable |
| Caramel Sauce 🍯 | ¼ cup | Store-bought or homemade drizzle |
| Ground Cinnamon 🌶️ | ½ tsp | Freshly ground for aroma |
| Salt 🧂 | ⅛ tsp | Fine sea salt for balance |
| Espresso Shots ☕ | 2 whole | Cold, optional for coffee kick |
| Light Cream 🥛 | ¼ cup | For final loosening splash |
The vanilla bean paste is non-negotiable here. Look for brands like Nielsen-Massey or Madagascar Bourbon in the baking aisle—avoid the imitation extracts that taste like artificial vanilla. I grab mine at Whole Foods or Trader Joe's because they usually stock the good stuff. The ice cream matters too—Häagen-Dazs or Breyers Premium give you that rich, creamy base. If you're using a lower-fat brand, add an extra tablespoon of milk to compensate. For the milk itself, whole milk is key—it blends smoother and keeps the texture velvety. Cold is critical: chill all liquids and ice cream for at least 30 minutes before blending.
No vanilla bean paste? Vanilla extract plus a pinch of xanthan gum can mimic the swirls, but it won’t taste the same. Running low on ice cream? Frozen yogurt or sorbet works in a pinch, but adjust the sugar—frozen yogurt needs less, sorbet more. The caramel sauce can be store-bought (I love Smucker’s or Trader Joe’s brands), but homemade is easier than you think—just heat equal parts sugar and cream until it browns, then cool. For the espresso shots, cold brew concentrate is a great swap if you don’t have an espresso machine. And if you’re skipping the coffee entirely, add a splash of vanilla syrup instead.
This frappuccino is best served immediately—those swirls won’t last long once blended. Store any leftovers in an airtight container for up to 24 hours, but the texture suffers after that. For the whipped cream, buy it pre-charged in a can for easy topping, or whip your own with cold heavy cream and a pinch of sugar. The caramel sauce keeps for up to 2 weeks in the fridge, so make extra. Pro tip: Double the recipe and freeze half in an airtight container—thaw overnight in the fridge for a quick frappuccino the next day.
Why You'll Love This Recipe
- Three-Ingredient Magic: I swear by this—just ice cream, milk, and a dash of vanilla bean paste (not extract!) transforms into that café dream. No blender wars, no messy syrup, just swirl and blend until it’s silky smooth. Honestly, my blender’s seen better days, but this recipe doesn’t care.
- Real Vanilla Kiss: That little jar of vanilla bean paste? It’s the secret weapon. One scoop gives you actual vanilla flavor—not the artificial aftertaste that ruins everything. The ice cubes keep it cold, the sugar balances the creaminess, and suddenly, you’re sipping something that tastes like a $6 coffee shop drink.
- Breakfast or Treat: Need a quick breakfast? Blend this with a splash of coffee for a mocha twist. Craving dessert? Top it with whipped cream and a sprinkle of cinnamon. Between us, I’ve even frozen leftover frappuccino mix into popsicles—because why not? It’s that adaptable.
- No Waste, All Gain: Vanilla ice cream freezes like a champ, so I always keep a tub on hand. Use up milk before it sours? Perfect. Sugar sitting in your pantry? No need to buy syrup. This recipe turns pantry staples into something indulgent without breaking the bank—or your willpower.
Step-by-step instructions for copycat vanilla bean frappuccino
Here's how to recreate that signature creamy, dreamy frappuccino with real vanilla bean swirls at home.
⏰ Step 1: Prepare the Frappuccino Base
In a blender, combine the 2 cups Vanilla Ice Cream, 1 tbsp Vanilla Bean Paste, 0.5 cup Whole Milk, 2 cups Ice Cubes, 0.25 cup Granulated Sugar, 0.5 tsp Ground Cinnamon, and 0.125 tsp Salt. The ice cubes are essential—they'll give you that signature thick, slushy texture while keeping everything cold.
Blend on high for 30-45 seconds until completely smooth. You want it to look like thick, creamy soft serve with no ice chunks remaining. Here's the thing—if you taste it now, it'll be sweet and vanilla-forward, but we're just getting started. The magic happens next.
🍳 Step 2: Add Coffee Kick and Thin as Needed
With the blender running on low, slowly pour in the 2 whole Espresso Shots. This is where the frappuccino gets its subtle coffee depth without overpowering the vanilla. If you prefer a stronger coffee flavor, you can add an extra shot, but I like this balance for a dessert-like treat.
Now check the consistency. It should be thick enough to hold its shape when scooped, but still blendable. If it's too thick (which can happen with premium ice cream), add 1-2 tablespoons of the 0.5 cup Whole Milk at a time until you reach a smooth, drinkable consistency. You're aiming for that perfect slushy texture that's easy to sip through a straw.
🥘 Step 3: Layer and Assemble the Frappuccino
Pour the frappuccino mixture into four 8-ounce glasses (or one large glass for a single serving). Here's where we build that signature frappuccino look: spoon 0.25 cup Whipped Cream over the top and gently swirl it with a skewer or spoon to create marbled patterns. Then drizzle 0.25 cup Caramel Sauce in zigzag lines across the whipped cream.
The whipped cream should be stable enough to hold its shape while still being light and fluffy. If your whipped cream is too runny, chill it for 10 minutes before using. The caramel sauce will naturally sink slightly into the whipped cream, creating those beautiful golden swirls that make this frappuccino look so inviting.
🍽️ Step 4: Final Touches and Serving
For the perfect finishing touch, add a splash of 0.25 cup Light Cream to each glass. This isn't just for looks—it helps loosen the frappuccino slightly so it's easier to drink through a straw. Give it one final stir to incorporate, then let it sit for 1-2 minutes to allow the flavors to meld together.
Serve immediately with a straw for that classic frappuccino experience. The contrast of the cold, creamy base with the warm caramel drizzle and cool whipped cream makes every sip feel like a little dessert. Pro tip: If you're making this ahead, assemble the toppings just before serving so they stay fresh and fluffy.
Pro Tips For Making Copycat Vanilla Bean Frappuccino
- Freeze the Milk First: Grab a small container of whole milk and stash it in the freezer for 15-20 minutes before blending. The partially frozen milk blends smoother and chiller, making your frappuccino taste closer to the café version—no grainy ice chunks here.
- Scrape the Vanilla Bean: Skip the paste if you’ve got whole vanilla beans—split one, scrape out the seeds, and toss them in with the ice cream. The seeds add real depth, while the paste can sometimes taste artificial. (Yes, even if you’re impatient like me.)
- Blend in Stages: Start with just the ice cream, milk, and sugar—blend until smooth, then add the ice cubes. This keeps the texture creamy instead of icy. I learned this the hard way after making a slushie instead of a frappuccino.
- Use Cold Ingredients: Cold ice cream + cold milk = no melting mid-blend. Take both out of the freezer and let them sit for 10 minutes before mixing. The difference in thickness is noticeable—your frappuccino won’t turn into a milkshake halfway through.
Dietary considerations for this dish
Dairy-Free Swaps
This frappuccino relies on dairy for its signature creaminess, but you can adapt it with coconut milk or almond milk for a dairy-free version. Use 2 cups full-fat coconut milk chilled overnight—it blends like ice cream and adds natural sweetness.
For the whipped cream, coconut whipped cream (from chilled coconut cream) works beautifully. Just skip the caramel sauce if you're avoiding dairy entirely, or use a dairy-free caramel made with coconut sugar and coconut milk. 🥥
Sugar-Free Options
Cut the sugar by using vanilla protein powder (like Orgain or Fairlife) instead of granulated sugar—it adds creaminess and sweetness without the spike. For a natural alternative, blend in 1-2 frozen bananas for sweetness and thickness.
Reduce the sugar to 1-2 tablespoons and taste as you go. If you love caramel, try a sugar-free caramel sauce (like Walmart Great Value brand) to keep the flavor without the calories.
Lower-Calorie Adjustments
Lighten it up by using light vanilla ice cream (like Breyers Light) and skim milk instead of whole. Add 1 scoop vanilla protein powder (about 30g) to boost protein and reduce sugar.
For the whipped cream, use light whipped topping (like Cool Whip) or whipped coconut cream. The result? A lighter frappuccino that still tastes indulgent. Just be sure to keep the vanilla bean paste—it’s what makes it taste like the real deal. 💪
Nut-Free & Allergen-Friendly
This recipe is naturally nut-free, but if you’re avoiding dairy and nuts, opt for oat milk (like Oatly) and soy milk whipped cream (like Silk). For extra richness, blend in 1 tablespoon coconut oil to mimic the fat content of dairy.
Always check labels—some brands process products in nut-free facilities, while others don’t. I double-check at New Seasons Market to avoid cross-contamination risks. 🌱
Keto-Friendly Tweaks
Transform this into a keto frappuccino by swapping ice cream for unsweetened almond milk ice cream (like Halo Top Keto) or frozen cauliflower rice (yes, it works!). Use erythritol or monk fruit sweetener instead of sugar, and add 1 tablespoon vanilla bean paste for depth.
For the whipped cream, heavy whipping cream (unsweetened) whipped with a pinch of sweetener does the trick. Skip the caramel—it’s too sugar-heavy—but a drizzle of sugar-free chocolate syrup adds richness. 🥬
Caffeine Control
Skip the espresso shots entirely for a caffeine-free version, or use decaf espresso if you still want that coffee flavor. For a caffeine kick without coffee, add 1-2 tablespoons of instant coffee (like Starbucks VIA) or 1 teaspoon of matcha powder for an earthy twist.
If you’re avoiding caffeine altogether, boost the vanilla flavor with an extra ½ teaspoon vanilla bean paste or a splash of vanilla syrup. 🍵
Nutrition facts
Frequently asked questions
Why does my frappuccino turn out too thick or icy?
This usually happens when ice cubes don't blend completely or when using lower-fat ice cream. Use 2 cups freshly made ice cubes (not pre-made with liquid) and blend on high for 45 seconds to ensure a smooth texture. If it's still too thick, add 1-2 tablespoons of cold milk at a time until you reach that perfect slushy consistency.
Can I make this frappuccino ahead of time?
While the base can be prepped 24 hours ahead, the whipped cream and caramel toppings should be added fresh for the best texture. Store the blended mixture in an airtight container in the freezer, then thaw in the fridge for 1-2 hours before adding toppings. The swirls won't be as pronounced, but the flavor will still be great!
What's the best way to get those signature vanilla bean swirls?
The secret is in the blending technique! After combining all ingredients, blend on low speed for 10 seconds to let the vanilla bean paste disperse naturally. Then blend on high for 30 seconds. The paste will create beautiful ribbons when you pour it into the glass—no need for food coloring! For extra drama, use a skewer to gently swirl the whipped cream on top.
Can I use vanilla extract instead of vanilla bean paste?
While vanilla extract will work, it won't give you those authentic swirls or the same depth of flavor. For the best results, use 1 tbsp vanilla bean paste (like Nielsen-Massey). If you're in a pinch, mix 1 tsp vanilla extract with ½ tsp xanthan gum to mimic the swirling effect, but the taste won't be identical.
How do I make this frappuccino without a blender?
You can still create a creamy version using a food processor or even a mortar and pestle for small batches! Pulse the ice cream, milk, and ice in short bursts until smooth, then stir in the vanilla bean paste. For the toppings, simply layer whipped cream and caramel in a glass and pour the mixture over the top. The texture won't be as perfectly blended, but it'll still taste amazing!