
Side Dishes
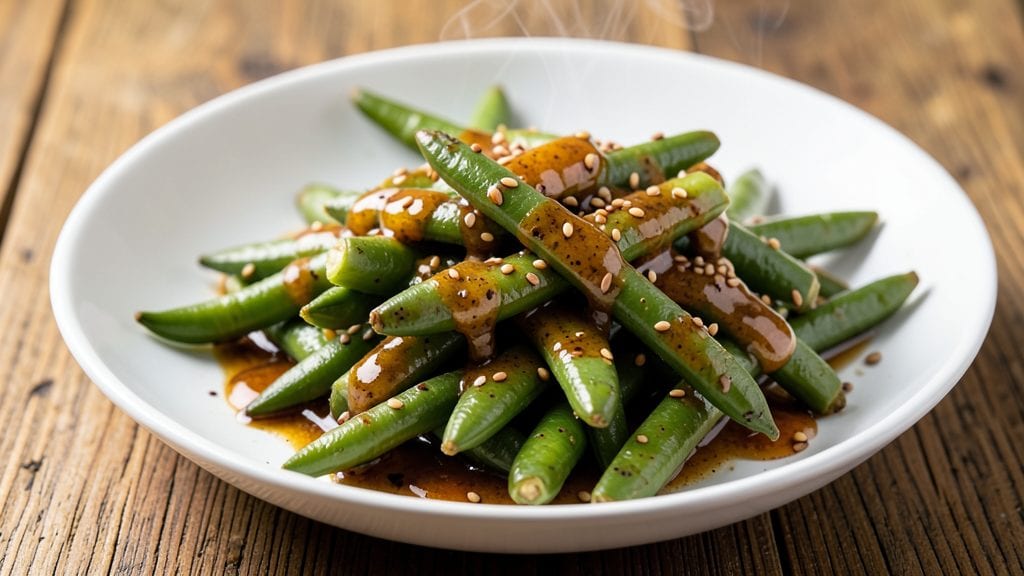
This miso-green beans recipe transforms simple green beans into an umami-packed side dish that rivals restaurant-quality preparations. The secret lies in balancing salty miso paste with sweet and tangy elements, creating a glaze that caramelizes beautifully while preserving the beans' satisfying crunch.
I developed this recipe after years of experimenting with quick, flavorful sides that hold up to any main course—whether grilled meats, roasted proteins, or even as a standalone vegan dish.
The beauty of this method is its simplicity: just 15 minutes of active prep, minimal ingredients, and a technique that delivers restaurant-quality results without fuss.
Fresh green beans are blanched to maintain their vibrant color and crisp texture, then tossed in a miso glaze that develops deep, complex flavors as it caramelizes. The balance of umami, sweetness, and acidity makes this dish universally appealing, yet it still feels special enough for dinner parties.
By the time you serve these beans, you’ll have a side dish that’s golden, glossy, and packed with flavor—crisp on the edges, tender yet firm in the center, and coated in a sticky-sweet miso glaze that clings to every bean.
The aroma alone will have everyone at the table asking for seconds, and the texture delivers that perfect contrast of crunch and tenderness. This is the kind of side that elevates any meal, whether you're serving it alongside grilled salmon, roasted chicken, or as part of a full vegan spread.
For extra depth, I recommend finishing with toasted sesame seeds or a sprinkle of chili flakes, but the glaze alone is already irresistible. The recipe scales effortlessly, so you can make it for a crowd or save leftovers for lunch the next day.
Let’s get cooking—this side dish is a game-changer for weeknight dinners and special occasions alike.
Ingredients for miso green beans
Restaurant-quality umami in 15 minutes—just 12 simple ingredients transform ordinary green beans into a showstopping side.
| Ingredient | Amount | Notes |
|---|---|---|
| Fresh Green Beans 🥦 | 1 ½ lb | Trimmed, ends snapped off |
| White Miso Paste 🍶 | ¼ cup | High-quality, unsweetened |
| Maple Syrup 🍯 | ⅛ cup | Pure, grade B preferred |
| Rice Vinegar 🍶 | 0.06 cup | Seasoned preferred for depth |
| Sesame Oil 🫒 | 1 tbsp | Toasted, not flavored |
| Toasted Sesame Seeds 🌾 | 1 tbsp | For garnish, store-bought okay |
| Red Chili Flakes 🌶️ | ½ tsp | Adjust for heat preference |
| Garlic Cloves 🧄 | 2 cloves | Minced, fresh preferred |
| Ginger Root 🌿 | 1 tsp | Freshly grated, peeled |
| Extra-Virgin Olive Oil 🫒 | 1 tbsp | For tossing, high quality |
| Diamond Crystal Kosher Salt 🧂 | ½ tsp | For seasoning beans |
| Water 💧 | 4 cups | For blanching, room temp |
The miso paste is the heart of this dish—look for white miso with a smooth, fermented aroma at specialty stores like Whole Foods or Trader Joe's. Avoid sweetened varieties, which can overpower the delicate balance of flavors. Fresh ginger and garlic should be vibrant and firm, with no signs of drying or mold. For the beans, harvest-style green beans with crisp, bright green pods hold up best during blanching. If using pre-trimmed beans, rinse them thoroughly to remove any dirt or debris that might cling to the pods. The sesame oil should be toasted sesame oil, not the flavored variety, to ensure you're getting that nutty depth without artificial additives.
No white miso? Red miso works in a pinch, though it'll add a slightly deeper color. Substitute maple syrup with agave nectar for a neutral sweetness, but avoid honey entirely. For extra tang, rice vinegar can be swapped with apple cider vinegar at the same ratio. If you're avoiding sesame seeds due to allergies, toasted pumpkin seeds provide a similar crunch. The garlic and ginger can be pre-minced from jars, but fresh is always superior. For a quicker prep, pre-trimmed green beans save time, though they may not be as crisp as fresh-cut. Always taste the glaze before tossing with the beans—adjust sweetness or acidity as needed.
Blanched green beans should be used immediately for peak texture, but the miso glaze can be prepared ahead and stored in an airtight container in the refrigerator for up to 5 days. To reheat, gently warm the beans and glaze together over low heat, adding a splash of water if needed. The dish reheats beautifully, making it ideal for meal prep—portion into containers with a sprinkle of sesame seeds on top for easy grab-and-go lunches. For longer storage, freeze the glazed beans in a single layer before transferring to a bag, where they'll keep for up to 3 months. Thaw overnight in the fridge before reheating.
Why You'll Love This Recipe
- Here’s what sold me: the maple syrup cuts through the saltiness of the miso, while the rice vinegar keeps it bright. Toss in a quick sear, and you’ve got that crispy edge with a creamy center—like a tiny, savory-sweet hug in every bite.
- Five-Ingredient Magic: I swear by this—just beans, miso, maple, vinegar, and sesame oil. That’s it. No chopping, no fuss, no hunting for obscure spices. The miso does all the heavy lifting, turning simple green beans into something ridiculously good.
- Umami Sweet Crunch: Here’s what sold me: the maple syrup cuts through the saltiness of the miso, while the rice vinegar keeps it bright. Toss in a quick sear, and you’ve got that crispy edge with a creamy center—like a tiny, savory-sweet hug in every bite.
- Lunchbox Hero: Between us, this is my go-to for packed lunches or quick dinners. It reheats like a champ (yes, even the next day) and pairs with everything—grilled chicken, rice, or just straight from the pot with chopsticks. My daughter picks out the best ones first, then asks for seconds.
Step-by-step instructions for miso-glazed green beans
Here's the method for achieving that perfect balance of umami depth and natural crunch in every bite.
Blanch the Green Beans for Crisp-Tender Texture
Fill a large pot with the 4 cups of water and bring to a rolling boil over high heat. Add the 0.5 teaspoon of diamond crystal kosher salt and stir until dissolved. While the water heats, trim the 1.5 pounds of fresh green beans by snapping off the ends and cutting any thick stems in half lengthwise.
Once the water boils vigorously, add the green beans in batches to avoid overcrowding. Blanch for exactly 2 minutes and 30 seconds - this ensures they remain crisp-tender rather than mushy. Immediately drain in a colander and rinse briefly under cold water to stop the cooking process. The beans should retain their vibrant green color and slight snap when bitten.
Create the Miso-Glaze Base
In a small saucepan, combine the 0.25 cup of white miso paste, 0.125 cup of maple syrup, 0.0625 cup of rice vinegar, 1 tablespoon of extra-virgin olive oil, 2 cloves of minced garlic, and 1 teaspoon of freshly grated ginger root. Heat over medium-low heat, stirring constantly with a silicone spatula to prevent scorching.
Simmer gently for 3 to 4 minutes until the mixture thickens slightly and becomes aromatic. You'll notice the miso dissolving completely and the garlic releasing its pungent fragrance. Remove from heat and let cool for 2 minutes - this prevents the sesame oil from smoking when added later. The glaze should coat the back of a spoon with a velvety consistency.
Toss and Roast for Caramelized Flavor
In a large skillet over medium-high heat, add the 1 tablespoon of toasted sesame oil. Once shimmering, add the blanched green beans in a single layer. Toss gently for 1 minute to distribute the oil evenly. Pour the cooled miso glaze over the beans and toss again to coat completely.
Cook for 3 to 4 minutes until the beans develop golden spots and the glaze begins to caramelize. The beans should be sizzling audibly and the edges should start to crisp slightly. If the glaze thickens too much, add 1 tablespoon of water to maintain the right consistency. The finished beans should have a glossy sheen from the glaze while maintaining their natural crunch.
Finish with Toasted Sesame Seeds and Chili Flakes
Transfer the miso-glazed green beans to a serving platter. Sprinkle evenly with the 1 tablespoon of toasted sesame seeds and 0.5 teaspoon of red chili flakes. Toss gently with tongs to distribute the seeds and flakes evenly over each bean.
Let rest for 2 minutes before serving to allow the flavors to meld completely. The sesame seeds should be toasted and aromatic, while the chili flakes add just a hint of heat that brightens the umami richness. Serve immediately while the beans are still vibrant and the glaze is warm, ensuring each bite delivers perfect texture contrast between the crisp beans and silky glaze.
Pro Tips For Making Miso Green Beans
- Trim the Beans First: Cut off the ends before cooking—no need to peel. The tough stems stay put, but the ends just get in the way. I used to skip this, and the beans always looked messy in the pan.
- Bloom the Miso: Warm the miso paste in a dry pan for 30 seconds before adding liquid—this releases its aroma without burning. Cold miso clumps like glue and ruins the sauce’s silkiness.
- Balance the Sweet-Salty: Taste the sauce before adding sesame oil—maple syrup can overpower miso’s depth. I learned this after making a batch that tasted like candy instead of savory.
- Finish with Oil: Drizzle sesame oil after removing from heat—it cools instantly and keeps the beans from absorbing too much fat. Pour it in while tossing, or you’ll end up with a greasy mess.
Best sauces and condiments for this recipe
Classic Miso-Glaze
The foundational glaze in this recipe combines white miso paste, maple syrup, and rice vinegar for a perfect balance of umami, sweetness, and acidity. I use Whole Foods 365 white miso for consistency, as it has a clean, fermented flavor without added salt.
For extra depth, I simmer the glaze with minced garlic and fresh ginger—just 2 cloves and 1 teaspoon—to infuse aromatic complexity. The key is simmering on medium-low heat for 3-4 minutes to let the miso fully dissolve while preventing scorching. 🌶️
Sesame Oil Finish
After tossing the blanched beans with the glaze, I finish them with toasted sesame oil—this adds a nutty aroma and helps the glaze cling to each bean. Use Kadoya toasted sesame oil for authentic flavor, as it’s cold-pressed and unrefined.
Heat the oil in a skillet until shimmering, then toss the beans for just 1 minute before adding the glaze. This step ensures the beans develop golden spots and a crisp exterior while staying tender inside. 💫
Sweet and Tangy Variations
For a sweeter glaze, increase the maple syrup to 0.15 cup and reduce the vinegar to 0.05 cup. If you prefer more tang, swap in apple cider vinegar or add a splash of lime juice (1 teaspoon) at the end.
I also love adding 1 teaspoon of grated daikon radish to the glaze for a subtle, earthy sweetness that pairs beautifully with the umami. 🍯
Spicy and Smoky Twist
To add heat, stir in 0.5 teaspoon of gochujang (Korean chili paste) with the miso for a smoky, spicy depth. For extra smokiness, finish with 0.25 teaspoon of smoked paprika and a pinch of cayenne pepper.
If you’re serving this as a vegan main, boost the protein by tossing in 2 tablespoons of toasted chickpeas at the end for crunch and texture. 🔥
Herb-Infused Glaze
For a fresher profile, blend 1 tablespoon of chopped cilantro or thai basil into the glaze while it’s warm. The herbs brighten the umami and add a vibrant color contrast.
I also like adding 0.5 teaspoon of fish sauce (for non-vegan versions) or soy sauce for extra depth. If you’re avoiding soy, coconut aminos work well as a substitute. 🌿
Creamy Miso Option
For a richer texture, stir in 1 tablespoon of tahini or cashew cream (2 tablespoons cashews blended with 2 tablespoons water) into the glaze. This adds a velvety finish that pairs perfectly with the crisp beans.
Garnish with toasted coconut flakes for a tropical twist or crumbled tempeh for added protein. 🥥
Nutrition facts
Frequently asked questions about miso-glazed green beans
Can I use frozen green beans instead of fresh?
Yes, but with adjustments! Thaw frozen beans completely first, then pat them very dry with paper towels to remove excess moisture. Since frozen beans are often softer, increase blanching time to 3 minutes to maintain texture. The miso glaze will still work perfectly - just expect slightly more tender beans.
How do I prevent the glaze from making the beans mushy?
Overcooking is the main culprit! Keep your heat at medium-high and cook the glazed beans for only 3-4 minutes total after adding the sauce. Use a large skillet to prevent crowding, and add 1 tablespoon water if the glaze thickens too quickly. Always start with properly blanched beans - they should have a slight snap when bitten.
What's the best way to store leftovers?
Store in an airtight container for up to 3 days in the fridge. Reheat gently in a skillet with 1 teaspoon water to restore moisture and crispness. For longer storage, freeze the glazed beans (without sesame seeds) for up to 3 months. Thaw overnight in the fridge before reheating. The texture won't be quite as crisp after freezing, but the flavor remains excellent.
Can I make this gluten-free?
Use a certified gluten-free white miso paste (many brands offer this) and check your rice vinegar for gluten-free certification. Traditional miso contains wheat, but gluten-free alternatives work perfectly. The rest of the ingredients are naturally gluten-free. Always verify labels as processing facilities can vary.
Why did my glaze turn lumpy?
This usually happens when miso isn't fully dissolved or the heat is too high. Stir constantly on medium-low heat for 3-4 minutes to prevent lumps. If it happens, blend the glaze briefly with an immersion blender or strain through a fine-mesh sieve before using. For extra smoothness, whisk the miso paste with a little warm water before adding other ingredients.