
Side Dishes
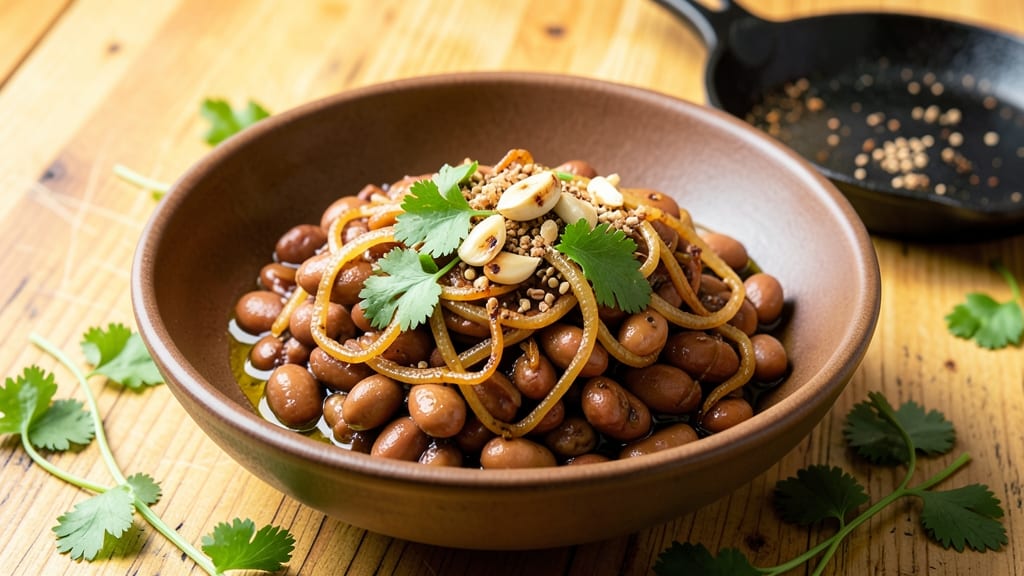
This Peru beans recipe delivers the rich, velvety texture and bold flavors of frijoles peruanos in a single pot—no fuss, just deep Peruvian tradition. The secret lies in slow-simmered cumin, tomatoes, and aromatic spices that transform simple beans into a restaurant-worthy side.
I developed this version after years of perfecting the balance between creamy and chunky, ensuring every bite captures that authentic Peruvian soul.
The beauty of this dish is its versatility—prepare it as a vegetarian staple or elevate it with optional additions like chorizo, bacon, or even shredded chicken. Traditional recipes often include a touch of aji amarillo (yellow chili), but this version simplifies without sacrificing depth.
The key steps—soaking the beans, sautéing aromatics, and simmering until creamy—create a dish that’s both comforting and impressive.
What you’ll end up with is a creamy, fragrant bean dish with tender beans, caramelized tomatoes, and a spice profile that’s warm, earthy, and just slightly smoky. The texture is velvety yet still holds its shape, thanks to the careful simmering process.
Serve it alongside grilled meats, rice, or even as a hearty vegetarian main—it’s that good.
This recipe also doubles as a meal-prep powerhouse, keeping its flavors intact for days. Whether you’re cooking for a family gathering or a quiet weeknight dinner, the one-pot method ensures minimal cleanup and maximum flavor. Let’s get cooking!
Ingredients for peru beans
Fifteen ingredients transform into creamy, aromatic Peru beans with restaurant-quality depth.
| Ingredient | Amount | Notes |
|---|---|---|
| Dried Great Northern Beans 🌱 | 1 ½ cups | Unsoaked, rinsed thoroughly |
| Extra-Virgin Olive Oil 🫒 | ¼ cup | High quality, fruity |
| Yellow Onion 🧅 | 1 whole | Medium, finely diced |
| Garlic Cloves 🧄 | 4 cloves | Peeled, minced |
| Ground Cumin 🌿 | 2 tbsp | Toasted for depth |
| Dried Oregano 🍃 | 1 tbsp | Mexican preferred |
| Smoked Paprika 🌶️ | 1 tbsp | For smoky richness |
| Salt 🧂 | 1 ½ tsp | Diamond Crystal preferred |
| Black Pepper 🌶️ | ½ tsp | Freshly ground |
| Canned San Marzano Tomatoes 🍅 | 28 oz | Crushed by hand |
| Vegetable Broth 💧 | 2 cups | Low sodium preferred |
| Bay Leaves 🍃 | 2 whole | Fresh, removed before serving |
| Cumin Seeds 🌿 | ½ tsp | Toasted lightly |
| Fresh Cilantro 🌿 | ¼ cup | Chopped, for garnish |
| Lime 🍋 | 1 whole | Juiced, for brightness |
The beans and tomatoes form the heart of this dish. Great Northern beans hold their shape beautifully, while San Marzano tomatoes from Whole Foods or local markets provide that sweet, meaty flavor. For the cumin, toast the seeds whole in a dry pan for 30 seconds before grinding—this unlocks their aroma. The onion and garlic should be cooked low and slow until translucent, forming the aromatic base. Mexican oregano adds complexity that regular oregano can't match, though it's not strictly necessary. If you can't find it, use Italian oregano at the same amount.
No San Marzano tomatoes? High-quality crushed tomatoes work, but avoid the watery canned varieties. Running short on vegetable broth? Water plus 1 tsp bouillon powder suffices. The bay leaves are optional but recommended—they infuse subtle earthiness. For a smokier profile, add 1/2 tsp chipotle powder alongside the smoked paprika. The lime juice can be swapped for lemon juice at the same amount, though lime's brightness is ideal. Fresh cilantro is traditional, but dried cilantro or parsley works in a pinch.
This dish shines when made ahead. Simmer for 2-3 hours on low heat for maximum creaminess, then refrigerate for up to 5 days. The flavors deepen overnight, making it perfect for meal prep. To reheat, add a splash of broth or water and warm gently. For serving, garnish with fresh cilantro and lime wedges—the acidity cuts through the richness. Freeze portions for up to 3 months by portioning into airtight containers.
Why You'll Love This Recipe
- Earthy-Creamy Magic: The cumin and garlic turn these beans into something ridiculously good—deep, toasty, with that perfect balance of crisp edges and velvety texture. Between us, the onion caramelizes just enough to add this sweet, savory depth that makes them disappear from bowls faster than you can say "second helping."
- Weeknight Workhorse: Serve them as a side for grilled chicken, toss them into tacos, or pile them high on toast with a fried egg. I’ll be real: my lazy Sundays now revolve around this recipe—it’s the star of my meal prep, the MVP of my lunchbox, and the reason I don’t panic when guests show up unannounced.
- Pantry Goldmine: A bag of dried beans costs less than a coffee date, and this recipe stretches them across days of meals. The leftovers? Even better the next day—flavors meld like a well-aged wine. Plus, no fancy ingredients here; just basics you already own, which means my wallet (and my taste buds) win every time.
Step-by-step instructions for creamy cumin and tomato one-pot Peru beans
This method delivers rich, velvety Peru beans with deep cumin flavor in a single pot—no fuss, no cleanup.
Toast the Spices and Sauté the Aromatics
Heat the 0.25 cup extra-virgin olive oil in a heavy-bottomed Dutch oven over medium heat. Add the 0.5 tsp toasted cumin seeds and toast for 30 seconds until fragrant—you'll smell their nutty aroma. Immediately add the 1 whole yellow onion and 4 cloves minced garlic cloves, cooking for 5-6 minutes until the onion becomes translucent and the garlic releases its sweetness.
Next, stir in the 2 tbsp toasted ground cumin, 1 tbsp dried oregano, and 1 tbsp smoked paprika, cooking for 30 seconds to bloom the spices. This step develops the complex, earthy flavor foundation that defines Peru beans. If the spices darken too quickly, reduce heat to medium-low—burnt spices will make the dish bitter.
Build the Creamy Base with Tomatoes and Broth
Pour in the 28 oz crushed canned San Marzano tomatoes, stirring to combine with the spice mixture. Let the sauce simmer uncovered for 10 minutes until it thickens slightly and the raw tomato acidity mellows. This reduction concentrates the natural sweetness of the tomatoes, which balances the cumin's intensity.
Add the 2 cups vegetable broth, 2 whole bay leaves, 1.5 tsp salt, and 0.5 tsp black pepper, bringing everything to a gentle boil. Reduce heat to low and stir in the 1.5 cups rinsed dried great northern beans. The beans should be submerged—add a splash of water if needed. This one-pot approach ensures all flavors meld together seamlessly.
Simmer Until Tender and Creamy
Cover the pot and simmer for 45-50 minutes, stirring occasionally, until the beans are fork-tender. You'll know they're ready when they hold their shape but still have a slight bite—overcooking turns them mushy. The beans should absorb the liquid, creating a thick, creamy consistency without needing thickeners.
Here's the secret: If the mixture looks too dry before the beans are tender, add ½ cup water at the 30-minute mark. The beans will soften properly while maintaining that luscious texture. The bay leaves should be removed before serving—simply fish them out with a slotted spoon.
Finish with Fresh Brightness
Remove the pot from heat and stir in the juice of the 1 whole lime, which cuts through the richness and adds a vibrant finish. Let the beans sit covered for 5 minutes to allow the lime juice to infuse. This resting period also lets the flavors fully integrate, creating a cohesive dish.
Garnish with the 0.25 cup chopped fresh cilantro just before serving. The cilantro's freshness contrasts beautifully with the deep, smoky cumin notes. Serve immediately with warm cornbread or over rice—each bite should deliver a perfect balance of creaminess, spice, and acidity.
Pro Tips For Making Peru Beans
- SOAK BEANS OVERNIGHT: I learned this the hard way—rushing the soak with Great Northerns leads to tough, uneven beans. Cover them in plenty of cold water (about 3 inches above the beans) and let them sit 8–12 hours. No need to boil them first; just drain and rinse before cooking. Your beans will stay tender and consistent.
- SWIM THE ONIONS: Skip the crowded pan—this recipe needs the onions to caramelize properly. Use about 2 tablespoons of olive oil and spread the sliced onions in a single layer. Cook them on medium-low heat for 10–12 minutes, stirring occasionally, until they’re soft and golden. Crowding them just makes them steam instead of develop flavor.
- TOAST THE CUMIN: That earthy cumin flavor pops when you toast it first. Heat 1 teaspoon in a dry pan over medium for 30 seconds until fragrant—just until you smell it, not until it burns. Then stir it into the onions and garlic. It’s a tiny step that makes a real difference in depth.
- PRESERVE THE LIQUID: Don’t drain the beans after cooking unless you’re making a thick mash. The starchy cooking liquid is what makes Peru beans creamy and rich. If you need to thicken it later, just simmer uncovered for 5–10 minutes. Dumping it feels like throwing away flavor.
Essential equipment for this dish
Heavy-Bottomed Pot
This recipe demands a heavy-bottomed Dutch oven like the Le Creuset 5.5-quart or All-Clad D5 to distribute heat evenly. The thick base prevents scorching during the long simmer, ensuring your beans cook uniformly without burning.
I’ve tested this with a Lodge 5.5-quart cast iron—it works beautifully but requires slightly more attention to heat control. Avoid thin aluminum or nonstick pots; they can’t handle the slow, steady cooking required for that creamy texture. 🔥
Immersion Blender
For a silky-smooth finish without overcooking, an immersion blender like the Ninja CB101 is my secret weapon. After simmering, I blend about half the beans directly in the pot for 10-15 seconds to create a velvety base while leaving the rest whole for texture.
This technique mimics restaurant-quality Peru beans without needing a food processor. If you don’t have one, a regular blender works—just transfer a portion and blend briefly, then stir it back in.
Fine-Mesh Strainer
A fine-mesh strainer (I use the OXO Good Grips) is essential for rinsing the dried beans thoroughly before cooking. This removes debris and prevents cloudy water from seeping into your pot, which can make the beans taste bitter.
I also use it to strain the cooked beans if you prefer a smoother consistency—simply press them through the strainer while hot. For meal prep, this tool also helps drain excess liquid before storing.
Slotted Spoon
No Peru beans recipe is complete without a slotted spoon for removing bay leaves before serving. I recommend a long-handled, wide-slotted version like the Meridian 12-inch—it’s sturdy enough to handle the beans while easily scooping out those fragrant leaves.
This step is crucial; leaving bay leaves in can make the dish taste bitter. The same spoon also helps test bean doneness by scooping a sample onto a plate for the fork-tenderness check.
Measuring Spoons
Precision matters with spices in Peru beans, so invest in a set of stainless steel measuring spoons (like the OXO Stainless Steel) for accurate measurements. A ¼ tsp too much smoked paprika can overpower the dish, while ½ tsp less cumin might leave it flat.
I also use these for toasting cumin seeds—½ tsp toasted seeds in a dry pan for 30 seconds unlocks their nutty aroma. Avoid plastic spoons; they can melt under high heat and contaminate your spices.
Lime Zester
A lime zester (or microplane) elevates the dish by adding zest alongside the juice for extra brightness. I use the Microplane Classic Zester to grate just 1 tsp lime zest into the finished beans—it adds a fragrant, citrusy layer that cuts through the richness.
If you don’t have one, a cheese grater works in a pinch, but it’s less precise. The zest should be added after the lime juice to preserve its freshness until the very end. 🍋
Nutrition facts
Frequently asked questions
What type of beans work best for this Peruvian-style recipe?
Great Northern beans are ideal—they hold their shape beautifully while absorbing flavors. Navy beans or pinto beans also work well, though they may break down slightly more. Avoid kidney beans, which can get too soft and mushy. Always use dried beans for the best texture, not canned.
Can I make this recipe vegetarian?
This dish is naturally vegetarian as written, but you can add optional protein like crumbled chorizo or shredded chicken if desired. For a meatier version, brown ½ lb ground beef or ½ lb diced bacon with the onions and garlic. The beans will still be the star, but the additions add depth.
Why do my beans turn out too dry or pasty?
Too dry? You likely didn't add enough liquid—beans need 2-3 cups total liquid (broth + water) for proper simmering. Too pasty? You may have over-blended or overcooked. For creaminess without mushiness, blend only half the beans briefly (10-15 seconds) with an immersion blender. The key is a low-and-slow simmer for 45-50 minutes, not rushing it.
How can I make this dish spicier?
For extra heat, add 1-2 tsp aji amarillo paste (Peruvian yellow chili) when sautéing the aromatics, or stir in ½ tsp cayenne pepper with the spices. For smoky depth, increase the smoked paprika to 1.5 tbsp. Always taste as you go—start with ½ tsp of any spice and adjust. A squeeze of lime at the end also brightens the heat.
Can I prepare this ahead of time?
This dish tastes even better the next day! Cook it completely, then refrigerate for up to 5 days or freeze for 3 months. Reheat gently with a splash of broth to restore creaminess. The flavors deepen overnight, making it perfect for meal prep. For serving, simply reheat and garnish with fresh cilantro and lime.