
Side Dishes
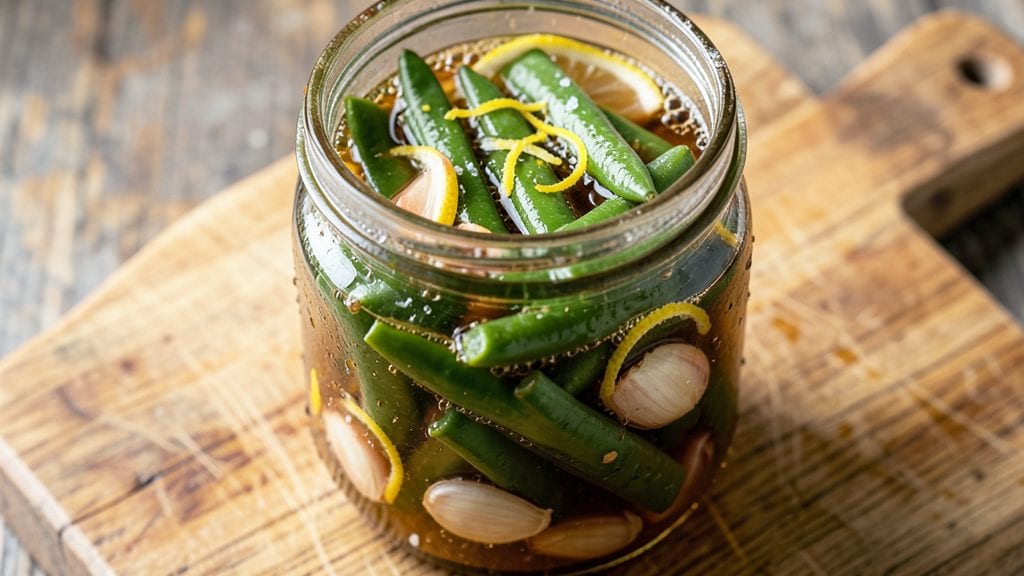
This pickled French beans recipe transforms simple green beans into a tangy, crunchy side dish that adds brightness to any meal in just 15 minutes of active time.
The vinegar brine preserves their crisp texture while infusing bold flavors—think zesty lemon, aromatic spices, or smoky paprika—that elevate everything from sandwiches to charcuterie boards. I developed this method after discovering how much faster quick-pickling is compared to traditional fermentation, without sacrificing depth of flavor.
The beauty of this recipe lies in its versatility—whether you prefer the classic Indian kathal ki achar approach with mustard seeds and curry leaves or a French-inspired version with shallots and tarragon, the technique remains the same.
Sterilizing jars properly ensures safety, while adjusting vinegar-to-water ratios lets you control tanginess. For maximum crunch, use firm beans and pack them tightly; for softer texture, add a pinch of sugar to balance the acidity.
What you’ll end up with is a jar of vibrant, vinegar-infused beans that stay crisp for weeks, ready to brighten grilled meats, salads, or even tacos. The aroma alone—bright, herby, and slightly tangy—will have everyone reaching for seconds.
This method works equally well for green beans, wax beans, or even snap peas, making it a pantry staple worth mastering.
Ready to transform ordinary beans into a flavor-packed side? The process is simpler than you’d think—just a few ingredients, precise timing, and a little patience for the flavors to meld. Let’s get started with a technique that’s both traditional and modern, ensuring your pickled beans shine in every bite.
Ingredients for pickled french beans
Fresh beans meet bold vinegar and aromatic spices for a quick-pickled side dish bursting with tangy crunch.
| Ingredient | Amount | Notes |
|---|---|---|
| Fresh French Green Beans 🌱 | 1 ½ lb | Trimmed, firm, ends cut |
| White Vinegar 🍶 | 1 cup | Distilled, 5% acidity |
| Water 💧 | 1 cup | Filtered preferred |
| Granulated Sugar 🍚 | ½ cup | White or raw |
| Diamond Crystal Kosher Salt 🧂 | 1 tbsp | Fine grain preferred |
| Fresh Garlic Cloves 🧄 | 4 cloves | Thinly sliced |
| Fresh Dill Sprigs 🌿 | 6 whole | Stems removed |
| Black Peppercorns 🌶️ | 1 tsp | Crushed lightly |
| Mustard Seeds 🌶️ | 1 tsp | Yellow or brown |
| Red Chili Flakes 🔥 | ½ tsp | Adjust for heat |
| Fresh Lemon Juice 🍋 | 2 tbsp | Freshly squeezed |
| Bay Leaves 🍃 | 2 whole | Dried or fresh |
The quality of your beans and vinegar determines the final texture and flavor profile. Trader Joe's or local farmers markets offer the freshest French green beans—look for vibrant green, crisp stems. White vinegar is ideal for its sharp tang, but apple cider vinegar adds subtle sweetness. Sugar balances acidity while preserving crunch, so avoid artificial sweeteners. For an Indian-inspired twist, swap mustard seeds for curry leaves and add a pinch of turmeric. Sterilize jars in boiling water for 10 minutes before filling to ensure safety.
No fresh dill? Dried dill at one-third the amount works in a pinch, though fresh delivers superior aroma. Running short on vinegar? Lemon juice works at double the quantity, though the flavor profile shifts slightly. For a French-inspired version, replace garlic with shallots and add tarragon. The red chili flakes can be omitted entirely for a milder heat level. If your beans are particularly fibrous, add 1/4 cup apple cider vinegar to the brine for extra tenderness. For a smoky depth, include 1/2 tsp smoked paprika in the brine mixture.
These pickled beans reach peak flavor after 48 hours of refrigeration, though they're safe to eat immediately. Store in airtight jars for up to 3 months in the refrigerator, with flavors intensifying over time. For gift-giving, use sterilized canning jars and include a handwritten note about the recipe. The brine can be reused for subsequent batches, though flavor diminishes after 3 uses. For a restaurant-quality presentation, garnish with extra dill and cracked black pepper before serving.
Why You'll Love This Recipe
- Fridge-Friendly Magic: I’ll be real—this recipe is my go-to for lazy Sundays when I’m staring at a jar of beans and thinking, "What even am I doing with these?" Toss them in vinegar and sugar, let them sit, and boom: instant pickles that last weeks. No fancy jars needed, just a clean mason and patience.
- Sweet-Tangy Crunch: Honestly, the balance here is chef’s kiss—the salt cuts through the sweetness while the vinegar keeps it bright, not cloying. Those beans stay crisp, and the sugar just melts into the perfect tangy bite. It’s like biting into a summer memory, but in jar form.
- Picnic-Proof Sidekick: Between us, these pickled beans are my secret weapon for potlucks, BBQs, or even just a sad Tuesday night. They pair with grilled chicken, sandwiches, or straight from the jar with a cold beer. No reheating, no fuss—just grab and go.
- Pantry Stash Winner: I’ll admit, I’ve made this so many times I’ve lost count. A batch lasts me months, and the cost? Ridiculously cheap. Fresh beans are affordable, and the vinegar/sugar mix stretches forever. Plus, no one ever complains when you pull these out—even my picky husband asks for seconds.
Step-by-step instructions for pickled French beans
This method delivers bright, tangy pickled beans with perfect crunch in just 15 minutes of active time.
Prepare the Beans and Aromatics
Trim the ends from the 1.5 lb fresh French green beans and cut them into 2-inch lengths. I use a sharp chef's knife for clean cuts that won't bruise the beans. Rinse them thoroughly under cold water to remove any dirt, then drain completely in a colander. The beans should be completely dry before pickling to ensure proper preservation.
In a small bowl, combine the 4 cloves thinly sliced fresh garlic cloves, 6 whole fresh dill sprigs (stems removed), 1 tsp crushed black peppercorns, 1 tsp mustard seeds, 0.5 tsp red chili flakes, and 2 whole bay leaves. This aromatic blend forms the flavor base for your pickled beans, so don't skip any components—each contributes uniquely to the final taste profile.
Create the Brine Solution
In a medium saucepan, combine the 1 cup white vinegar, 1 cup water, 0.5 cup granulated sugar, and 1 tbsp diamond crystal kosher salt. Bring to a boil over medium-high heat, stirring until the sugar and salt completely dissolve. The solution should be clear with no visible sugar crystals remaining.
Once boiling, immediately reduce heat to medium-low and let it simmer for exactly 2 minutes. This brief simmer ensures the sugar fully incorporates and the brine reaches the proper temperature for pickling. Remove from heat and let cool for 5 minutes while you prepare the remaining ingredients.
Combine and Pack the Beans
Transfer the cooled brine to a clean 1-quart mason jar, leaving about 1 inch of headspace at the top. Add the aromatic blend to the jar first, then carefully pack the trimmed green beans tightly around them. You'll need to work in batches if your jar isn't large enough to hold all beans at once.
Pour the 2 tbsp fresh lemon juice over the packed beans. This additional acidity enhances the tangy flavor and helps preserve the bright green color. Seal the jar tightly and give it a gentle shake to distribute the liquid evenly around all the beans.
Process for Perfect Preservation
Place the sealed jar in a large pot and cover with about 2 inches of water. Bring to a boil over medium-high heat, then immediately reduce to medium-low and process for exactly 10 minutes. This water bath processing ensures proper sterilization while maintaining the beans' vibrant color and crisp texture.
Remove the jar from the pot using tongs and let it cool completely at room temperature. Once cooled, store in the refrigerator where these pickled beans will keep for up to 3 weeks. The acidity from the vinegar and lemon juice creates an ideal environment for preservation while maintaining that satisfying crunch.
Pro Tips For Making Pickled French Beans
- Blanch Before Pickling: Drop those beans into boiling water for 2-3 minutes first—yes, even if you’re eager to skip it. I learned this the hard way when my beans stayed crunchy and sad after a week. A quick blanch softens them just enough to soak up the brine while keeping their shape.
- Trim Like a Pro: Snip the ends at a 45-degree angle with kitchen shears instead of chopping—it looks cleaner and prevents the beans from floating like little rafts in your jar. (Trust me, no one wants to fish for beans while pouring pickled goodness.)
- Sterilize Jars Hot: Run your jars and lids through a quick rinse with boiling water before filling, even if you’re not canning long-term. Cold jars sweat condensation, which dilutes your brine and turns your pickles into a sad, watery mess. Takes 30 seconds, saves you regret.
- Measure Salt Precisely: Diamond Crystal kosher salt is not the same as table salt—use the recipe’s measurements exactly, or your beans will taste either bland or harsh. I used to eyeball it and wondered why my pickles never hit the spot. A kitchen scale or measuring spoon fixes that.
Storing and reheating your leftovers
Refrigerator Storage
After processing, your pickled French beans will stay fresh in the refrigerator for up to 3 weeks when stored in sterilized, airtight mason jars. I always use Ball or Kerr brand jars with two-piece lids—they create the best seal.
Store the jars in the coldest part of your fridge (usually the back shelf) to maximize shelf life. The flavors actually deepen over time, so wait at least 48 hours before tasting to let the tangy, herby notes develop fully. 💫
Freezing for Long-Term
For extended storage beyond 3 weeks, freezing is your best option. Portion the pickled beans into freezer-safe containers or ziplock bags, leaving ½ inch of headspace to prevent ice crystals from breaking the jars. Label each container with the date and freeze for up to 3 months.
When ready to use, thaw overnight in the fridge—never microwave directly as it can make the beans mushy. For best texture, add them straight from the freezer to warm dishes like soups or stir-fries. ❄️
Reheating Safely
If you’ve stored your pickled beans in the fridge and want to serve them warm (uncommon but delicious with roasted meats), gently reheat them in a saucepan with 2 tbsp of the pickling liquid over low heat for 3-4 minutes.
This prevents the beans from drying out while keeping their crisp texture. Avoid high heat—it turns the vinegar brine into a sticky mess. For cold servings, simply drain and rinse briefly under cold water to remove excess acidity if desired. 🔥
Reviving Stale Crunch
If your pickled beans lose their crispness after a week or two, don’t toss them! Drain the beans and pat them dry with a paper towel, then toss with 1 tsp of fresh lemon juice and ½ tsp of cornstarch.
Let sit for 10 minutes, then drain again. The acidity and starch work together to restore that satisfying crunch—perfect for quick salads or sandwiches. This trick works like magic for beans that’ve sat too long. ✨
Reusing the Brine
The pickling liquid in your jar is flavor gold—don’t waste it! Strain out the herbs and spices, then store the liquid in a clean bottle in the fridge for up to 3 uses.
Use it to marinate proteins (like chicken or shrimp), deglaze pans, or even mix into dressings for a tangy kick. Each reuse will be slightly less potent, but it’s still packed with umami and acidity.
Just avoid reusing if the beans showed any signs of spoilage (like mold or off smells). 💡
Gift-Worthy Packaging
Want to share your pickled beans? Transfer them to small, sterilized jars (like 4-ounce Ball jars) and tie a kitchen twine around the lid with a handwritten tag. I like adding a spoonful of fresh dill on top for presentation.
These make elegant host gifts—especially when paired with crackers or cheese. For extra flair, attach a recipe card with your brine recipe so recipients can recreate the magic at home. 🎁
Nutrition facts
Frequently asked questions
Can I use wax beans instead of French green beans?
Wax beans work beautifully in this recipe—their slightly sweeter flavor pairs wonderfully with the tangy vinegar. Just trim the ends carefully since wax beans tend to be more fibrous. For extra tenderness, add 1/4 cup apple cider vinegar to the brine solution. The texture will be slightly softer but still delightfully crisp.
How do I prevent my pickled beans from turning mushy?
Mushiness usually happens from overcooking or improper storage. Always pack beans tightly into sterilized jars and leave 1 inch of headspace. Process jars in a water bath for exactly 10 minutes—no longer! Store in the fridge, not at room temperature, and avoid opening the jar repeatedly. For extra crunch, add 1 tsp baking soda to the brine (it helps preserve texture).
What’s the best way to use up leftover brine?
Don’t toss that flavorful liquid! Strain out the herbs and store the brine in a clean bottle for up to 3 uses. Use it to marinate grilled chicken, shrimp, or tofu, or mix into vinaigrettes for salads. For a quick sauce, simmer 1/2 cup brine with 1 tbsp honey and a splash of soy sauce—perfect for drizzling over noodles or rice.
Can I make this recipe without vinegar?
While traditional pickling requires vinegar for acidity and preservation, you can create a quick "lactic acid" pickle by using 2 cups of water, 1 tbsp salt, and 1 tbsp lemon juice instead. This method relies on fermentation and works best with firm beans. Store in the fridge for up to 1 week, but the flavor will be milder and less tangy. For safety, always use sterilized jars.
How do I adjust the heat level for kids or sensitive eaters?
Simply omit the red chili flakes entirely for a mild version. For extra safety, add 1/2 tsp ground turmeric instead—it adds color and a gentle earthy flavor without heat. If you want subtle warmth, use 1/4 tsp smoked paprika instead of chili flakes. Always taste the brine before packing the beans to ensure it’s kid-friendly.